SSL Certificate Configuration
Overview
SSL certificates are required for HTTPS communication between browsers and services. Certificate requirements differ based on deployment type.
The shared development certificate (friendly.crt / friendly.key) and the Compose files referenced on this page ship on FT_DISK:
ONE_IOT_UI/docker/ui-backend-conf for the certificate pair and
ONE_IOT_UI/docker for compose.all-in-one.yaml, compose.ui-backend.yaml
and compose.portals.yaml.
| Use the host path for the deployment you are operating: |
-
All-in-One:
/usr/local/ft-system/ui-backend/config/ssl/(the common stack directory); -
standalone portals:
/usr/local/ui-portals/portals/ssl/; -
standalone AI Agent:
/usr/local/ui-ai-agent/ui-ai-agent/ssl/; -
standalone UI Backend HTTPS:
/usr/local/ft-system/ui-backend/config/ssl/(same path as All-in-One).
Unless stated otherwise, the certificate-copying commands below use the standalone portals path.
For the All-in-One stack, substitute /usr/local/ft-system/ui-backend/config/ssl/.
Deployment Scenarios
All-in-One Deployment
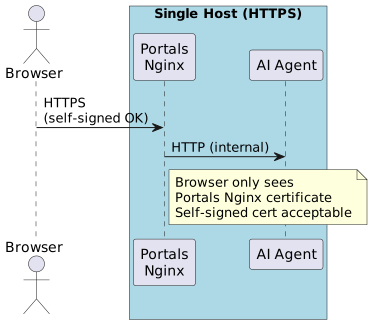
Certificate Behavior:
- Browser communicates only with Portals Nginx via HTTPS - Nginx proxies requests to AI Agent via HTTP internally - Self-signed certificate works without browser warnings - AI Agent accessible at /ai-agent path through Nginx proxy
Separate Host Deployment
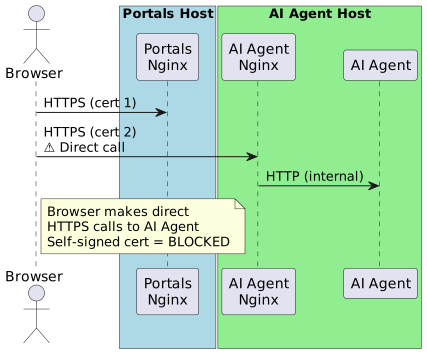
Certificate Behavior: - Browser communicates with two separate hosts via HTTPS - Angular app makes direct API calls to AI Agent from browser - Self-signed certificates cause browser blocking - Both hosts need valid certificates
Problems with Self-Signed Certificates: 1. Browser shows security warning when opening Angular UI 2. Browser blocks HTTPS requests to AI Agent 3. Users must manually accept multiple certificate warnings
Certificate Requirements
| Deployment | Certificate Type | Hosts Requiring Certs | Browser Warnings |
|---|---|---|---|
All-in-One |
Self-signed acceptable |
Portals Nginx only |
Minor (single warning) |
Separate |
Trusted required |
Portals Nginx + AI Agent Nginx |
Blocked (self-signed) |
Certificate Files
Required certificate files on the host:
/usr/local/ui-portals/portals/ssl/              # standalone portals
├── friendly.crt                                 # SSL certificate (public)
└── friendly.key                                 # private key (keep secure)

/usr/local/ui-ai-agent/ui-ai-agent/ssl/          # standalone AI Agent
├── friendly.crt
└── friendly.key

/usr/local/ft-system/ui-backend/config/ssl/      # All-in-One portals
├── friendly.crt
└── friendly.key
File Formats:
- .crt - Certificate file (PEM format) - .key - Private key file (PEM format, unencrypted)
Generating Trusted Certificates
Option 1: Let’s Encrypt (Free, Public Domain)
Best for publicly accessible domains with internet connectivity.
Prerequisites
-
Public domain name (e.g.,
mycompany.com) -
Port 80/443 accessible from internet
-
Certbot installed on server
Install Certbot
- Ubuntu/Debian
-
apt-get update apt-get install -y certbot - CentOS/RHEL
-
yum install -y certbot
Generate Wildcard Certificate
# Generate wildcard cert for *.example.com
certbot certonly --manual \
  --preferred-challenges=dns \
  --email admin@example.com \
  --agree-tos \
  -d *.example.com \
  -d example.com
DNS Challenge:
1. Certbot will display a TXT record to add to your DNS 2. Add TXT record: _acme-challenge.example.com → <provided_value>
3. Wait for DNS propagation (1-5 minutes) 4. Press Enter to continue verification
Certificate Location:
/etc/letsencrypt/live/example.com/
├── fullchain.pem  # Use as friendly.crt
└── privkey.pem    # Use as friendly.key
Copy Certificates
# Create SSL directory for standalone portals
mkdir -p /usr/local/ui-portals/portals/ssl

# Copy certificates
cp /etc/letsencrypt/live/example.com/fullchain.pem \
   /usr/local/ui-portals/portals/ssl/friendly.crt

cp /etc/letsencrypt/live/example.com/privkey.pem \
   /usr/local/ui-portals/portals/ssl/friendly.key

# Set secure permissions
chmod 644 /usr/local/ui-portals/portals/ssl/friendly.crt
chmod 600 /usr/local/ui-portals/portals/ssl/friendly.key
Auto-Renewal
Let’s Encrypt certificates expire after 90 days. Set up auto-renewal:
# Test renewal
certbot renew --dry-run

# Add cron job for auto-renewal
echo "0 3 * * * certbot renew --quiet && cp /etc/letsencrypt/live/example.com/*.pem /usr/local/ui-portals/portals/ssl/ && docker compose restart" >> /etc/crontab
Option 2: Internal Certificate Authority (Private Network)
Best for internal networks without internet access.
Create CA Certificate
# Create CA directory on the standalone portals host
mkdir -p /usr/local/ui-portals/ca
cd /usr/local/ui-portals/ca

# Generate CA private key
openssl genrsa -out ca.key 4096

# Generate CA certificate (valid 10 years)
openssl req -x509 -new -nodes -key ca.key -sha256 -days 3650 -out ca.crt \
  -subj "/C=US/ST=State/L=City/O=Company/OU=IT/CN=Company Root CA"
Distribute CA certificate:
Install ca.crt on all client machines to trust your internal CA.
Generate Server Certificate
# Generate server private key
openssl genrsa -out friendly.key 2048

# Create certificate signing request (CSR)
openssl req -new -key friendly.key -out friendly.csr \
  -subj "/C=US/ST=State/L=City/O=Company/OU=IT/CN=*.example.internal"

# Create SAN configuration file
cat > san.cnf <<EOF
[req]
distinguished_name = req_distinguished_name
req_extensions = v3_req
prompt = no

[req_distinguished_name]
C = US
ST = State
L = City
O = Company
OU = IT
CN = *.example.internal

[v3_req]
keyUsage = keyEncipherment, dataEncipherment
extendedKeyUsage = serverAuth
subjectAltName = @alt_names

[alt_names]
DNS.1 = *.example.internal
DNS.2 = example.internal
DNS.3 = *.portals.example.internal
DNS.4 = *.ai-agent.example.internal
EOF

# Sign certificate with CA (valid 2 years)
openssl x509 -req -in friendly.csr -CA ca.crt -CAkey ca.key -CAcreateserial \
  -out friendly.crt -days 730 -sha256 -extfile san.cnf -extensions v3_req
Copy Certificates
# Create SSL directory for standalone portals
mkdir -p /usr/local/ui-portals/portals/ssl

# Copy certificates
cp friendly.crt /usr/local/ui-portals/portals/ssl/
cp friendly.key /usr/local/ui-portals/portals/ssl/

# Set secure permissions
chmod 644 /usr/local/ui-portals/portals/ssl/friendly.crt
chmod 600 /usr/local/ui-portals/portals/ssl/friendly.key
Trust CA on Client Machines
- Windows
-
1. Copy ca.crt to Windows machine 2. Double-click ca.crt 3. Click "Install Certificate" 4. Select "Local Machine" 5. Choose "Trusted Root Certification Authorities" 6. Restart browser - macOS
-
# Add CA to system keychain sudo security add-trusted-cert -d -r trustRoot -k /Library/Keychains/System.keychain ca.crt - Linux
-
# Ubuntu/Debian
cp ca.crt /usr/local/share/ca-certificates/company-ca.crt
update-ca-certificates

# CentOS/RHEL
cp ca.crt /etc/pki/ca-trust/source/anchors/company-ca.crt
update-ca-trust
Option 3: Commercial Certificate Authority
Purchase wildcard certificate from commercial CA (DigiCert, GoDaddy, etc.).
-
Generate CSR on your server
-
Submit CSR to CA
-
Complete domain validation
-
Download certificate files
-
Copy to
/usr/local/ui-portals/portals/ssl/(or to the All-in-One path specified above)
Nginx Configuration
Portals Nginx (UI Service)
The portals container needs SSL configuration to serve HTTPS.
Mount SSL Certificates
The shipped portals composes already mount the SSL directory, so for a standard install you only drop friendly.crt / friendly.key into it.
The mount differs per layout: the standalone stack (compose.portals.yaml) uses ${DATA_FOLDER}/portals/ssl, while compose.all-in-one.yaml reuses
${DATA_FOLDER}/ui-backend/config/ssl. compose.ui-backend.yaml no longer carries a portals service and mounts no portals SSL.
The relevant portals block (standalone stack):
services:
  portals:
    image: hub.friendly-tech.com/ui/portals:latest
    ports:
      - "${FT_UI_HTTP_PORT:-8880}:80"     # HTTP (redirect)
      - "${FT_UI_HTTPS_PORT:-8843}:443"   # HTTPS
    volumes:
      - ${DATA_FOLDER:-.}/portals/ssl:/etc/nginx/ssl:ro
      - ${DATA_FOLDER:-.}/portals/nginx/logs:/var/log/nginx
    # ... rest of config
Nginx SSL Configuration Example
The official standalone portals stack already supplies the Nginx configuration. The following is a
reference only for a supported custom override; it must not be created under ui-backend/config/
on a standalone portals host:
server {
    listen 443 ssl;

    # SSL Configuration
    ssl_certificate /etc/nginx/ssl/friendly.crt;
    ssl_certificate_key /etc/nginx/ssl/friendly.key;

    # SSL Security Settings
    ssl_protocols TLSv1.2 TLSv1.3;
    ssl_prefer_server_ciphers on;
    ssl_ciphers 'ECDHE-ECDSA-AES128-GCM-SHA256:ECDHE-RSA-AES128-GCM-SHA256:ECDHE-ECDSA-AES256-GCM-SHA384:ECDHE-RSA-AES256-GCM-SHA384';

    # Proxy all requests to the Python AI agent
    location / {
      proxy_pass http://ui-ai-agent:8080;

      # Proxy headers
      proxy_set_header Host ui-ai-agent:8080;
      proxy_set_header X-Real-IP $remote_addr;
      proxy_set_header X-Forwarded-For $proxy_add_x_forwarded_for;
      proxy_set_header X-Forwarded-Proto https;  # Always HTTPS
      proxy_set_header X-Forwarded-Host $host;
      proxy_set_header X-Forwarded-Port $server_port;

      # Timeouts for long-running requests
      proxy_connect_timeout 60s;
      proxy_send_timeout 60s;
      proxy_read_timeout 60s;

      # WebSocket support (if needed)
      proxy_http_version 1.1;
      proxy_set_header Upgrade $http_upgrade;
      proxy_set_header Connection "upgrade";

      # Buffering settings for large responses
      proxy_buffering on;
      proxy_buffer_size 4k;
      proxy_buffers 8 4k;
      proxy_busy_buffers_size 8k;
    }
AI Agent Nginx (Separate Deployment)
For separate AI Agent deployment, add nginx reverse proxy.
Create AI Agent Nginx Container
Create ai-agent-nginx-ssl.conf:
server {
    listen 80;
    server_name _;
    return 301 https://$host$request_uri;
}

server {
    listen 443 ssl http2;
    server_name _;

    # SSL certificates
    ssl_certificate /etc/nginx/ssl/friendly.crt;
    ssl_certificate_key /etc/nginx/ssl/friendly.key;

    # SSL settings
    ssl_protocols TLSv1.2 TLSv1.3;
    ssl_ciphers HIGH:!aNULL:!MD5;
    ssl_prefer_server_ciphers on;
    ssl_session_cache shared:SSL:10m;

    # Security headers
    add_header Strict-Transport-Security "max-age=31536000" always;

    # Proxy to AI Agent
    location / {
        proxy_pass http://ui-ai-agent:8080;
        proxy_set_header Host $host;
        proxy_set_header X-Real-IP $remote_addr;
        proxy_set_header X-Forwarded-For $proxy_add_x_forwarded_for;
        proxy_set_header X-Forwarded-Proto $scheme;

        # WebSocket support (if needed)
        proxy_http_version 1.1;
        proxy_set_header Upgrade $http_upgrade;
        proxy_set_header Connection "upgrade";
    }
}
AI Agent nginx in compose.ai-agent.yaml
services:
  ui-ai-agent:
    # ... existing config

  ai-agent-nginx:
    image: nginx:alpine
    ports:
      - "443:443"
      - "80:80"
    volumes:
      - ${DATA_FOLDER:-.}/ui-ai-agent/ssl:/etc/nginx/ssl:ro
      - ./ai-agent-nginx-ssl.conf:/etc/nginx/conf.d/default.conf:ro
    depends_on:
      - ui-ai-agent
    restart: unless-stopped
The shipped compose.ai-agent.yaml already includes an ai-agent-nginx service. In the package
it mounts the package’s own nginx.conf (./nginx.conf:/etc/nginx/nginx.conf:ro) and ssl/
(./ssl:/etc/nginx/ssl:ro) and publishes ${FT_AI_AGENT_HTTP_PORT:-8882}:443 — so for a standard
install you only place friendly.crt / friendly.key into the package’s ssl/ folder. The snippet
above is the equivalent hand-built form (own conf.d file and cert path) for a custom setup.
|
Verification
Verify Certificate Files
# Check certificate details
openssl x509 -in /usr/local/ui-portals/portals/ssl/friendly.crt -text -noout

# Verify certificate and key match
openssl x509 -noout -modulus -in friendly.crt | openssl md5
openssl rsa -noout -modulus -in friendly.key | openssl md5
# Output should match

# Check certificate expiration
openssl x509 -noout -dates -in friendly.crt

# Verify certificate chain
openssl verify -CAfile ca.crt friendly.crt
Test HTTPS Access
# Test Portals
curl -v https://portals.example.com

# Test AI Agent
curl -v https://ai-agent.example.com

# Check certificate from command line
openssl s_client -connect portals.example.com:443 -showcerts
Browser Testing
-
Open
https://portals.example.comin browser -
Check for green padlock icon (no warnings)
-
Click padlock → View certificate details
-
Verify certificate issuer and expiration date
-
Test AI Agent calls from browser console
Troubleshooting
Certificate Warnings in Browser
Symptom: Browser shows "Your connection is not private" or similar warning.
Causes: 1. Self-signed certificate (separate deployment) 2. Certificate doesn’t match hostname 3. Certificate expired 4. CA not trusted by browser
Solution:
# Check certificate CN and SAN
openssl x509 -in friendly.crt -text -noout | grep -A1 "Subject:"
openssl x509 -in friendly.crt -text -noout | grep -A1 "Subject Alternative Name"

# Verify hostname matches certificate
curl -v https://your-hostname.com 2>&1 | grep "subject:"
Certificate and Key Mismatch
Symptom: Nginx fails to start with SSL error.
Solution:
# Verify modulus match
openssl x509 -noout -modulus -in friendly.crt | openssl md5
openssl rsa -noout -modulus -in friendly.key | openssl md5

# If mismatch, regenerate certificate with correct key
Permission Denied Errors
Symptom: Nginx cannot read certificate files.
Solution:
# Set correct permissions
chmod 644 /usr/local/ui-portals/portals/ssl/friendly.crt
chmod 600 /usr/local/ui-portals/portals/ssl/friendly.key

# Ensure files are readable by nginx user
chown root:root /usr/local/ui-portals/portals/ssl/*
AI Agent HTTPS Blocked
Symptom: Browser blocks requests to AI Agent with NET::ERR_CERT_AUTHORITY_INVALID.
Solution: 1. Install internal CA certificate on client machines 2. Or use Let’s Encrypt for public domains 3. Verify certificate matches AI Agent hostname
Certificate Expired
Symptom: Browser shows "Certificate expired" error.
Solution:
# Check expiration
openssl x509 -noout -dates -in friendly.crt

# Renew certificate (Let's Encrypt)
certbot renew --force-renewal

# Or regenerate with internal CA
# (see Option 2 above)

# Copy new certificates and restart
docker compose restart
Security Best Practices
File Permissions
# Certificate (public) - readable by all
chmod 644 friendly.crt

# Private key - readable by owner only
chmod 600 friendly.key

# SSL directory
chmod 755 /usr/local/ui-portals/portals/ssl
Private Key Protection
-
Never commit private keys to version control
-
Add to
.gitignore:
*.key
*.pem
ui-backend/config/ssl/-
Store backups securely (encrypted)
-
Restrict access to SSL directory
Certificate Monitoring
Monitor certificate expiration:
# Check days until expiration
echo | openssl s_client -connect portals.example.com:443 2>/dev/null | \
  openssl x509 -noout -dates | grep "notAfter" | cut -d= -f2

# Or use monitoring tools:
# - Nagios with check_ssl_cert plugin
# - Prometheus with blackbox_exporter
# - Commercial: SSL Labs, QualysCertificate Renewal Workflow
# 1. Backup existing certificates
cp -r /usr/local/ui-portals/portals/ssl \
   /usr/local/ui-portals/portals/ssl.backup.$(date +%Y%m%d)

# 2. Renew certificate (Let's Encrypt example)
certbot renew

# 3. Copy renewed certificates
cp /etc/letsencrypt/live/example.com/fullchain.pem \
   /usr/local/ui-portals/portals/ssl/friendly.crt
cp /etc/letsencrypt/live/example.com/privkey.pem \
   /usr/local/ui-portals/portals/ssl/friendly.key

# 4. Restart services
docker compose restart portals
docker compose restart ai-agent-nginx  # If separate deployment

# 5. Verify
curl -v https://portals.example.com
openssl s_client -connect portals.example.com:443 | openssl x509 -noout -dates
Quick Reference
| Task | Command |
|---|---|
Generate CSR |
|
View certificate |
|
Check expiration |
|
Verify cert/key match |
|
Test HTTPS |
|
Check remote cert |
|
Convert formats |
|