Azure AD + Keycloak — Integration Guide
| Parameter | Value |
|---|---|
Keycloak version |
26.0 (Docker) |
Azure AD |
Microsoft Entra ID |
Backend protocol |
SAML 2.0 (backend <→ Keycloak) |
Broker protocol |
OpenID Connect v1.0 (Keycloak <→ Azure AD) |
1. Overview
This guide describes the Azure AD login type: how to register an application in Microsoft Entra ID (Azure AD), integrate it with Keycloak as an Identity Broker, and manage users through Keycloak after the integration is complete.
The OneIoT platform uses two separate Keycloak realms — one for the Support Center (SC) portal and one for the Management Console (MC) portal. Both realms are connected to the same Azure AD application.
On the backend this is the saml login type: the backend is a SAML Service Provider and
Keycloak is its SAML Identity Provider. Keycloak, in turn, does not store the passwords — it brokers authentication to Azure AD over OIDC. In other words, the Azure AD login type
is the SAML setup plus an OIDC Identity-Provider broker to
Azure AD configured inside each Keycloak realm.
1.1. How it works
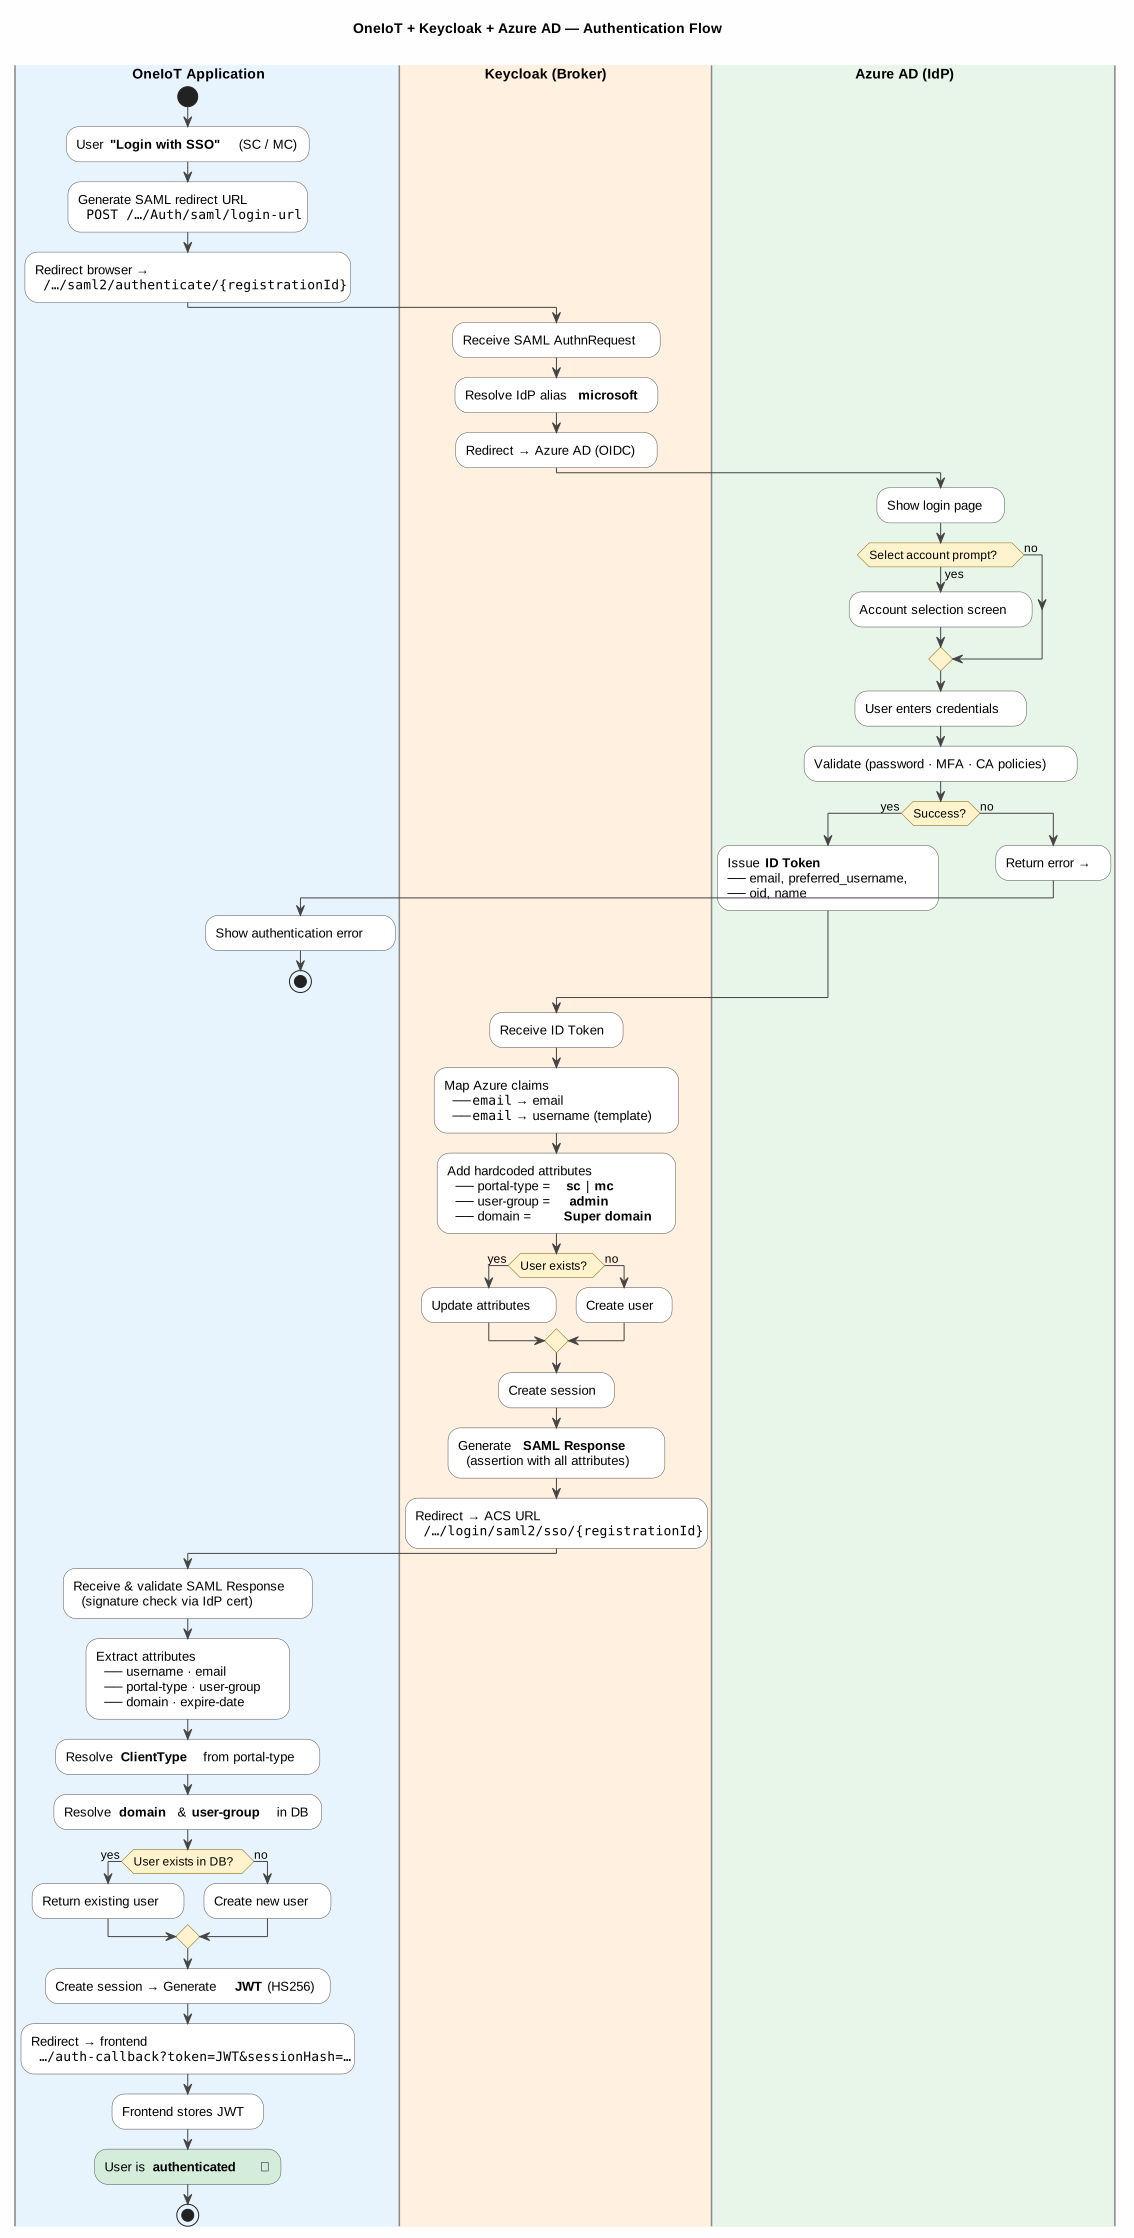
The platform uses a three-layer authentication architecture:
| Layer | Component | Role |
|---|---|---|
Application |
OneIoT Backend (Spring Boot) |
Initiates the SAML authentication request and receives the authenticated user session. |
Broker |
Keycloak |
Acts as an intermediary between the application and the identity provider. Maps user attributes and adds custom fields required by the application. |
Identity Provider |
Microsoft Azure AD (Entra ID) |
Performs the actual user authentication and identity verification. |
1.3. Attribute flow
| Attribute | Source | Keycloak Mapper Type | Description |
|---|---|---|---|
|
Azure AD token |
Attribute Importer |
Imported directly from the Azure AD |
|
Azure AD token |
Username Template Importer |
Derived from |
|
Keycloak (hardcoded) |
Hardcoded Attribute |
Set per realm: |
|
Mode A: Keycloak (hardcoded) |
Hardcoded Attribute / Attribute Importer |
The application user-group name. Must exist in the application database for that portal; a missing or unknown value blocks the login. |
|
Mode A: Keycloak (hardcoded) |
Hardcoded Attribute / Attribute Importer |
The application domain name. |
|
Two ways to set
user-group / domain
|
1.4. Why Keycloak as a broker (not direct Azure AD integration)?
-
Keycloak adds the
portal-typeclaim (per realm) that Azure AD does not provide, and imports the per-useruser-group/domainvalues from Azure into the fixed claim names the application requires — without the application needing any Azure-specific code. -
Administrators can manage user attributes, sessions, and access directly in Keycloak without needing Azure AD admin permissions.
-
Each portal (SC / MC) uses a separate Keycloak realm with its own default attribute values, allowing portal-specific configuration.
-
If the identity provider changes in the future (e.g., from Azure AD to Okta or ADFS), only the Keycloak broker configuration needs to be updated — the application remains unchanged.
2. Prerequisites
Before configuring the Azure AD broker:
-
Deploy Keycloak — see Keycloak Deployment (Docker Compose,
keycloakschema, TLS certificate, shared network, HA). -
Complete the SAML setup — create the
oneiot-sc/oneiot-mcrealms, their SAML clients (oneiot-sp-sc/oneiot-sp-mc), attribute mappers, and export the IdP signing certificates, following SAML SSO Setup. The steps below add the Azure AD Identity Provider on top of that SAML configuration.
3. Backend configuration
On the backend, the Azure AD login type is configured exactly like the SAML login type — the backend talks SAML to Keycloak and is unaware of Azure AD. Set app.authentication-type
to saml, enable SAML, and point the SAML IdP variables at the Keycloak realms:
SAML_ENABLED=true
SAML_REDIRECT_HOST=https://<PORTALS_HOST>:8843

# IdP = the Keycloak realms (which broker to Azure AD)
SAML_SC_IDP_ENTITY_ID=https://<KEYCLOAK_HOST>:<PORT>/realms/oneiot-sc
SAML_SC_IDP_SSO_URL=https://<KEYCLOAK_HOST>:<PORT>/realms/oneiot-sc/protocol/saml
SAML_MC_IDP_ENTITY_ID=https://<KEYCLOAK_HOST>:<PORT>/realms/oneiot-mc
SAML_MC_IDP_SSO_URL=https://<KEYCLOAK_HOST>:<PORT>/realms/oneiot-mc/protocol/saml
These variables live in the backend per-service env file ui-backend/.env (loaded after the shared .env via env_file: [.env, ./ui-backend/.env], shipped in
FT_DISK — ONE_IOT_UI/docker/ui-backend), in its commented SAML block — there is
no separate SAML env file. See SAML SSO Setup — Environment
variables for the complete variable table and the IdP certificate mount (sc-idp.crt /
mc-idp.crt). The backend configuration is identical whether Keycloak authenticates users
locally or brokers them to Azure AD — only the Keycloak side differs, as described below.
4. Part 1: Creating an App Registration in Microsoft Entra ID
-
Open the Microsoft Entra ID portal.
-
In the left menu, navigate to Manage > App registrations.
-
Click New registration.
-
Fill in the following:
-
Name: a descriptive name, for example
OneIoT-Keycloak -
Supported account types: select the option that suits your organization
-
Redirect URI: leave empty for now
-
-
Click Register.
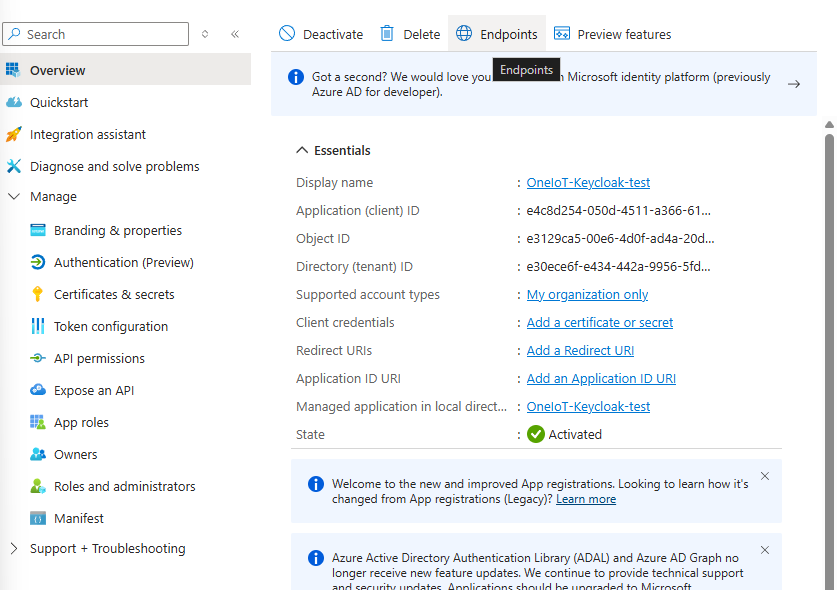
After creation, the Overview page is displayed:
| Field | Description |
|---|---|
Application (client) ID |
Unique identifier of the registered application. Will be used in Keycloak as the |
Directory (tenant) ID |
Azure AD tenant identifier. Part of the Discovery endpoint URL. |
| Keep this page open — the values above will be needed in the following steps. |
5. Choose a mode: fixed or per-user user-group / domain
The backend requires three attributes on every SAML assertion — portal-type, user-group and
domain — and rejects the login if any of them is missing or carries a name it does not know.
portal-type is always a hardcoded value per realm; how the other two are produced depends on what the deployment needs.
Pick one mode and configure both attributes accordingly.
| Mode | Use when | How user-group / domain are produced |
|---|---|---|
A — Single user-group, single domain |
Every Azure user should land in the same application user-group and in the super domain. |
Hardcoded Attribute mappers on the Keycloak Identity Provider, exactly like |
B — Multi user-group / multi-domain |
Different users must land in different user-groups, different domains, or both. |
Azure directory-extension attributes per user, imported by Attribute Importer mappers (Parts 1b, 1c and user-group / domain in Part 2.6). |
|
A missing attribute blocks the login — in both modes
This matters most for |
|
Never configure both modes for the same attribute
A Hardcoded Attribute mapper and an Attribute Importer writing the same User Attribute Name must not coexist on one Identity Provider: the hardcoded value is written for every user and overrides the per-user import, silently collapsing a multi-domain deployment into a single domain. When switching modes, delete the mappers of the mode you are leaving. |
5.1. Mode A — Fixed user-group and domain (Hardcoded Attribute mappers)
On each Identity Provider (Identity providers > Login with Microsoft > Mappers > Add mapper), add three Hardcoded Attribute mappers.
They are configured exactly like the
portal-type mapper in portal-type; only the name and value differ.
| User Attribute Name | Value | Notes |
|---|---|---|
|
|
Always hardcoded, in both modes. |
|
The application user-group every SSO user should get, e.g. |
Must already exist in the application database for that portal (Settings > User groups). It is never created automatically. |
|
|
Resolves to |
Set Sync mode override = Force on all three, so the values are refreshed on every login rather than only at user creation.
Then skip Parts 1b and 1c entirely and continue at
Part 2: Integrating Azure AD into Keycloak; in Part 2.6, create only the email, username
and the three hardcoded mappers above.
| Mode A is a valid permanent configuration for single-tenant deployments, not just a starting point. Moving to Mode B later means registering the Azure extension attributes and replacing two mappers — the realm, the Identity Provider and the flows stay as they are. |
6. Part 1b: Per-user attributes in Azure (userGroup / domain)
| Parts 1b and 1c apply to Mode B only. In Mode A both values come from hardcoded mappers and Azure needs no extension attributes — see Choose a mode: fixed or per-user user-group / domain. |
This part makes each Azure user carry their own user-group and domain, delivered to Keycloak as claims in the Azure ID token.
It is what enables multiple roles and multiple domains
across users.
The value is stored in Azure AD directory-extension attributes on each user and emitted as optional claims. Setting the value per user is done through Microsoft Graph (Graph Explorer or PowerShell) — the Entra portal UI does not expose these fields for editing.
|
Screenshots
The screenshots in this part were captured on the |
6.1. 1b.1 Register two directory-extension attributes on the app
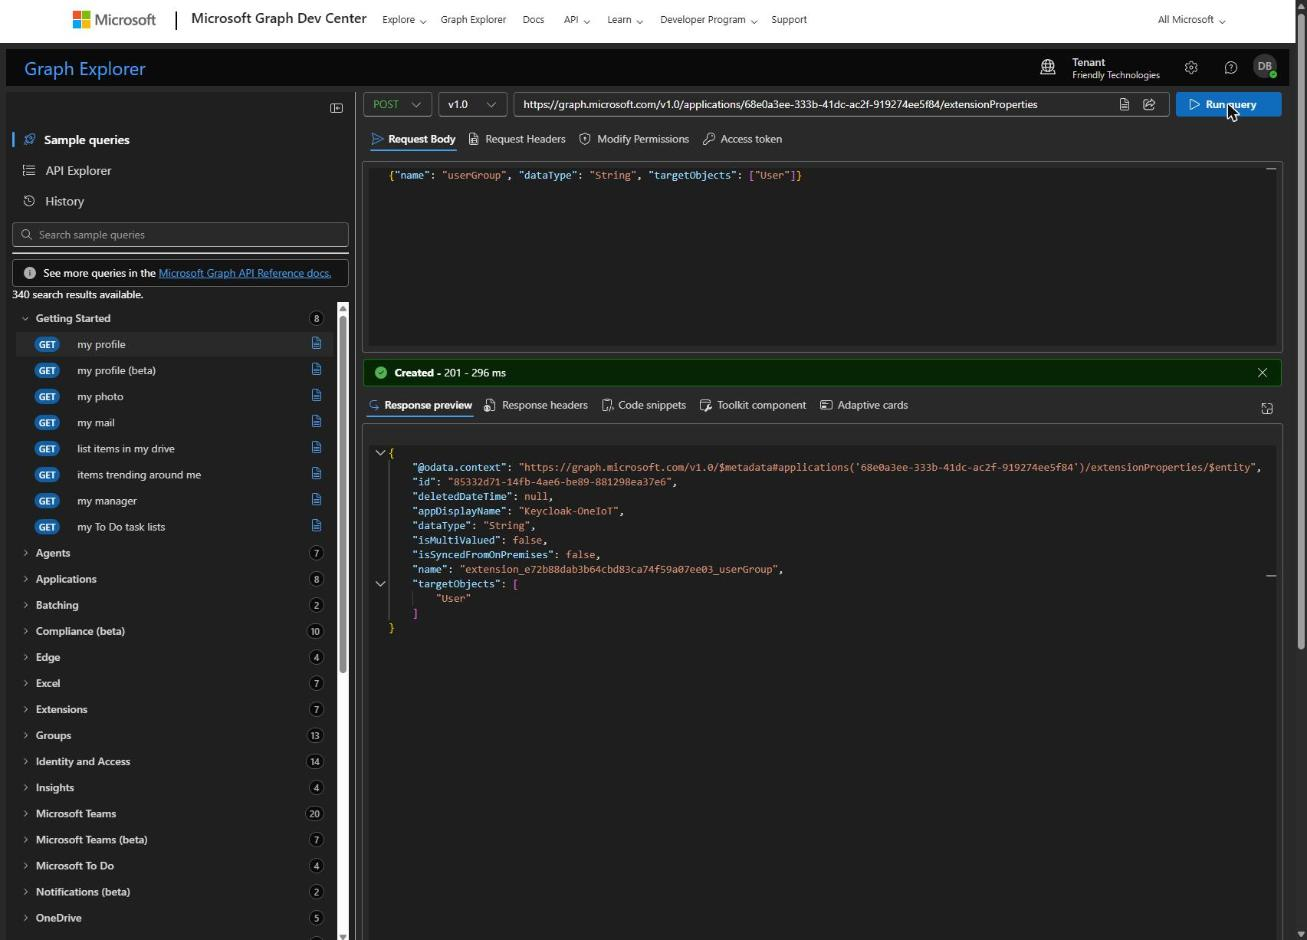
Register the userGroup and domain extension attributes once, on the App registration from
Part 1. In Microsoft Graph Explorer,
signed in as a directory admin, run:
POST https://graph.microsoft.com/v1.0/applications/{APP_OBJECT_ID}/extensionProperties
Content-Type: application/json

{ "name": "userGroup", "dataType": "String", "targetObjects": ["User"] }
Repeat with "name": "domain". Each response contains a name field of the form
extension_{APP_ID_NO_DASHES}_userGroup / extension_{APP_ID_NO_DASHES}_domain — copy both.
This full name is the one Microsoft Graph, the app manifest and PowerShell use (Parts 1b.2, 1b.3
and 1c.3). It is not the name the claim carries inside the token — read the warning in
1b.3 Emit the attributes as optional claims (ID token) before configuring the Keycloak mappers in Part 2.6.
|
|
6.2. 1b.2 Set the value on each user
For every user that logs in through Azure, set the two attributes to names that exactly match records in the application database for that portal:
PATCH https://graph.microsoft.com/v1.0/users/{USER_ID_OR_UPN}
Content-Type: application/json

{
  "extension_{APP_ID_NO_DASHES}_userGroup": "operator",
  "extension_{APP_ID_NO_DASHES}_domain":    "Super domain"
}-
userGroup— an existing application user-group name for that portal (e.g.admin,operator). -
domain— an existing application domain name, or exactlySuper domain(with a space) for full access.
|
The super-domain literal is
Super domain — with a spaceThe backend recognises the super domain only by the exact string |
To set the values in bulk, use the Microsoft Graph PowerShell SDK: Update-MgUser -UserId
<upn> -AdditionalProperties @{ "extension_…userGroup" = "operator"; "extension…_domain" =
"Super domain" }.
|
6.3. 1b.3 Emit the attributes as optional claims (ID token)
-
In the App registration, go to Manage > Token configuration.
-
Click Add optional claim.
-
Token type: select ID.
-
In the list, find and check the two extension attributes (
userGroup,domain). -
Click Add. If prompted to turn on the necessary Microsoft Graph permissions, accept.
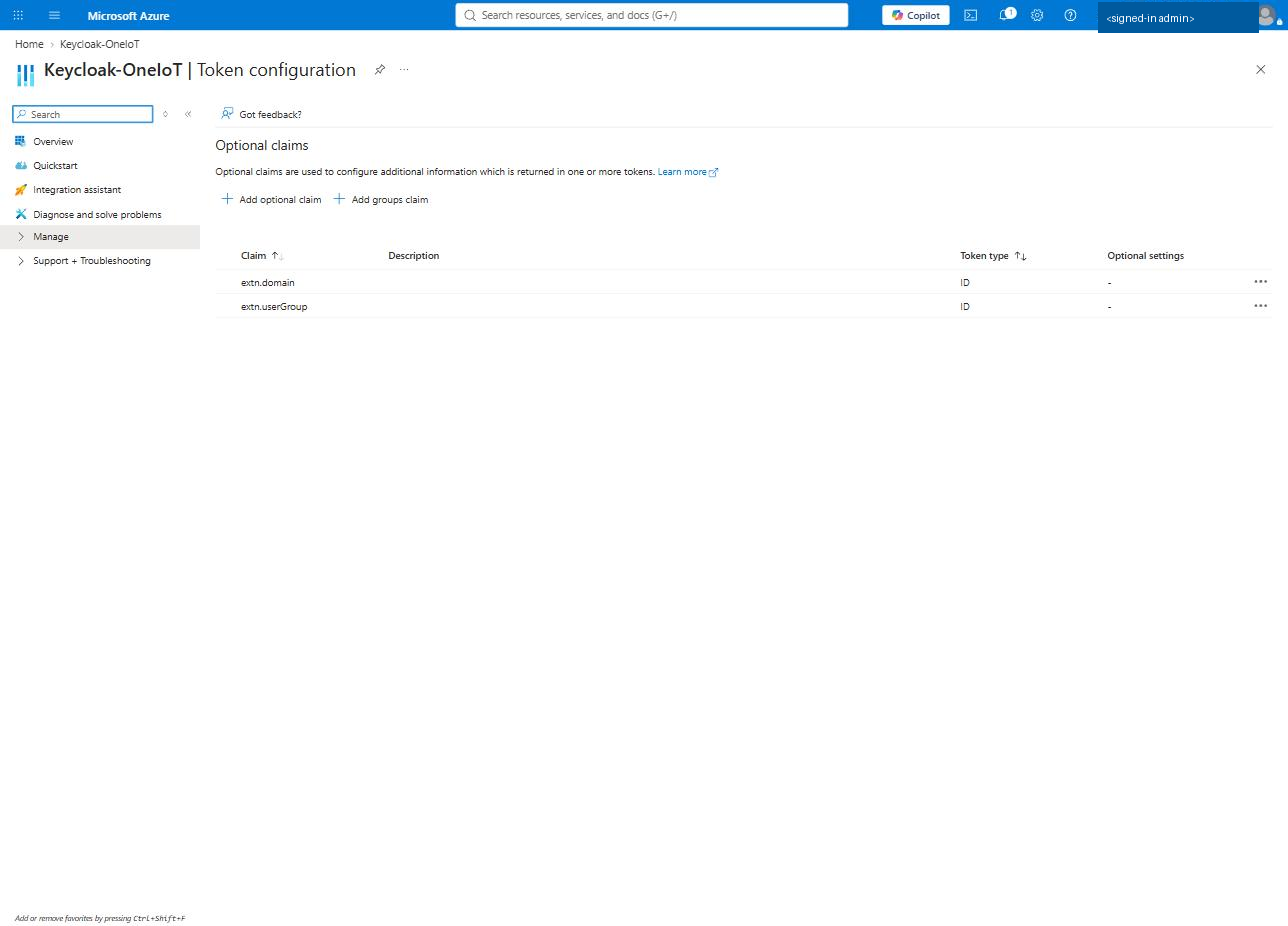
After this, the Azure ID token that Keycloak receives carries both per-user values. Keycloak reads them in Part 2.6.
|
The claim name inside the token is NOT the extension name — read this before Part 2.6
A directory-extension attribute has two different names. They are not interchangeable, and using the wrong one is the single most common reason this setup silently does not work.
Put the long name into the Keycloak Claim field and it matches nothing: the mapper saves
without complaint, the Azure login succeeds, but the Attribute Importer writes no value. The
user ends up with an empty On top of that, Keycloak reads a dot in the Claim field as a nested-path separator (as in
|
7. Part 1c: Multi-domain and multi-group access (per-user assignment)
Part 1b is the one-time setup of the mechanism. This part is the recurring operational procedure: giving one Azure user their own application user-group and their own domain, so that different users of the same portal land in different domains with different permission sets.
This is what makes the installation multi-domain: the domain is no longer a single realm-wide constant, it travels with the user in the Azure ID token.
| What you set | Where it lives | What it controls |
|---|---|---|
|
Directory-extension attribute on the Azure user |
The application user-group (permission set), matched by name in the OneIoT database. |
|
Directory-extension attribute on the Azure user |
The application domain the user works in, matched by name; the literal |
7.1. 1c.1 Prerequisites
Before assigning attributes to a user, all of the following must already be true:
-
The two extension attributes are registered on the App registration — see 1b.1 Register two directory-extension attributes on the app.
-
Both are emitted as optional claims on the ID token — see 1b.3 Emit the attributes as optional claims (ID token).
-
Both Keycloak realms have
user-groupanddomainas Attribute Importer mappers withSync mode override = Force, and the old Hardcoded Attribute mappers for those two names are deleted — see 2.6. Configuring Identity Provider Mappers. -
The account performing the change holds the User Administrator or Global Administrator directory role in Entra ID.
-
Graph Explorer has admin consent for
Directory.ReadWrite.All(orUser.ReadWrite.All). -
The user-group name and the domain name already exist in the OneIoT database for the target portal.
|
Application Administrator is not enough
The Application Administrator role lets you register the extension attributes (Part 1b.1) and
edit Token configuration, but it does not allow writing to user objects. Granting To check which roles the signed-in account holds: |
7.2. 1c.2 Choosing the values
userGroup-
An existing application user-group name for that portal, for example
adminoroperator. The name is matched case-sensitively against the database. domain-
Either an existing application domain name, or exactly
Super domainfor access to all domains.
|
The super-domain literal is
Super domain — with a spaceThe backend recognises the super domain by the exact string |
A typical multi-domain assignment looks like this:
| User | Portal | userGroup |
domain |
|---|---|---|---|
Platform administrator |
SC |
|
|
Operator, one customer |
SC |
|
|
Operator, another customer |
SC |
|
|
Read-only auditor |
MC |
|
|
7.3. 1c.3 Setting the values on a user
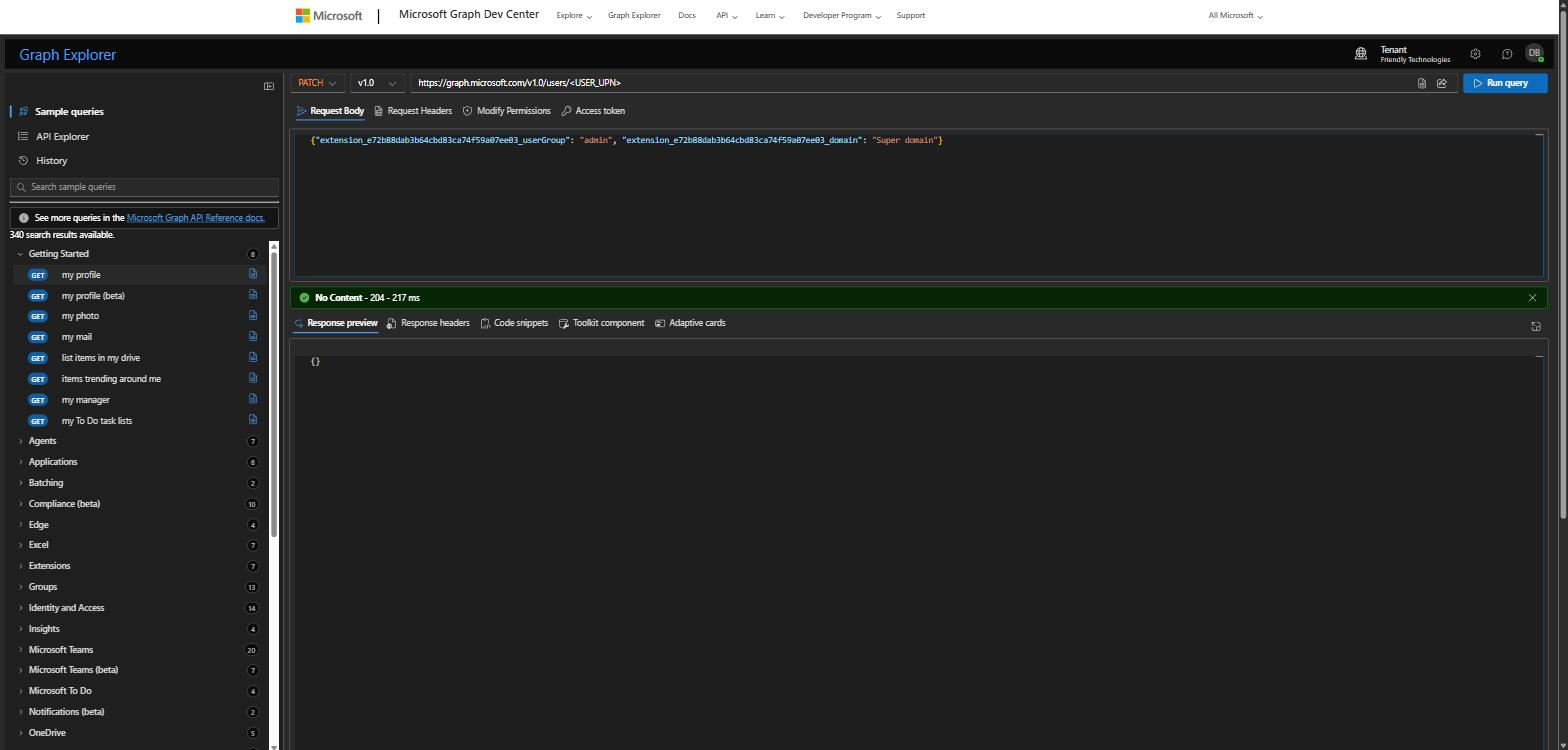
The Entra portal UI does not expose directory-extension attributes for editing — they can only be written through Microsoft Graph.
-
Open Microsoft Graph Explorer and sign in with the account that holds the User Administrator role.
-
Set the HTTP method to PATCH and the version to v1.0.
-
Enter the request URL, where
<USER_UPN>is the user’s UPN (or their object ID):https://graph.microsoft.com/v1.0/users/<USER_UPN> -
Open the Request body tab and paste the payload, substituting the exact claim names returned in Part 1b.1 and the values chosen in 1c.2:
{ "extension_{APP_ID_NO_DASHES}_userGroup": "admin", "extension_{APP_ID_NO_DASHES}_domain": "Super domain" } -
Click Run query.
A response of 204 No Content means the attributes were written.
|
Both attributes can be set independently. Sending only one key in the payload leaves the other one untouched. |
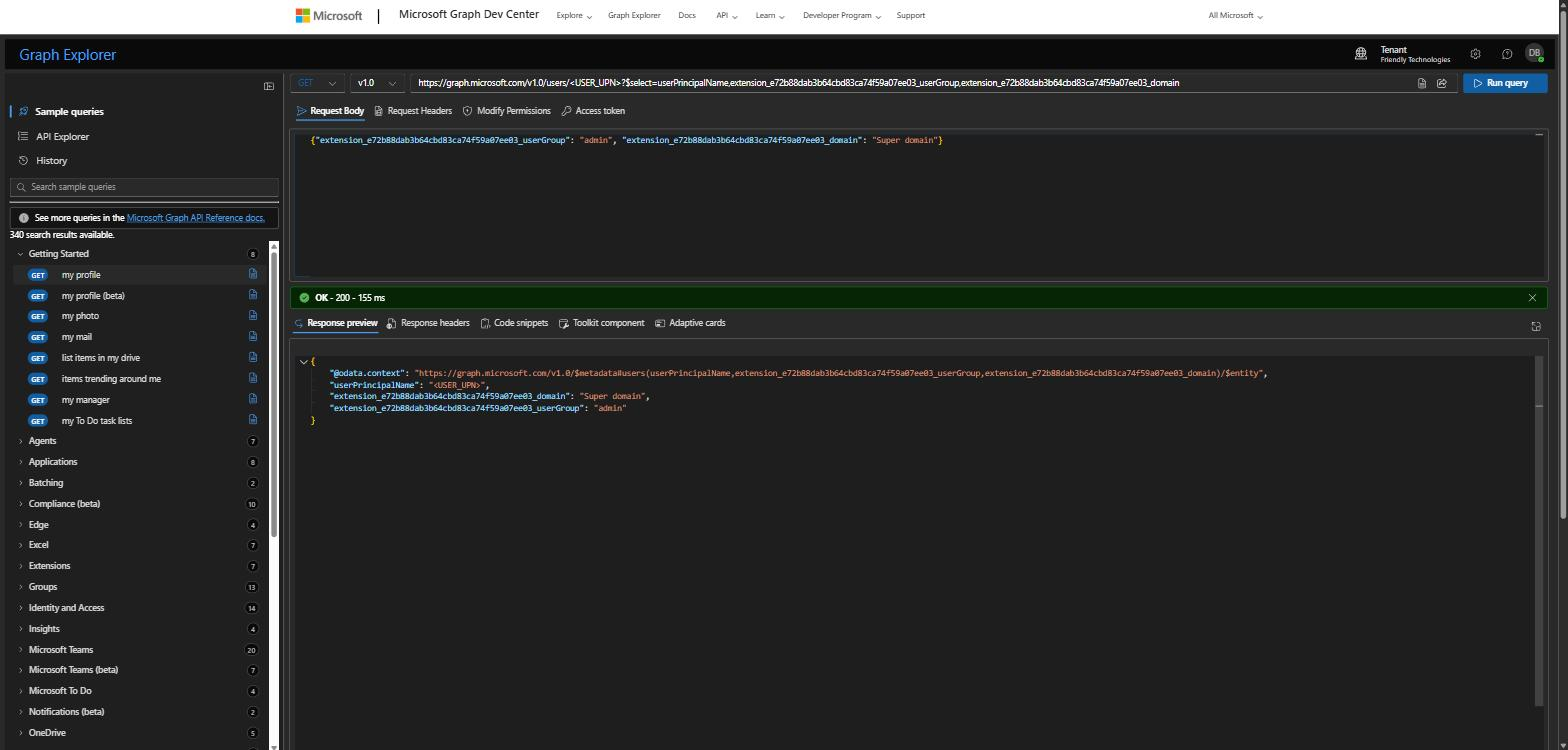
7.4. 1c.4 Verifying the values in Azure
Directory-extension attributes are not returned by a plain GET /users/{id} — they must be
requested explicitly with $select:
GET https://graph.microsoft.com/v1.0/users/<USER_UPN>?$select=userPrincipalName,extension_{APP_ID_NO_DASHES}_userGroup,extension_{APP_ID_NO_DASHES}_domainThe response must contain both values:
7.5. 1c.5 Verifying end to end in Keycloak
-
Sign the user out completely — both from the portal/Keycloak session and from Microsoft (https://login.microsoftonline.com/logout). A cached session keeps serving the previous token and the new values will not appear.
-
Log in to the portal through Login with Microsoft.
-
In the Keycloak admin console, open the realm for that portal (
oneiot-sc/oneiot-mc) and go to Users > the user > Attributes. -
Confirm the attributes:
user-groupthe value set in 1c.3
domainthe value set in 1c.3
portal-typescormc, from the hardcoded mapper -
Confirm in the portal that the user sees exactly the data of their domain and the permissions of their group.
Because the mappers use Sync mode override = Force, the values are refreshed on every
login, not only when the Keycloak user is first created. Any values left over from the old
Hardcoded Attribute mappers are overwritten on the next login.
|
7.6. 1c.6 Changing or revoking access later
To move a user to another domain or group, repeat 1c.3 with the new values. The change takes effect at the user’s next login.
To clear an attribute, send null:
{ "extension_{APP_ID_NO_DASHES}_domain": null }|
Keycloak keeps the previously imported attribute on the user until the next successful broker login. When revoking access, also terminate the user’s active sessions (Users > the user > Sessions, or Sessions at realm level), otherwise the current session continues with the old domain until it expires. |
7.7. 1c.7 Bulk assignment
For more than a handful of users, use the Microsoft Graph PowerShell SDK instead of Graph Explorer:
Connect-MgGraph -Scopes "User.ReadWrite.All"

Update-MgUser -UserId "<USER_UPN>" -AdditionalProperties @{
  "extension_{APP_ID_NO_DASHES}_userGroup" = "operator"
  "extension_{APP_ID_NO_DASHES}_domain"    = "AussieBB"
}
Driving it from a CSV with UserPrincipalName,UserGroup,Domain columns:
Import-Csv .\users.csv | ForEach-Object {
  Update-MgUser -UserId $_.UserPrincipalName -AdditionalProperties @{
    "extension_{APP_ID_NO_DASHES}_userGroup" = $_.UserGroup
    "extension_{APP_ID_NO_DASHES}_domain"    = $_.Domain
  }
}
7.8. 1c.8 Troubleshooting
| Symptom | Cause | Fix |
|---|---|---|
|
The signed-in account lacks the User Administrator role, or Graph Explorer has no admin consent
for |
Check the roles with the |
|
Malformed body — typically a stray quote left in the editor when the previous payload was overwritten. |
Clear the Request body field completely and retype the JSON. |
|
Wrong UPN, or the guest user’s UPN differs from their email address. |
Use the user’s object ID instead of the UPN. |
The attribute is missing from the |
Directory-extension attributes are only returned when requested. |
Add them to |
|
Almost always the mapper Claim field: it still holds the long |
Set the mapper Claim to exactly |
The value in Keycloak does not change after being updated in Azure |
The mapper Sync mode is not |
Set |
The user logs in but the portal returns |
The |
Correct the value in Azure to a name that exists in the database and have the user log in again. |
8. Part 2: Integrating Azure AD into Keycloak
For initial Keycloak setup and realm creation, see SAML SSO — Integration Guide.
The steps below must be performed for each realm (oneiot-sc and oneiot-mc).
8.1. 2.1. Creating the Identity Provider
-
Open the Keycloak Admin Console at
https://<KEYCLOAK_HOST>:8500. -
Select the target realm (e.g.,
oneiot-sc). -
In the left menu, navigate to Identity providers.
-
Click Add provider and select OpenID Connect v1.0.
-
In the Alias field, change the default value from
oidctomicrosoft.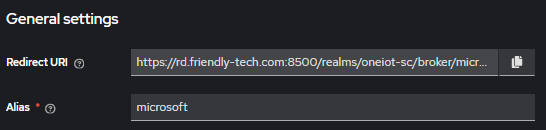
Changing the Alias is mandatory. The Alias determines the broker endpoint URL path. -
The Redirect URI field at the top is auto-generated based on the Alias. Copy this value — it will be added to Azure in the next step.
8.2. 2.2. Adding the Redirect URI in Azure
-
Go back to the Azure App Registration Overview page.
-
Click Add a Redirect URI.
-
Click Add a platform and select Web.
-
Paste the Redirect URI copied from Keycloak.
-
Click Save.
Repeat steps 2.1—2.2 for the second realm (e.g., oneiot-mc), so that Azure has two Redirect URIs:
-
https://rd.friendly-tech.com:8500/realms/oneiot-sc/broker/microsoft/endpoint -
https://rd.friendly-tech.com:8500/realms/oneiot-mc/broker/microsoft/endpoint
8.3. 2.3. Creating a Client Secret in Azure
A Client Secret is required for Keycloak to authenticate with Azure AD. One secret is shared across both Keycloak realms.
-
In the Azure App Registration, navigate to Manage > Certificates & secrets.
-
Go to the Client secrets tab.
-
Click + New client secret.
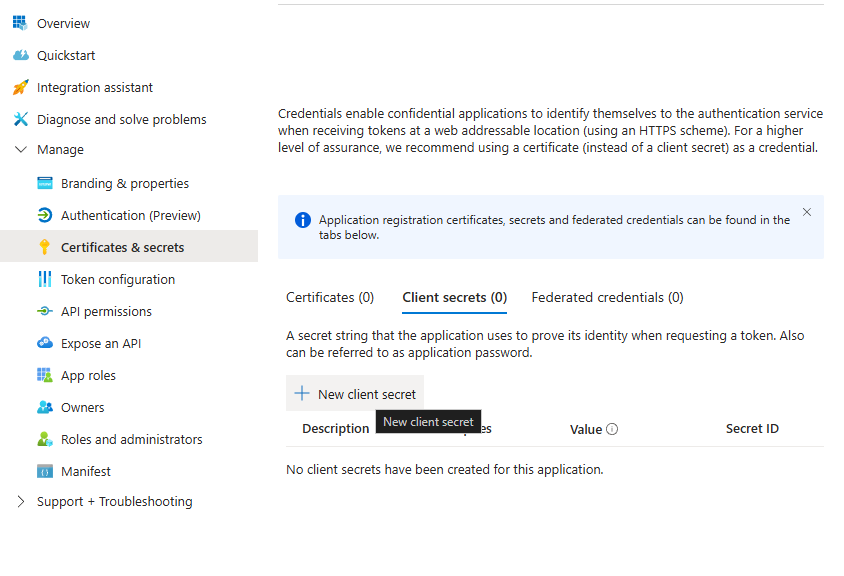
-
Enter a description and choose an expiration period.
-
Click Add.
| Copy the secret Value immediately after creation. It is only displayed once. If you lose it, you will need to create a new one. |
8.4. 2.4. Obtaining the Discovery Endpoint from Azure
-
Go back to the Azure App Registration Overview page.
-
Click the Endpoints button in the top toolbar.
-
Copy the OpenID Connect metadata document URL.
The URL format is:
https://login.microsoftonline.com/<TENANT_ID>/v2.0/.well-known/openid-configuration
8.5. 2.5. Completing the Identity Provider Configuration in Keycloak
Go back to the Keycloak Identity Provider configuration page and fill in the remaining fields:
-
Discovery endpoint — paste the OpenID Connect metadata document URL from Azure.

-
Client ID — enter the Application (client) ID from the Azure App Registration Overview.
-
Client Secret — enter the secret Value created in Azure.

-
Click Save.
Repeat this step for the second realm using the same Discovery endpoint, Client ID, and Client Secret.
After completing both realms, each Keycloak realm should have a configured microsoft Identity Provider linked to the same Azure AD application.
8.6. 2.6. Configuring Identity Provider Mappers
Mappers define how user attributes from Azure AD are imported into Keycloak. This configuration must be done in both realms on each Identity Provider.
-
Open the Identity Provider (
Login with Microsoft). -
Go to the Mappers tab.
-
Click Add mapper and create the mappers described below.
After all mappers are created, the list should look like this:
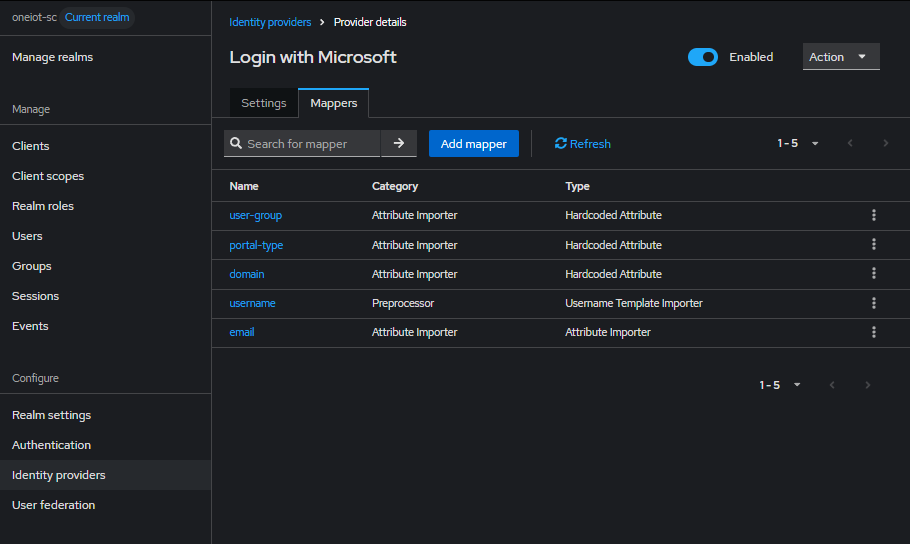
8.6.1. email
Imports the user email from Azure AD.
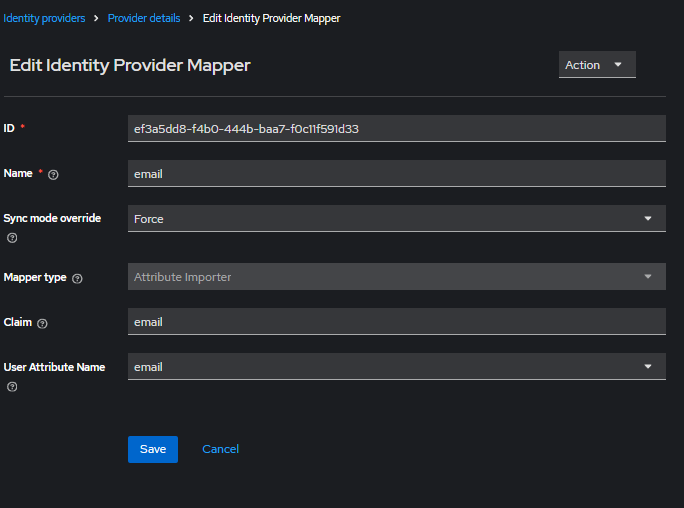
Name |
|
Sync mode override |
|
Mapper type |
|
Claim |
|
User Attribute Name |
|
8.6.2. username
Sets the Keycloak username based on the email claim from Azure AD.
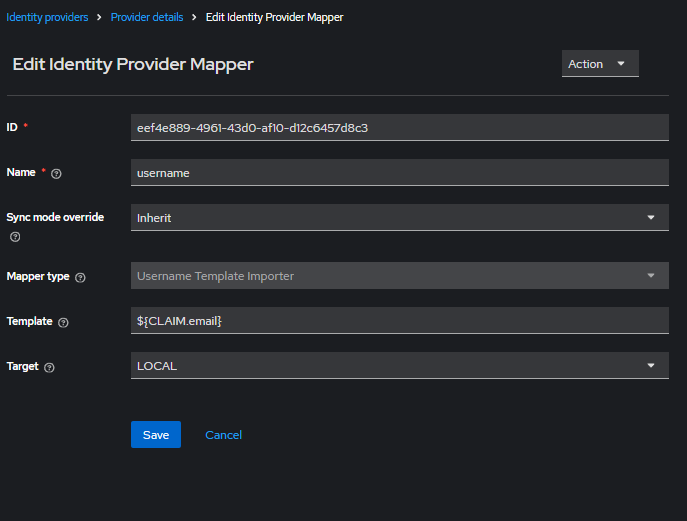
Name |
|
Sync mode override |
|
Mapper type |
|
Template |
|
Target |
|
8.6.3. portal-type
A hardcoded attribute that defines which portal the user belongs to. This value is not provided by Azure AD — it is assigned by default for every user logging in through this realm.
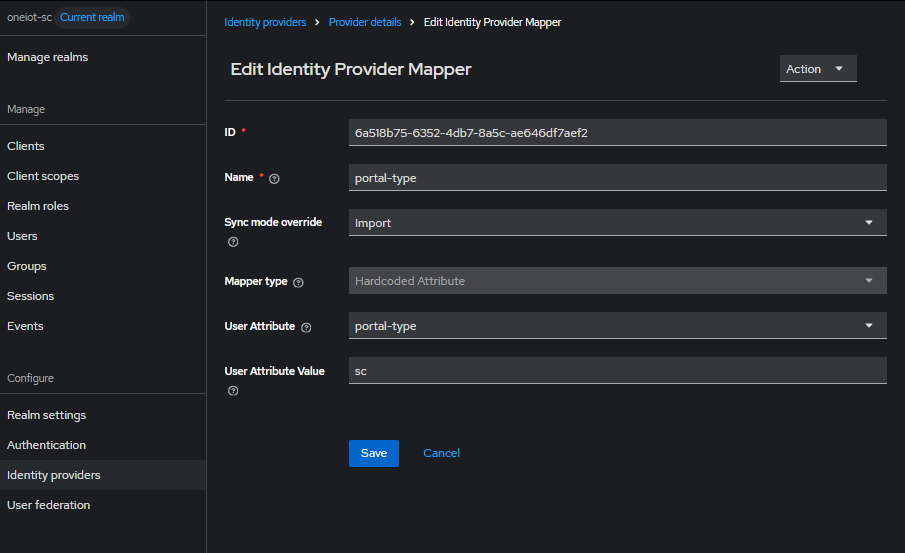
Name |
|
Sync mode override |
|
Mapper type |
|
User Attribute |
|
User Attribute Value |
|
In the oneiot-sc realm set the value to sc. In the oneiot-mc realm set the value to mc.
|
|
Use the token claim names
extn\.userGroup / extn\.domain — with the backslashThe two Attribute Importers below must be given the token claim name, not the long
|
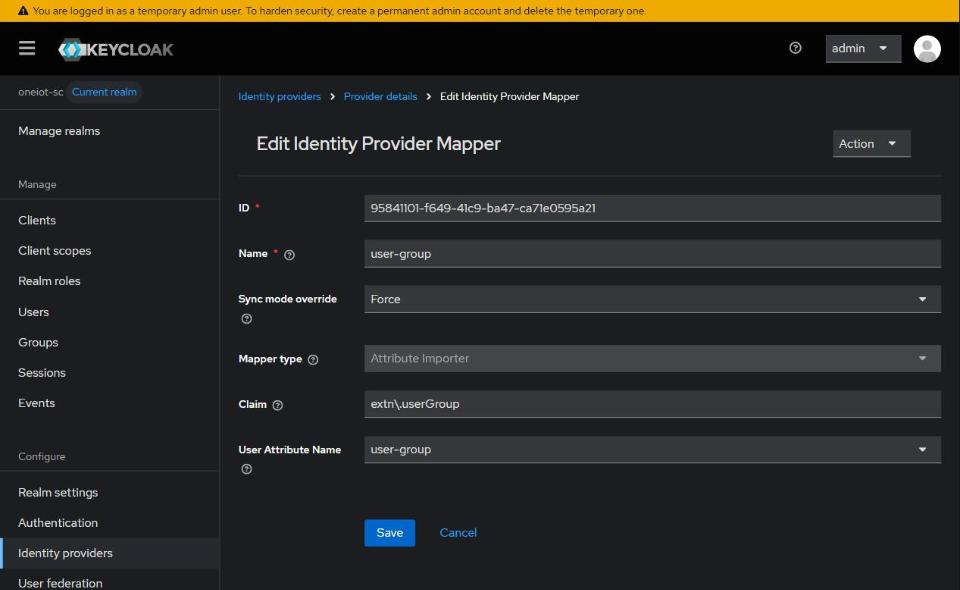
8.6.4. user-group
Imports the per-user application user-group from the Azure extension claim registered in
Part 1b: Per-user attributes in Azure (userGroup / domain). Sync mode override = Force so the
value is refreshed on every login (not only at user creation).
Name |
|
Sync mode override |
|
Mapper type |
|
Claim |
|
User Attribute Name |
|
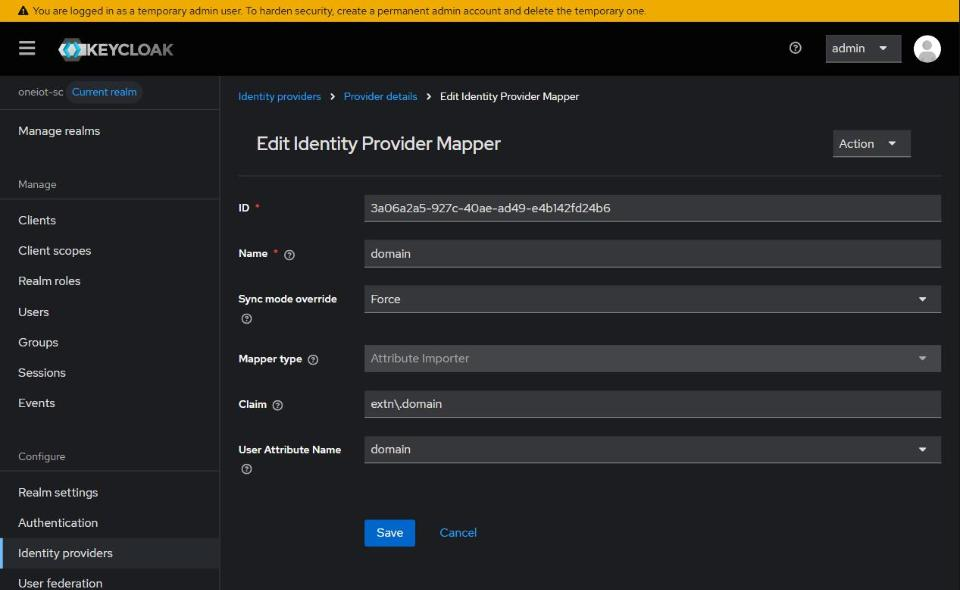
8.6.5. domain
Imports the per-user application domain from the Azure extension claim. Identical to the
user-group mapper, with domain substituted.
Name |
|
Sync mode override |
|
Mapper type |
|
Claim |
|
User Attribute Name |
|
|
Remove any Hardcoded Attribute mappers for
user-group / domain firstThese Attribute Importers replace the Mode A mappers.
If Hardcoded Attribute mappers for
|
portal-type stays a Hardcoded Attribute in both modes (it is per realm, sc / mc).
Only user-group and domain differ: Attribute Importer in Mode B, Hardcoded Attribute in
Mode A.
|
The imported values must exactly match a user-group / domain that already exists in the application database for that portal.
A user whose assertion carries an unknown name — or no
user-group / domain attribute at all — is rejected with NO_MATCH_AUTH (HTTP 403); nothing is created on the fly and no implicit default is applied.
See Choose a mode: fixed or per-user user-group / domain.
|
9. Part 3: Configuring Authentication Flows
All authentication flow settings described below must be configured in each realm separately.
9.1. 3.1. Browser Flow — Auto-redirect to Azure AD
By default, Keycloak shows its own login page. To skip it and redirect users directly to the Azure AD login page, create a custom Browser flow.
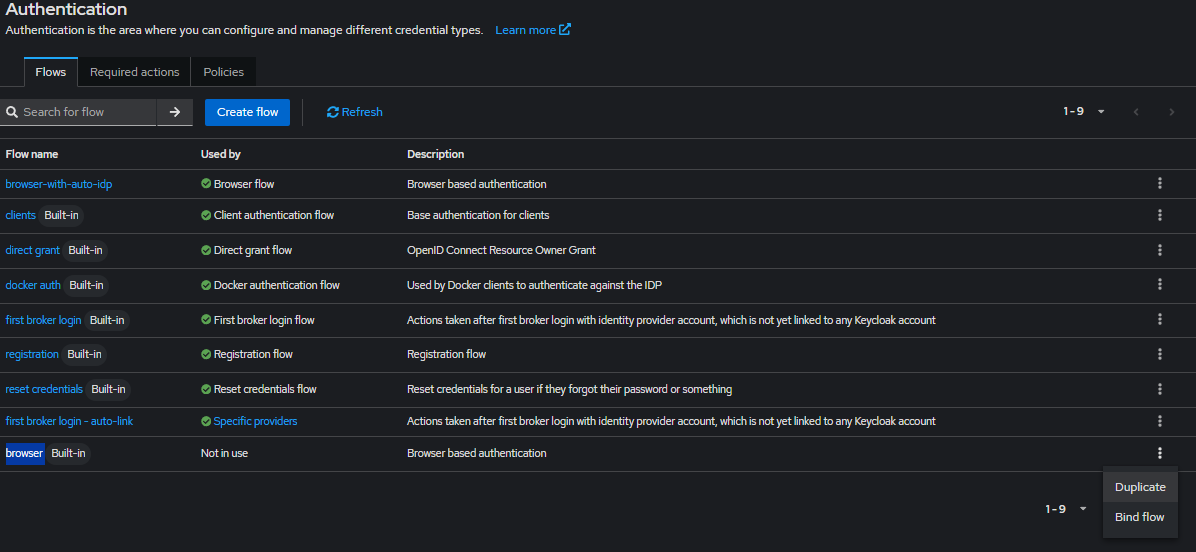
-
In the left menu, navigate to Authentication.
-
Find the browser flow in the list.
-
Click the three-dot menu on the right and select Duplicate.
-
Enter a name for the new flow (e.g.,
browser-with-auto-idp) and click Duplicate. -
Open the new flow.
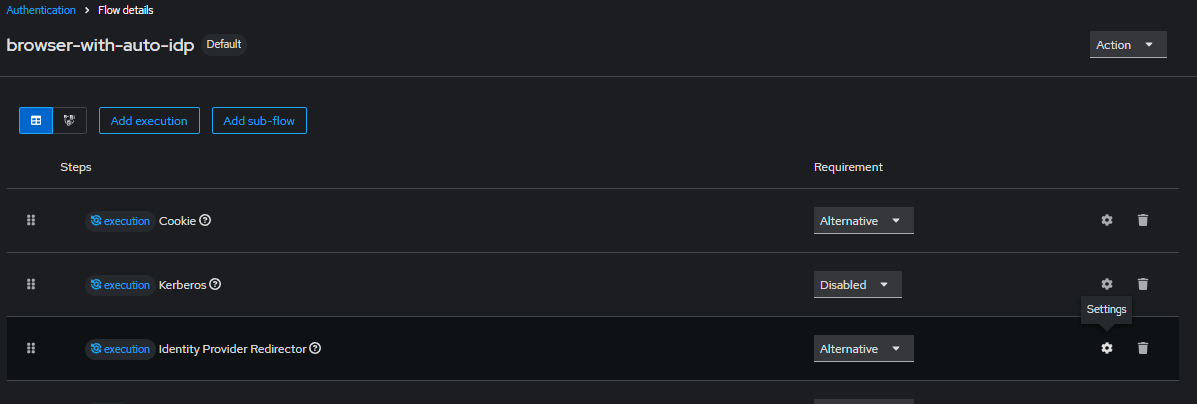
-
Click the gear icon on the Identity Provider Redirector step.
-
In the configuration dialog, set Default Identity Provider to
microsoft(the same Alias used when creating the Identity Provider).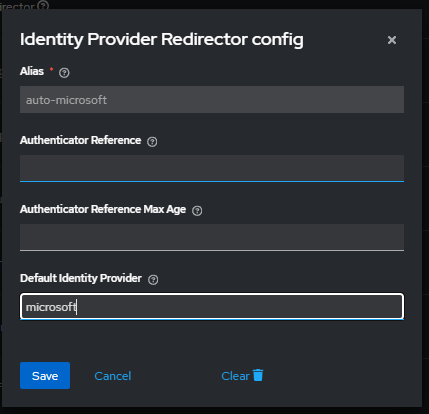
-
Click Save.
-
Go back to the Authentication flows list.
-
Find the
browser-with-auto-idpflow, click the three-dot menu and select Bind flow.
-
Select Browser flow and confirm.
After binding, the Authentication page should show browser-with-auto-idp as the active Browser flow:
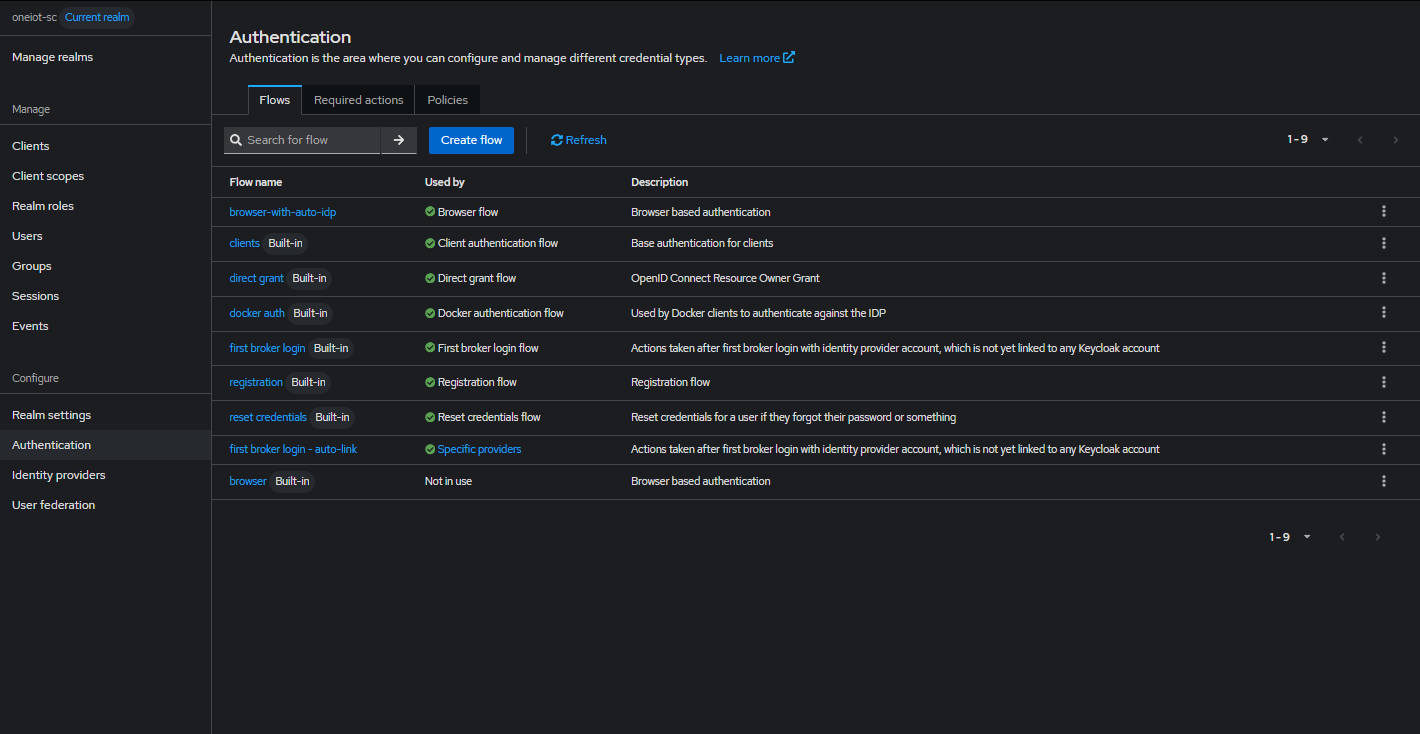
9.2. 3.2. Identity Provider — Prompt Setting
To configure how Azure AD prompts users during login:
-
Open the Identity Provider (
microsoft) in the current realm. -
Scroll down and expand the Advanced section.
-
Find the Prompt dropdown and select the preferred option.
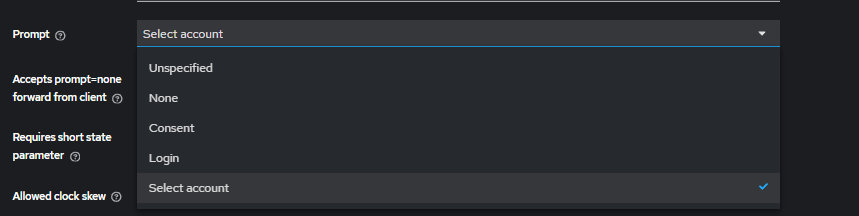
Option Behavior Select accountAzure AD shows a list of logged-in Microsoft accounts and allows choosing another one. Recommended.
LoginAlways shows the Azure AD login form, even if the user is already signed in.
ConsentAsks the user for consent to share data with the application.
NoneNo prompt — silently authenticates if a session exists.
Select account is recommended because it allows users to choose between multiple Microsoft accounts or log in with a different one.
|
9.3. 3.3. First Broker Login Flow — Auto-link Users
By default, when a user logs in via Azure AD for the first time, Keycloak asks to review the profile and verify the email. Since Keycloak acts only as a broker and we trust Azure AD to verify users, these steps should be disabled.
-
In the Authentication flows list, find the first broker login flow.
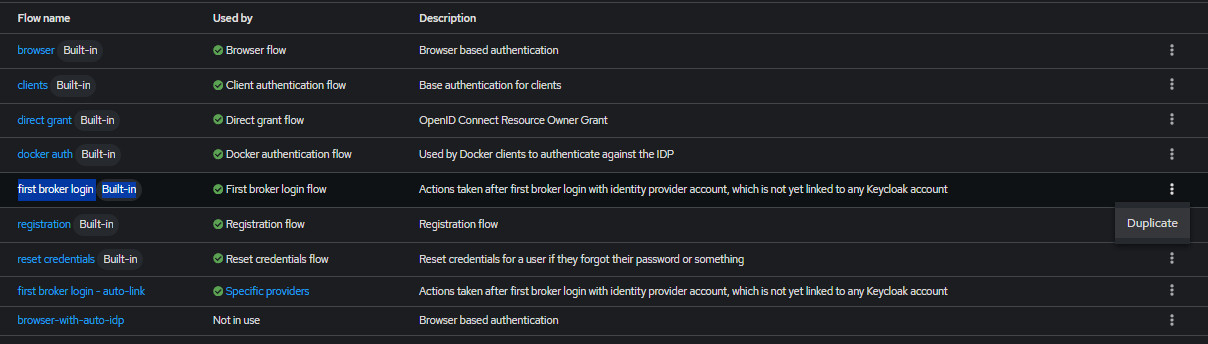
-
Click the three-dot menu and select Duplicate.
-
Enter a name (e.g.,
first broker login - auto-link) and click Duplicate.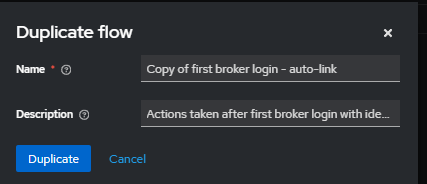
-
Open the new flow and change the following steps to Disabled:
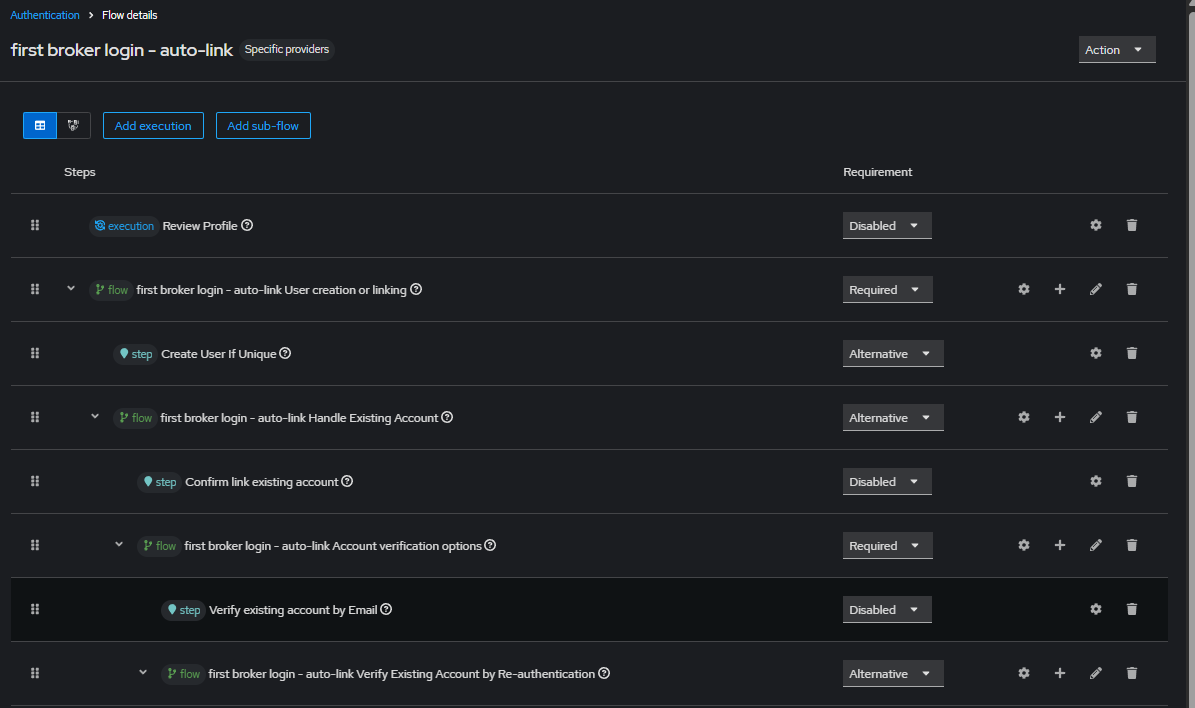
Step Set to Reason Review Profile
DisabledUsers should not be asked to fill in profile fields on first login.
Confirm link existing account
DisabledSkip the confirmation prompt when linking to an existing account.
Verify existing account by Email
DisabledSkip email verification — Azure AD already verified the user.
-
Save the flow.
9.4. 3.4. Assigning the First Login Flow to the Identity Provider
-
Open the Identity Provider (
microsoft) settings. -
Scroll down to the First login flow override field.
-
Select the newly created flow (
first broker login - auto-link).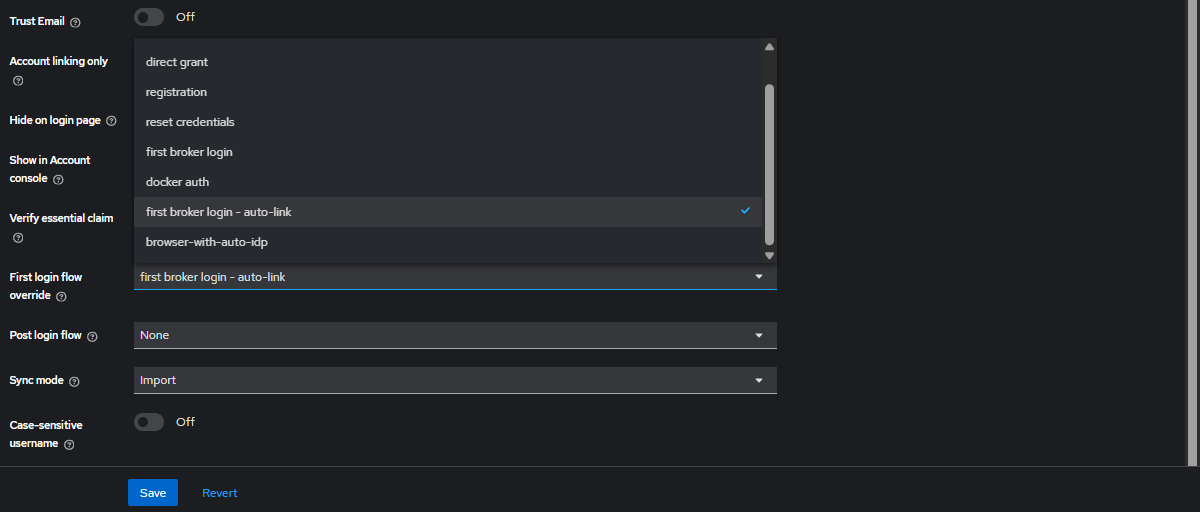
-
Click Save.
| Both authentication flows (Browser flow and First login flow) must be configured in each realm separately. Repeat all steps from 3.1 to 3.4 for the second realm. |
10. Part 4: Managing Users in Keycloak
10.1. User Attributes
Users created through the Azure AD broker receive:
-
portal-type—scormcdepending on the realm (Hardcoded Attribute mapper). -
user-group— imported per user from the AzureuserGroupextension claim (Attribute Importer). -
domain— imported per user from the Azuredomainextension claim (Attribute Importer).
|
Change per-user values in Azure, not in Keycloak
Because the |
10.2. Editing User Attributes
-
In the left menu, navigate to Users.
-
Select the user.
-
Go to the Attributes tab.
-
Update the attribute values as needed and click Save.
For user-group and domain this is only a temporary override — the next login
re-imports the Azure value (Sync mode = Force). Change these permanently in Azure
(Part 1b.2). Use the Keycloak Attributes tab for a one-off, until-next-login adjustment.
|
10.3. Terminating User Sessions
-
In the left menu, navigate to Users.
-
Select the user.
-
Go to the Sessions tab.
-
Click Sign out to terminate the active session.
10.4. Deleting Users
-
In the left menu, navigate to Users.
-
Select the user.
-
Click Delete and confirm.
| Each realm manages its users independently. Changes made in one realm do not affect the other. |
10.5. Recommendations
-
Set every Azure user’s
userGroup/domainextension attribute (Part 1b.2) to names that already exist in the application database for that portal. An empty or unknown value — for either attribute — blocks the login withNO_MATCH_AUTH(HTTP 403). -
Super domain(with a space) grants access to every domain. Assign it deliberately — most users should carry a specific domain instead. -
To restrict a user, change their
userGroupextension attribute in Azure to a group with limited permissions and have them re-login. -
Every user must belong to exactly one group and one domain value; the claims are single-valued.