SSL Certificate Configuration
Overview
SSL certificates are required for HTTPS communication between browsers and services. Certificate requirements differ based on deployment type.
Deployment Scenarios
All-in-One Deployment
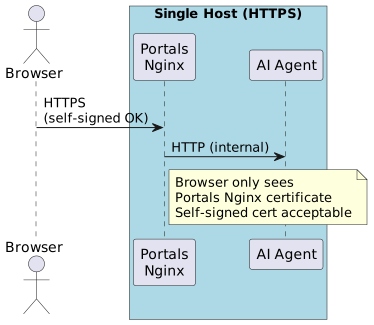
Certificate Behavior:
- Browser communicates only with Portals Nginx via HTTPS - Nginx proxies requests to AI Agent via HTTP internally - Self-signed certificate works without browser warnings - AI Agent accessible at /ai-agent path through Nginx proxy
Separate Host Deployment
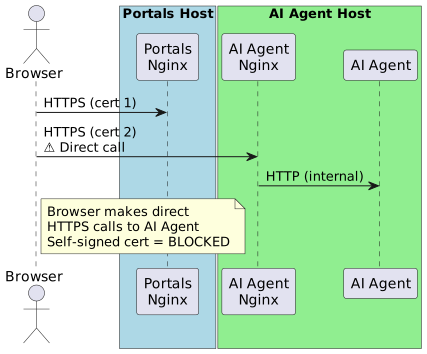
Certificate Behavior: - Browser communicates with two separate hosts via HTTPS - Angular app makes direct API calls to AI Agent from browser - Self-signed certificates cause browser blocking - Both hosts need valid certificates
Problems with Self-Signed Certificates: 1. Browser shows security warning when opening Angular UI 2. Browser blocks HTTPS requests to AI Agent 3. Users must manually accept multiple certificate warnings
Certificate Requirements
| Deployment | Certificate Type | Hosts Requiring Certs | Browser Warnings |
|---|---|---|---|
All-in-One |
Self-signed acceptable |
Portals Nginx only |
Minor (single warning) |
Separate |
Trusted required |
Portals Nginx + AI Agent Nginx |
Blocked (self-signed) |
Certificate Files
Required certificate files:
ui-backend-conf/ssl/
├── friendly.crt    # SSL certificate (public)
└── friendly.key    # Private key (keep secure)
File Formats:
- .crt - Certificate file (PEM format) - .key - Private key file (PEM format, unencrypted)
Generating Trusted Certificates
Option 1: Let’s Encrypt (Free, Public Domain)
Best for publicly accessible domains with internet connectivity.
Prerequisites
-
Public domain name (e.g.,
mycompany.com) -
Port 80/443 accessible from internet
-
Certbot installed on server
Install Certbot
- Ubuntu/Debian
-
apt-get update apt-get install -y certbot - CentOS/RHEL
-
yum install -y certbot
Generate Wildcard Certificate
# Generate wildcard cert for *.example.com
certbot certonly --manual \
  --preferred-challenges=dns \
  --email admin@example.com \
  --agree-tos \
  -d *.example.com \
  -d example.com
DNS Challenge:
1. Certbot will display a TXT record to add to your DNS 2. Add TXT record: _acme-challenge.example.com → <provided_value>
3. Wait for DNS propagation (1-5 minutes) 4. Press Enter to continue verification
Certificate Location:
/etc/letsencrypt/live/example.com/
├── fullchain.pem  # Use as friendly.crt
└── privkey.pem    # Use as friendly.key
Copy Certificates
# Create SSL directory
mkdir -p /usr/local/ft-services/ui-backend-conf/ssl

# Copy certificates
cp /etc/letsencrypt/live/example.com/fullchain.pem \
   /usr/local/ft-services/ui-backend-conf/ssl/friendly.crt

cp /etc/letsencrypt/live/example.com/privkey.pem \
   /usr/local/ft-services/ui-backend-conf/ssl/friendly.key

# Set secure permissions
chmod 644 /usr/local/ft-services/ui-backend-conf/ssl/friendly.crt
chmod 600 /usr/local/ft-services/ui-backend-conf/ssl/friendly.key
Auto-Renewal
Let’s Encrypt certificates expire after 90 days. Set up auto-renewal:
# Test renewal
certbot renew --dry-run

# Add cron job for auto-renewal
echo "0 3 * * * certbot renew --quiet && cp /etc/letsencrypt/live/example.com/*.pem /usr/local/ft-services/ui-backend-conf/ssl/ && docker-compose restart" >> /etc/crontab
Option 2: Internal Certificate Authority (Private Network)
Best for internal networks without internet access.
Create CA Certificate
# Create CA directory
mkdir -p /usr/local/ft-services/ca
cd /usr/local/ft-services/ca

# Generate CA private key
openssl genrsa -out ca.key 4096

# Generate CA certificate (valid 10 years)
openssl req -x509 -new -nodes -key ca.key -sha256 -days 3650 -out ca.crt \
  -subj "/C=US/ST=State/L=City/O=Company/OU=IT/CN=Company Root CA"
Distribute CA certificate:
Install ca.crt on all client machines to trust your internal CA.
Generate Server Certificate
# Generate server private key
openssl genrsa -out friendly.key 2048

# Create certificate signing request (CSR)
openssl req -new -key friendly.key -out friendly.csr \
  -subj "/C=US/ST=State/L=City/O=Company/OU=IT/CN=*.example.internal"

# Create SAN configuration file
cat > san.cnf <<EOF
[req]
distinguished_name = req_distinguished_name
req_extensions = v3_req
prompt = no

[req_distinguished_name]
C = US
ST = State
L = City
O = Company
OU = IT
CN = *.example.internal

[v3_req]
keyUsage = keyEncipherment, dataEncipherment
extendedKeyUsage = serverAuth
subjectAltName = @alt_names

[alt_names]
DNS.1 = *.example.internal
DNS.2 = example.internal
DNS.3 = *.portals.example.internal
DNS.4 = *.ai-agent.example.internal
EOF

# Sign certificate with CA (valid 2 years)
openssl x509 -req -in friendly.csr -CA ca.crt -CAkey ca.key -CAcreateserial \
  -out friendly.crt -days 730 -sha256 -extfile san.cnf -extensions v3_req
Copy Certificates
# Create SSL directory
mkdir -p /usr/local/ft-services/ui-backend-conf/ssl

# Copy certificates
cp friendly.crt /usr/local/ft-services/ui-backend-conf/ssl/
cp friendly.key /usr/local/ft-services/ui-backend-conf/ssl/

# Set secure permissions
chmod 644 /usr/local/ft-services/ui-backend-conf/ssl/friendly.crt
chmod 600 /usr/local/ft-services/ui-backend-conf/ssl/friendly.key
Trust CA on Client Machines
- Windows
-
1. Copy ca.crt to Windows machine 2. Double-click ca.crt 3. Click "Install Certificate" 4. Select "Local Machine" 5. Choose "Trusted Root Certification Authorities" 6. Restart browser - macOS
-
# Add CA to system keychain sudo security add-trusted-cert -d -r trustRoot -k /Library/Keychains/System.keychain ca.crt - Linux
-
# Ubuntu/Debian
cp ca.crt /usr/local/share/ca-certificates/company-ca.crt
update-ca-certificates

# CentOS/RHEL
cp ca.crt /etc/pki/ca-trust/source/anchors/company-ca.crt
update-ca-trust
Nginx Configuration
Portals Nginx (UI Service)
The portals container needs SSL configuration to serve HTTPS.
Mount SSL Certificates
Update compose.yml for ui-service:
services:
  portals:
    image: hub.friendly-tech.com/ui/portals:latest
    ports:
      - "443:443"    # Add HTTPS port
      - "80:80"      # Keep HTTP for redirect
    volumes:
      - ${DATA_FOLDER:-.}/ui-backend-conf/ssl:/etc/nginx/ssl:ro
      - ${DATA_FOLDER:-.}/ft-data/ui-portals/nginx/logs:/var/log/nginx
    # ... rest of config
Nginx SSL Configuration
Create ui-backend-conf/nginx.conf:
server {
    listen 443 ssl;

    # SSL Configuration
    ssl_certificate /etc/nginx/ssl/friendly.crt;
    ssl_certificate_key /etc/nginx/ssl/friendly.key;

    # SSL Security Settings
    ssl_protocols TLSv1.2 TLSv1.3;
    ssl_prefer_server_ciphers on;
    ssl_ciphers 'ECDHE-ECDSA-AES128-GCM-SHA256:ECDHE-RSA-AES128-GCM-SHA256:ECDHE-ECDSA-AES256-GCM-SHA384:ECDHE-RSA-AES256-GCM-SHA384';

    # Proxy all requests to the Python AI agent
    location / {
      proxy_pass http://ui-ai-agent:8080;

      # Proxy headers
      proxy_set_header Host ui-ai-agent:8080;
      proxy_set_header X-Real-IP $remote_addr;
      proxy_set_header X-Forwarded-For $proxy_add_x_forwarded_for;
      proxy_set_header X-Forwarded-Proto https;  # Always HTTPS
      proxy_set_header X-Forwarded-Host $host;
      proxy_set_header X-Forwarded-Port $server_port;

      # Timeouts for long-running requests
      proxy_connect_timeout 60s;
      proxy_send_timeout 60s;
      proxy_read_timeout 60s;

      # WebSocket support (if needed)
      proxy_http_version 1.1;
      proxy_set_header Upgrade $http_upgrade;
      proxy_set_header Connection "upgrade";

      # Buffering settings for large responses
      proxy_buffering on;
      proxy_buffer_size 4k;
      proxy_buffers 8 4k;
      proxy_busy_buffers_size 8k;
    }
AI Agent Nginx (Separate Deployment)
For separate AI Agent deployment, add nginx reverse proxy.
Create AI Agent Nginx Container
Create ai-agent-nginx-ssl.conf:
server {
    listen 80;
    server_name _;
    return 301 https://$host$request_uri;
}

server {
    listen 443 ssl http2;
    server_name _;

    # SSL certificates
    ssl_certificate /etc/nginx/ssl/friendly.crt;
    ssl_certificate_key /etc/nginx/ssl/friendly.key;

    # SSL settings
    ssl_protocols TLSv1.2 TLSv1.3;
    ssl_ciphers HIGH:!aNULL:!MD5;
    ssl_prefer_server_ciphers on;
    ssl_session_cache shared:SSL:10m;

    # Security headers
    add_header Strict-Transport-Security "max-age=31536000" always;

    # Proxy to AI Agent
    location / {
        proxy_pass http://ui-ai-agent:8080;
        proxy_set_header Host $host;
        proxy_set_header X-Real-IP $remote_addr;
        proxy_set_header X-Forwarded-For $proxy_add_x_forwarded_for;
        proxy_set_header X-Forwarded-Proto $scheme;

        # WebSocket support (if needed)
        proxy_http_version 1.1;
        proxy_set_header Upgrade $http_upgrade;
        proxy_set_header Connection "upgrade";
    }
}
Update AI Agent compose.yml
services:
  ui-ai-agent:
    # ... existing config

  ai-agent-nginx:
    image: nginx:alpine
    ports:
      - "443:443"
      - "80:80"
    volumes:
      - ${DATA_FOLDER:-.}/ui-backend-conf/ssl:/etc/nginx/ssl:ro
      - ./ai-agent-nginx-ssl.conf:/etc/nginx/conf.d/default.conf:ro
    depends_on:
      - ui-ai-agent
    restart: unless-stopped
Verification
Verify Certificate Files
# Check certificate details
openssl x509 -in /usr/local/ft-services/ui-backend-conf/ssl/friendly.crt -text -noout

# Verify certificate and key match
openssl x509 -noout -modulus -in friendly.crt | openssl md5
openssl rsa -noout -modulus -in friendly.key | openssl md5
# Output should match

# Check certificate expiration
openssl x509 -noout -dates -in friendly.crt

# Verify certificate chain
openssl verify -CAfile ca.crt friendly.crt
Test HTTPS Access
# Test Portals
curl -v https://portals.example.com

# Test AI Agent
curl -v https://ai-agent.example.com

# Check certificate from command line
openssl s_client -connect portals.example.com:443 -showcerts
Browser Testing
-
Open
https://portals.example.comin browser -
Check for green padlock icon (no warnings)
-
Click padlock → View certificate details
-
Verify certificate issuer and expiration date
-
Test AI Agent calls from browser console
Troubleshooting
Certificate Warnings in Browser
Symptom: Browser shows "Your connection is not private" or similar warning.
Causes: 1. Self-signed certificate (separate deployment) 2. Certificate doesn’t match hostname 3. Certificate expired 4. CA not trusted by browser
Solution:
# Check certificate CN and SAN
openssl x509 -in friendly.crt -text -noout | grep -A1 "Subject:"
openssl x509 -in friendly.crt -text -noout | grep -A1 "Subject Alternative Name"

# Verify hostname matches certificate
curl -v https://your-hostname.com 2>&1 | grep "subject:"
Certificate and Key Mismatch
Symptom: Nginx fails to start with SSL error.
Solution:
# Verify modulus match
openssl x509 -noout -modulus -in friendly.crt | openssl md5
openssl rsa -noout -modulus -in friendly.key | openssl md5

# If mismatch, regenerate certificate with correct key
Permission Denied Errors
Symptom: Nginx cannot read certificate files.
Solution:
# Set correct permissions
chmod 644 /usr/local/ft-services/ui-backend-conf/ssl/friendly.crt
chmod 600 /usr/local/ft-services/ui-backend-conf/ssl/friendly.key

# Ensure files are readable by nginx user
chown root:root /usr/local/ft-services/ui-backend-conf/ssl/*
AI Agent HTTPS Blocked
Symptom: Browser blocks requests to AI Agent with NET::ERR_CERT_AUTHORITY_INVALID.
Solution: 1. Install internal CA certificate on client machines 2. Or use Let’s Encrypt for public domains 3. Verify certificate matches AI Agent hostname
Certificate Expired
Symptom: Browser shows "Certificate expired" error.
Solution:
# Check expiration
openssl x509 -noout -dates -in friendly.crt

# Renew certificate (Let's Encrypt)
certbot renew --force-renewal

# Or regenerate with internal CA
# (see Option 2 above)

# Copy new certificates and restart
docker-compose restart
Security Best Practices
File Permissions
# Certificate (public) - readable by all
chmod 644 friendly.crt

# Private key - readable by owner only
chmod 600 friendly.key

# SSL directory
chmod 755 /usr/local/ft-services/ui-backend-conf/ssl
Private Key Protection
-
Never commit private keys to version control
-
Add to
.gitignore:
*.key
*.pem
ui-backend-conf/ssl/-
Store backups securely (encrypted)
-
Restrict access to SSL directory
Certificate Monitoring
Monitor certificate expiration:
# Check days until expiration
echo | openssl s_client -connect portals.example.com:443 2>/dev/null | \
  openssl x509 -noout -dates | grep "notAfter" | cut -d= -f2

# Or use monitoring tools:
# - Nagios with check_ssl_cert plugin
# - Prometheus with blackbox_exporter
# - Commercial: SSL Labs, QualysCertificate Renewal Workflow
# 1. Backup existing certificates
cp -r /usr/local/ft-services/ui-backend-conf/ssl \
   /usr/local/ft-services/ui-backend-conf/ssl.backup.$(date +%Y%m%d)

# 2. Renew certificate (Let's Encrypt example)
certbot renew

# 3. Copy renewed certificates
cp /etc/letsencrypt/live/example.com/fullchain.pem \
   /usr/local/ft-services/ui-backend-conf/ssl/friendly.crt
cp /etc/letsencrypt/live/example.com/privkey.pem \
   /usr/local/ft-services/ui-backend-conf/ssl/friendly.key

# 4. Restart services
docker-compose restart portals
docker-compose restart ai-agent-nginx  # If separate deployment

# 5. Verify
curl -v https://portals.example.com
openssl s_client -connect portals.example.com:443 | openssl x509 -noout -dates
Quick Reference
| Task | Command |
|---|---|
Generate CSR |
|
View certificate |
|
Check expiration |
|
Verify cert/key match |
|
Test HTTPS |
|
Check remote cert |
|
Convert formats |
|