Azure AD + Keycloak — Integration Guide
| Parameter | Value |
|---|---|
Keycloak version |
TBD |
Azure AD |
Microsoft Entra ID |
Protocol |
OpenID Connect v1.0 |
1. Overview
This guide describes how to register an application in Microsoft Entra ID (Azure AD), integrate it with Keycloak as an Identity Broker, and manage users through Keycloak after the integration is complete.
The OneIoT platform uses two separate Keycloak realms — one for the Support Center (SC) portal and one for the Management Console (MC) portal. Both realms are connected to the same Azure AD application.
2. Part 1: Creating an App Registration in Microsoft Entra ID
-
Open the Microsoft Entra ID portal.
-
In the left menu, navigate to Manage > App registrations.
-
Click New registration.
-
Fill in the following:
-
Name: a descriptive name, for example
OneIoT-Keycloak -
Supported account types: select the option that suits your organization
-
Redirect URI: leave empty for now
-
-
Click Register.
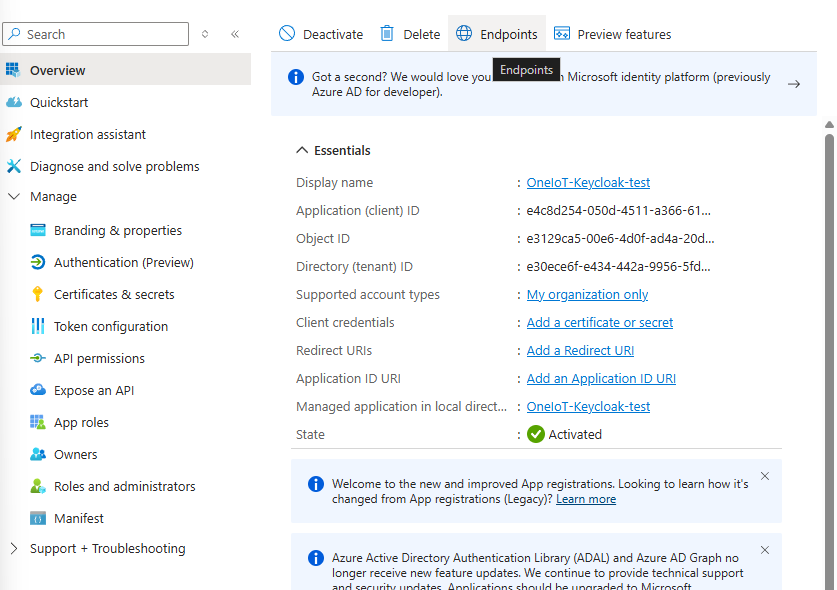
After creation, the Overview page is displayed:
| Field | Description |
|---|---|
Application (client) ID |
Unique identifier of the registered application. Will be used in Keycloak as the |
Directory (tenant) ID |
Azure AD tenant identifier. Part of the Discovery endpoint URL. |
| Keep this page open — the values above will be needed in the following steps. |
3. Part 2: Integrating Azure AD into Keycloak
For initial Keycloak setup and realm creation, see SAML SSO — Integration Guide.
The steps below must be performed for each realm (oneiot-sc and oneiot-mc).
3.1. 2.1. Creating the Identity Provider
-
Open the Keycloak Admin Console at
https://<KEYCLOAK_HOST>:8500. -
Select the target realm (e.g.,
oneiot-sc). -
In the left menu, navigate to Identity providers.
-
Click Add provider and select OpenID Connect v1.0.
-
In the Alias field, change the default value from
oidctomicrosoft.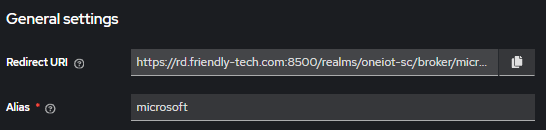
Changing the Alias is mandatory. The Alias determines the broker endpoint URL path. -
The Redirect URI field at the top is auto-generated based on the Alias. Copy this value — it will be added to Azure in the next step.
3.2. 2.2. Adding the Redirect URI in Azure
-
Go back to the Azure App Registration Overview page.
-
Click Add a Redirect URI.
-
Click Add a platform and select Web.
-
Paste the Redirect URI copied from Keycloak.
-
Click Save.
Repeat steps 2.1—2.2 for the second realm (e.g., oneiot-mc), so that Azure has two Redirect URIs:
-
https://rd.friendly-tech.com:8500/realms/oneiot-sc/broker/microsoft/endpoint -
https://rd.friendly-tech.com:8500/realms/oneiot-mc/broker/microsoft/endpoint
3.3. 2.3. Creating a Client Secret in Azure
A Client Secret is required for Keycloak to authenticate with Azure AD. One secret is shared across both Keycloak realms.
-
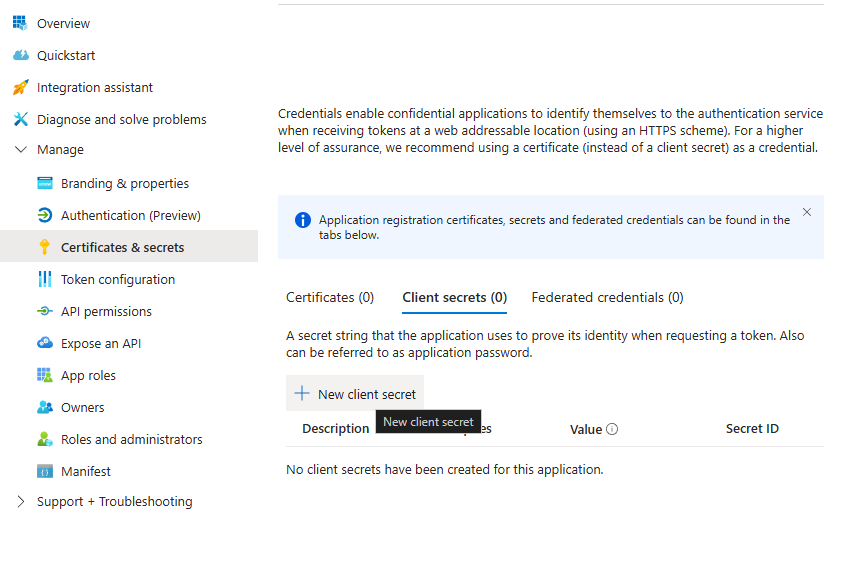
In the Azure App Registration, navigate to Manage > Certificates & secrets.
-
Go to the Client secrets tab.
-
Click + New client secret.
-
Enter a description and choose an expiration period.
-
Click Add.
| Copy the secret Value immediately after creation. It is only displayed once. If you lose it, you will need to create a new one. |
3.4. 2.4. Obtaining the Discovery Endpoint from Azure
-
Go back to the Azure App Registration Overview page.
-
Click the Endpoints button in the top toolbar.
-
Copy the OpenID Connect metadata document URL.
The URL format is:
https://login.microsoftonline.com/<TENANT_ID>/v2.0/.well-known/openid-configuration
3.5. 2.5. Completing the Identity Provider Configuration in Keycloak
Go back to the Keycloak Identity Provider configuration page and fill in the remaining fields:
-
Discovery endpoint — paste the OpenID Connect metadata document URL from Azure.

-
Client ID — enter the Application (client) ID from the Azure App Registration Overview.
-
Client Secret — enter the secret Value created in Azure.

-
Click Save.
Repeat this step for the second realm using the same Discovery endpoint, Client ID, and Client Secret.
After completing both realms, each Keycloak realm should have a configured microsoft Identity Provider linked to the same Azure AD application.
3.6. 2.6. Configuring Identity Provider Mappers
Mappers define how user attributes from Azure AD are imported into Keycloak. This configuration must be done in both realms on each Identity Provider.
-
Open the Identity Provider (
Login with Microsoft). -
Go to the Mappers tab.
-
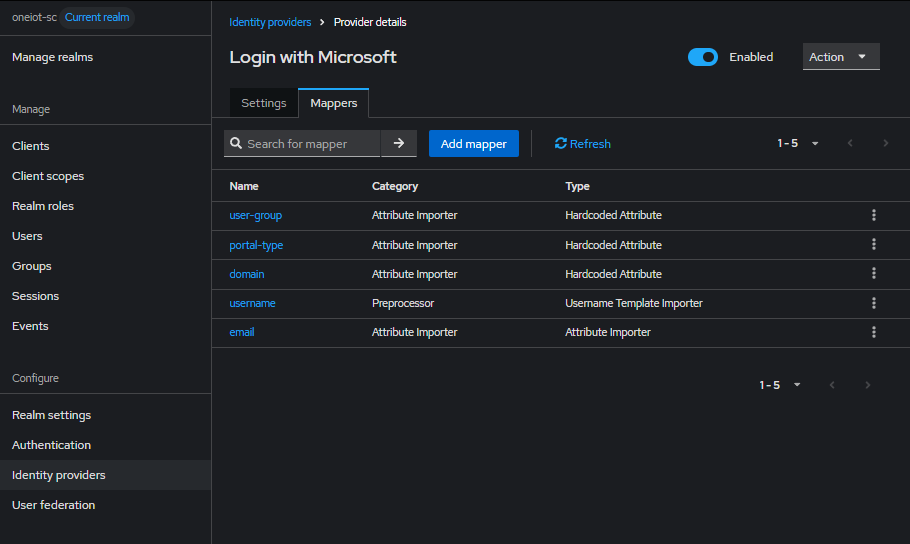
Click Add mapper and create the mappers described below.
After all mappers are created, the list should look like this:
3.6.1. email
Imports the user email from Azure AD.
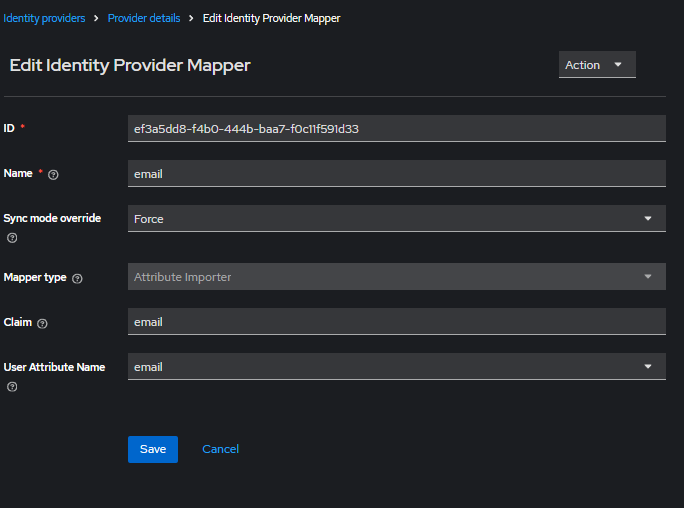
Name |
|
Sync mode override |
|
Mapper type |
|
Claim |
|
User Attribute Name |
|
3.6.2. username
Sets the Keycloak username based on the email claim from Azure AD.
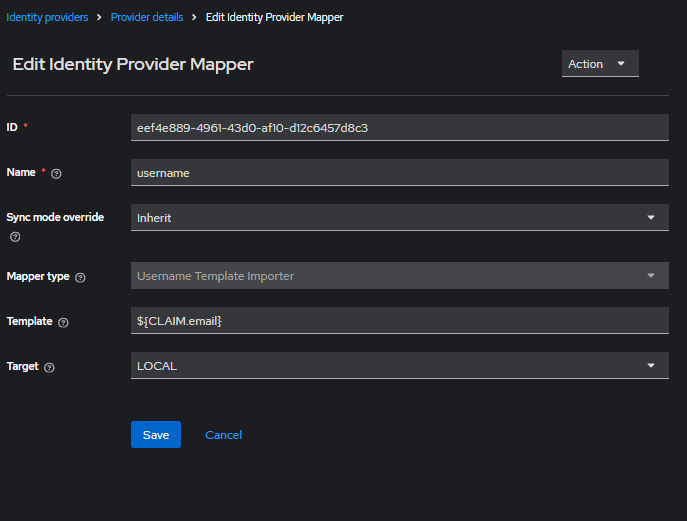
Name |
|
Sync mode override |
|
Mapper type |
|
Template |
|
Target |
|
3.6.3. portal-type
A hardcoded attribute that defines which portal the user belongs to. This value is not provided by Azure AD — it is assigned by default for every user logging in through this realm.
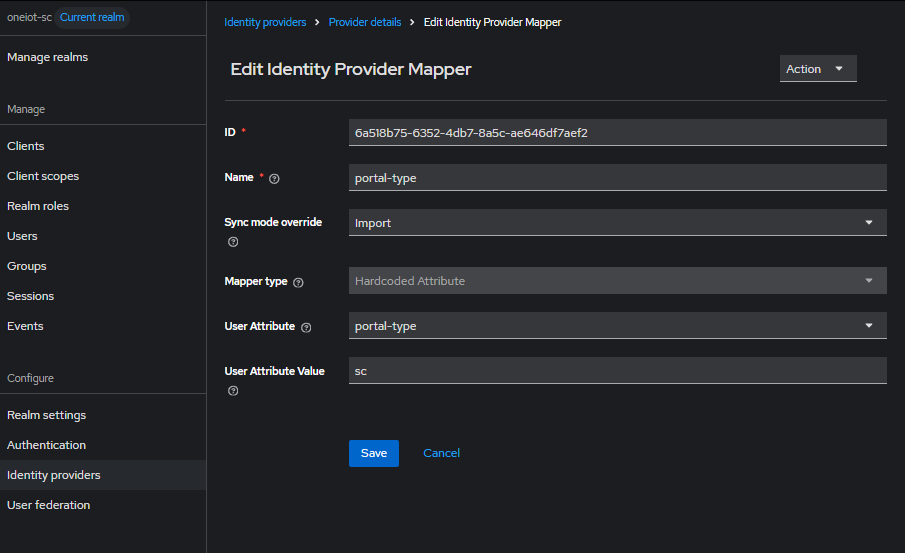
Name |
|
Sync mode override |
|
Mapper type |
|
User Attribute |
|
User Attribute Value |
|
In the oneiot-sc realm set the value to sc. In the oneiot-mc realm set the value to mc.
|
3.6.4. user-group
A hardcoded default user group assigned to every new user. The value must match an existing user group name in the OneIoT application database. Can be changed later by an administrator.
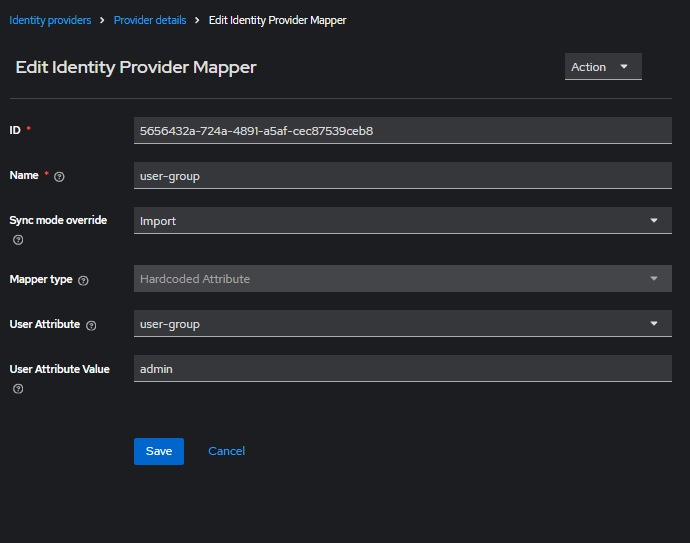
Name |
|
Sync mode override |
|
Mapper type |
|
User Attribute |
|
User Attribute Value |
|
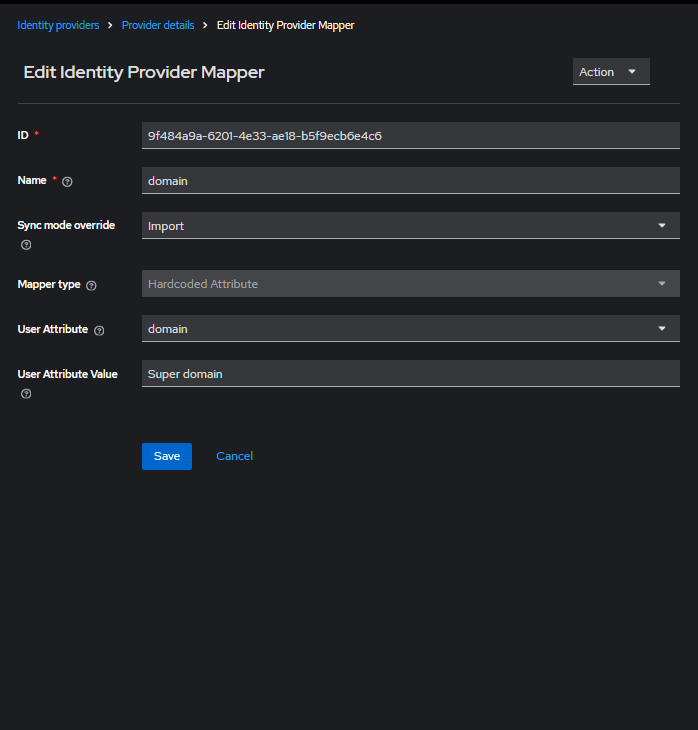
3.6.5. domain
A hardcoded default domain assigned to every new user. The value must match an existing domain name in the OneIoT application database. Can be changed later by an administrator.
Name |
|
Sync mode override |
|
Mapper type |
|
User Attribute |
|
User Attribute Value |
|
The portal-type, user-group, and domain mappers use Hardcoded Attribute type because these values are not provided by Azure AD. They serve as defaults for the OneIoT application and can be changed by an administrator after the user is created.
|
4. Part 3: Configuring Authentication Flows
All authentication flow settings described below must be configured in each realm separately.
4.1. 3.1. Browser Flow — Auto-redirect to Azure AD
By default, Keycloak shows its own login page. To skip it and redirect users directly to the Azure AD login page, create a custom Browser flow.
-
In the left menu, navigate to Authentication.
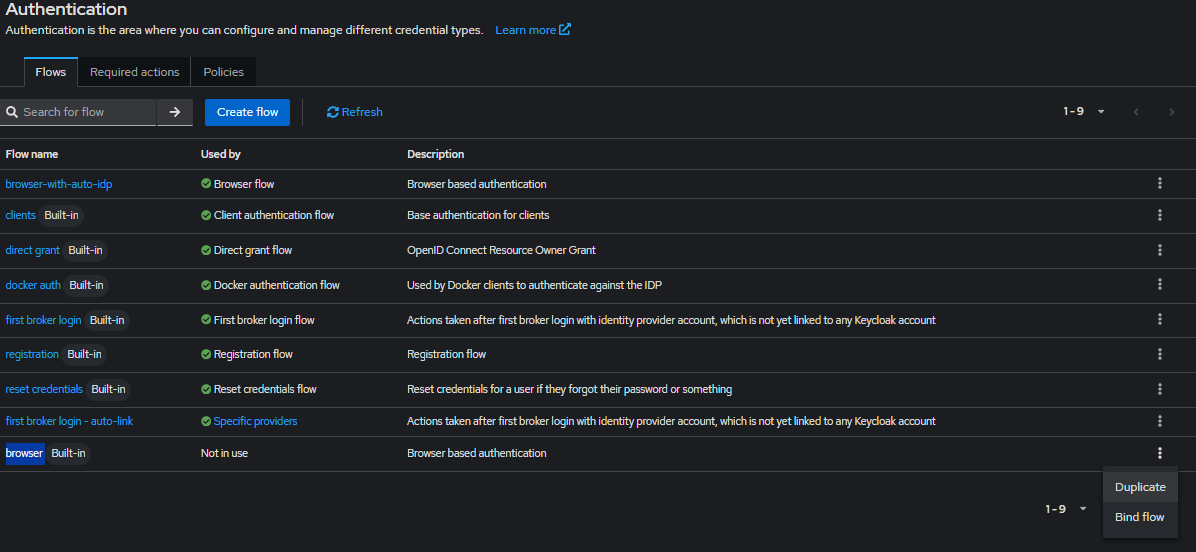
-
Find the browser flow in the list.
-
Click the three-dot menu on the right and select Duplicate.
-
Enter a name for the new flow (e.g.,
browser-with-auto-idp) and click Duplicate. -
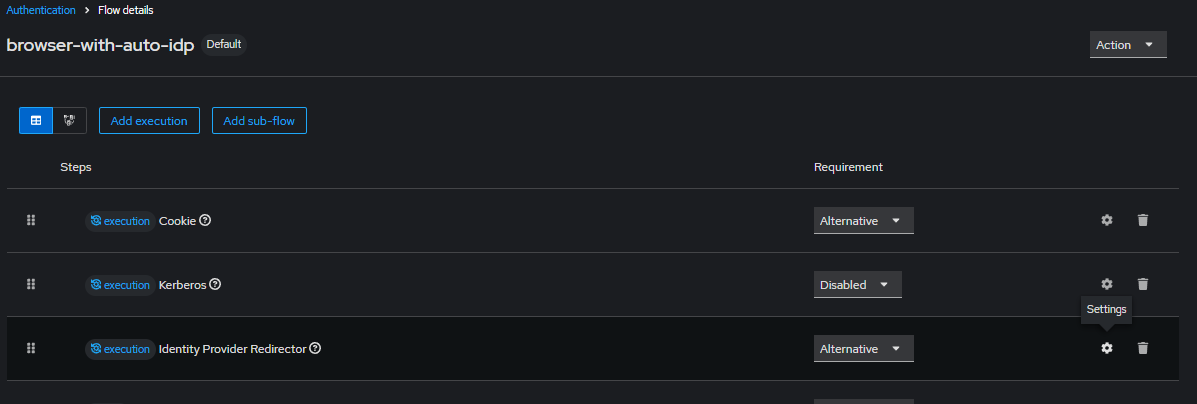
Open the new flow.
-
Click the gear icon on the Identity Provider Redirector step.
-
In the configuration dialog, set Default Identity Provider to
microsoft(the same Alias used when creating the Identity Provider).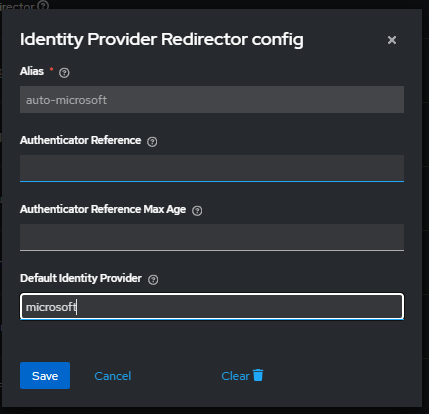
-
Click Save.
-
Go back to the Authentication flows list.
-
Find the
browser-with-auto-idpflow, click the three-dot menu and select Bind flow.
-
Select Browser flow and confirm.
After binding, the Authentication page should show browser-with-auto-idp as the active Browser flow:
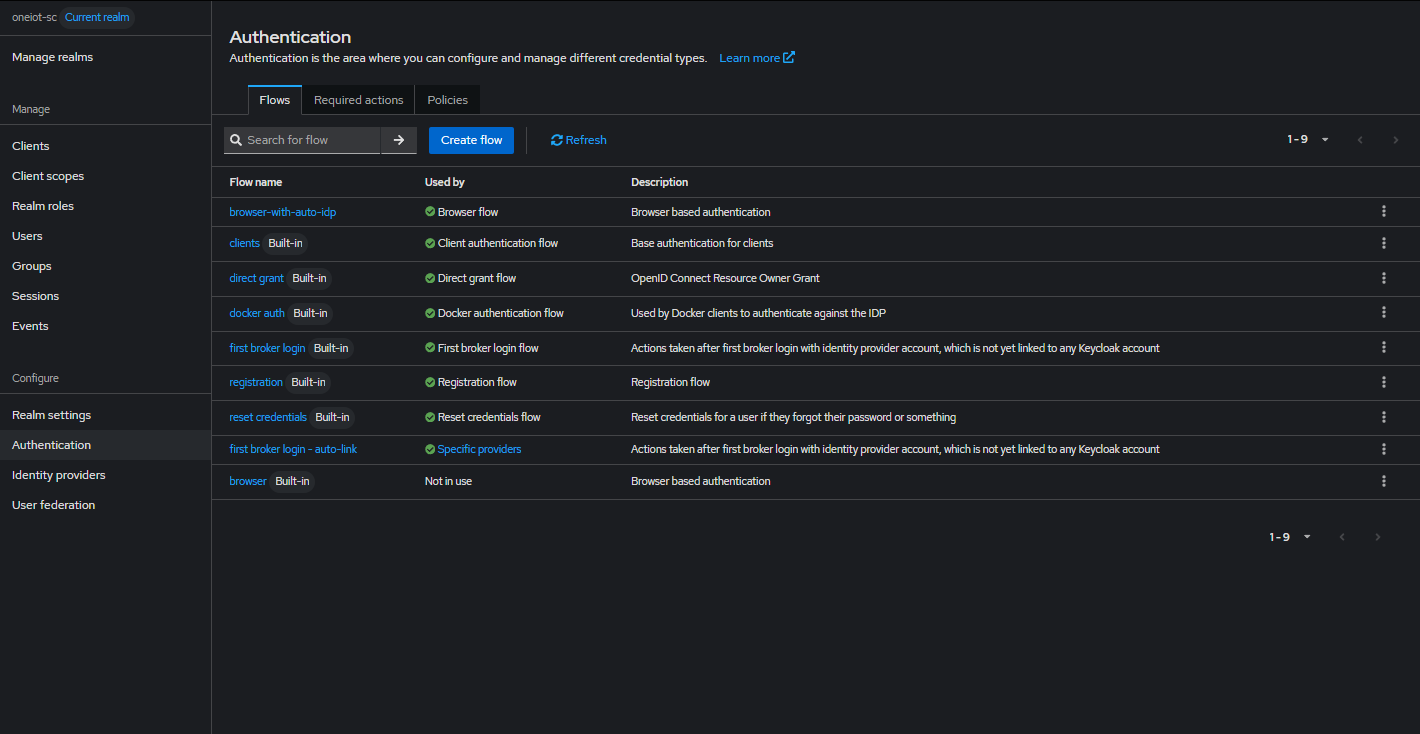
4.2. 3.2. Identity Provider — Prompt Setting
To configure how Azure AD prompts users during login:
-
Open the Identity Provider (
microsoft) in the current realm. -
Scroll down and expand the Advanced section.
-
Find the Prompt dropdown and select the preferred option.
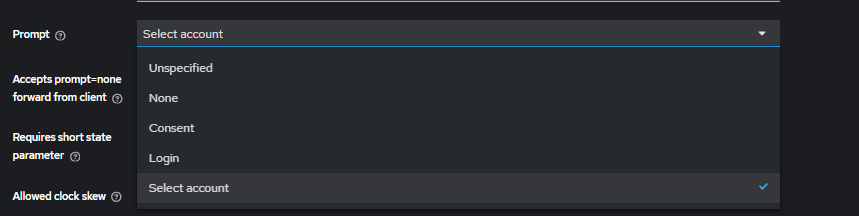
Option Behavior Select accountAzure AD shows a list of logged-in Microsoft accounts and allows choosing another one. Recommended.
LoginAlways shows the Azure AD login form, even if the user is already signed in.
ConsentAsks the user for consent to share data with the application.
NoneNo prompt — silently authenticates if a session exists.
Select account is recommended because it allows users to choose between multiple Microsoft accounts or log in with a different one.
|
4.3. 3.3. First Broker Login Flow — Auto-link Users
By default, when a user logs in via Azure AD for the first time, Keycloak asks to review the profile and verify the email. Since Keycloak acts only as a broker and we trust Azure AD to verify users, these steps should be disabled.
-
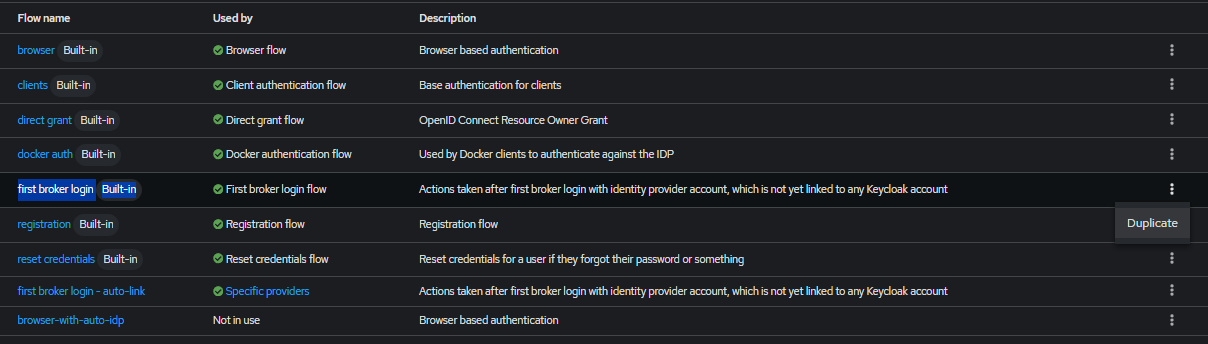
In the Authentication flows list, find the first broker login flow.
-
Click the three-dot menu and select Duplicate.
-
Enter a name (e.g.,
first broker login - auto-link) and click Duplicate.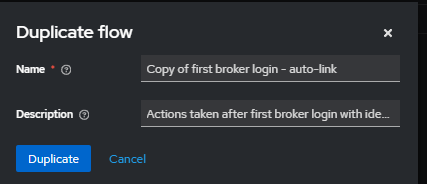
-
Open the new flow and change the following steps to Disabled:
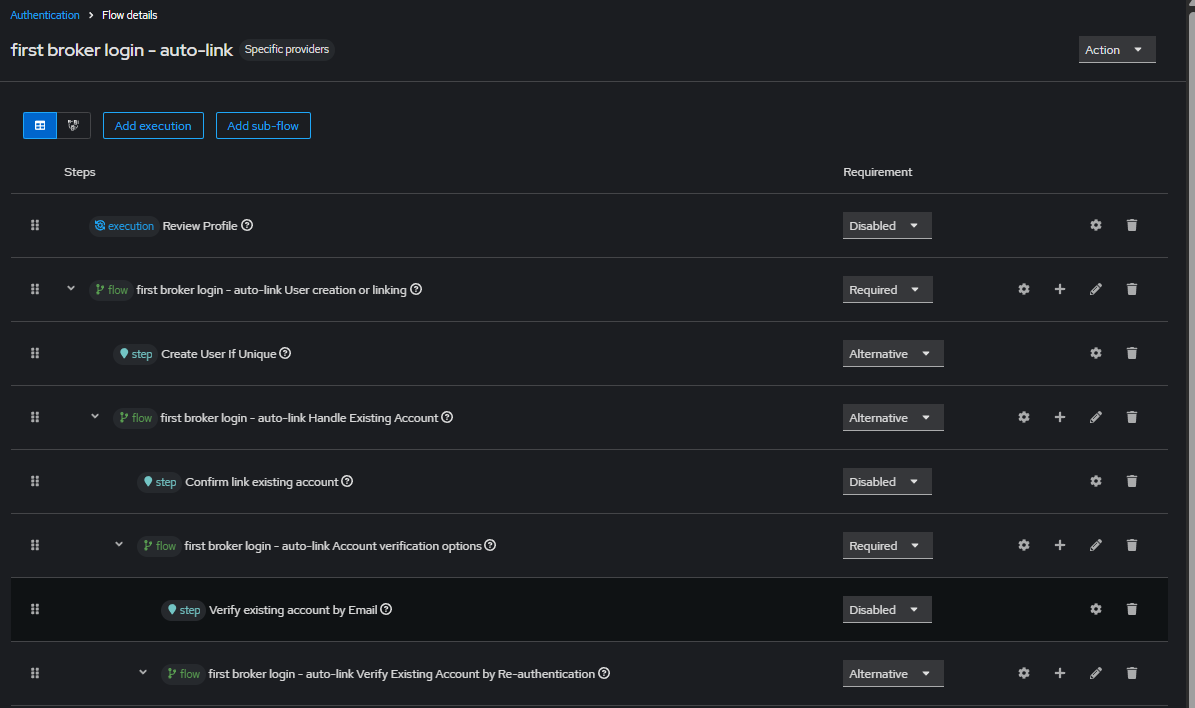
Step Set to Reason Review Profile
DisabledUsers should not be asked to fill in profile fields on first login.
Confirm link existing account
DisabledSkip the confirmation prompt when linking to an existing account.
Verify existing account by Email
DisabledSkip email verification — Azure AD already verified the user.
-
Save the flow.
4.4. 3.4. Assigning the First Login Flow to the Identity Provider
-
Open the Identity Provider (
microsoft) settings. -
Scroll down to the First login flow override field.
-
Select the newly created flow (
first broker login - auto-link).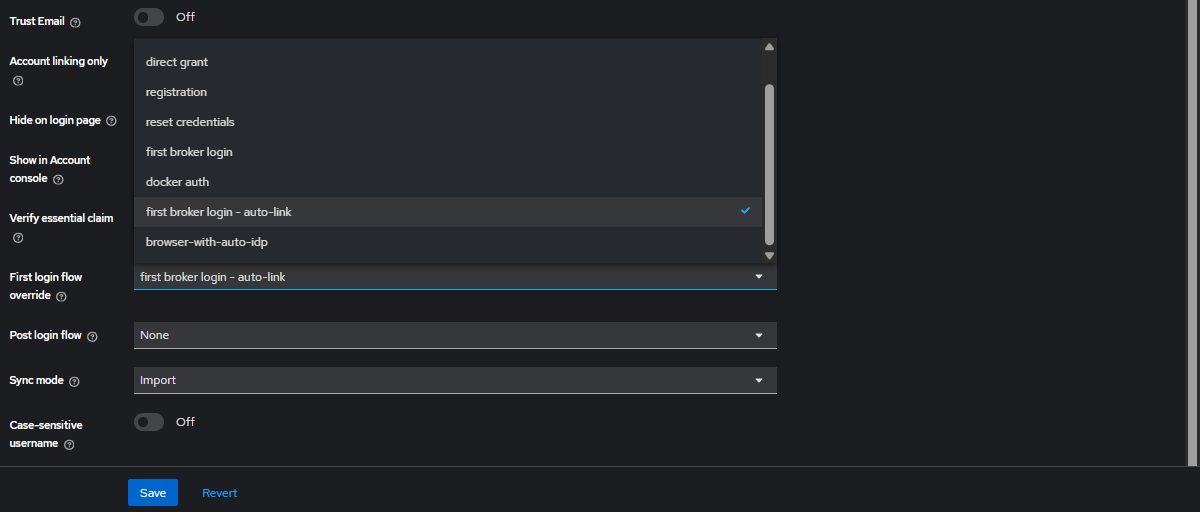
-
Click Save.
| Both authentication flows (Browser flow and First login flow) must be configured in each realm separately. Repeat all steps from 3.1 to 3.4 for the second realm. |
5. Part 4: Managing Users in Keycloak
5.1. User Attributes
Users created through the Azure AD broker will automatically receive the default attribute values configured in the Identity Provider Mappers
-
portal-type—scormcdepending on the realm -
user-group— default group (e.g.,admin) -
domain— default domain (e.g.,Super domain)
These values can be changed by an administrator at any time.
5.2. Editing User Attributes
-
In the left menu, navigate to Users.
-
Select the user.
-
Go to the Attributes tab.
-
Update the attribute values as needed and click Save.
5.3. Terminating User Sessions
-
In the left menu, navigate to Users.
-
Select the user.
-
Go to the Sessions tab.
-
Click Sign out to terminate the active session.
5.4. Deleting Users
-
In the left menu, navigate to Users.
-
Select the user.
-
Click Delete and confirm.
| Each realm manages its users independently. Changes made in one realm do not affect the other. |
5.5. Recommendations
-
The default mapper values (
admin/Super domain) create administrator-level users. If your organization has pre-configured user groups or domains for new users, specify those names in the mapper configuration instead. -
User attributes (
user-group,domain,portal-type) can be changed by an administrator in two clicks through the Keycloak user’s Attributes tab. -
To restrict access for a specific user, change their
user-groupattribute to a group with limited permissions in the application.