SAML SSO Docker Deployment Guide
| Parameter | Value |
|---|---|
Application version |
Spring Boot 3.5.6 / Java 25 |
Identity Provider |
Keycloak 26.0 (Docker) |
Standard |
SAML 2.0, HTTP POST Binding |
Networking |
Docker Compose with shared bridge network |
1. Overview
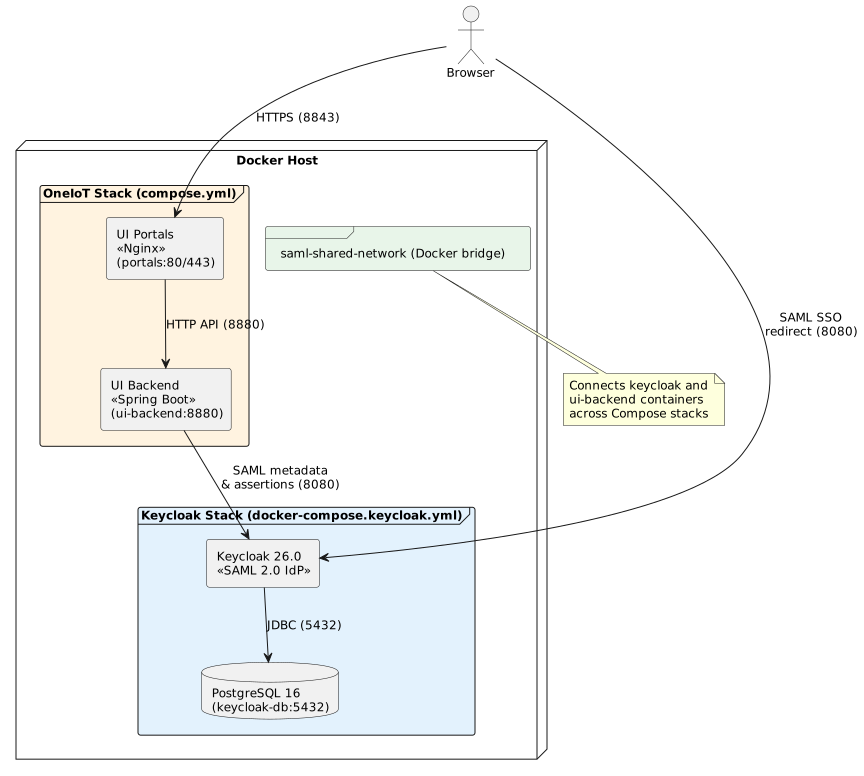
This guide covers deploying Keycloak (as a test Identity Provider) in Docker alongside the OneIoT backend, with full SAML SSO configuration. Both services run in separate Docker Compose stacks connected via a shared Docker network, allowing container-to-container communication by hostname.
The deployment consists of two independent Compose stacks:
-
Keycloak stack — Keycloak IdP + PostgreSQL database for Keycloak metadata storage
-
OneIoT stack — UI Backend (Spring Boot) + UI Portals (Nginx), using the existing
compose.yml
A shared Docker bridge network (ft-shared-network) connects the two stacks, enabling the backend to reach Keycloak for SAML metadata exchange and assertion verification.
2. Prerequisites
-
Docker Engine 24+ and Docker Compose v2+ installed on the deployment host.
-
OneIoT backend Docker image built and available locally or in a registry.
-
Prepare and build the all in one compose file from:
FT_DISK → prerelease → ONE IOT UI → docker → all in one → saml
docker compose up -d-
Basic familiarity with SAML SSO concepts. See SAML SSO Integration Guide for a full description of the authentication flow, attribute mapping, and architecture.
-
IdP signing certificates exported for both portals (
sc-idp.crt,mc-idp.crt) — see Exporting IdP Signing Certificate.
3. Keycloak Docker deployment
3.1. Docker Compose for Keycloak
Run compose-saml.yml with the following content:
version: "3.9"

networks:
  ft-network:
    name: ft-shared-network
    driver: bridge

services:
  keycloak:
    image: quay.io/keycloak/keycloak:latest
    command: start --hostname=https://<DOCKER_HOST>:8500
    volumes:
     - ./<YOUR.crt>.crt:/opt/keycloak/conf/server.crt
     - ./<YOUR.key>.key:/opt/keycloak/conf/server.key
    environment:
      KC_LOG_LEVEL: "INFO,org.keycloak.protocol.saml:DEBUG,org.keycloak.saml:DEBUG,org.keycloak.events:DEBUG"
      KEYCLOAK_ADMIN: admin
      KEYCLOAK_ADMIN_PASSWORD: admin
      KC_HTTPS_CERTIFICATE_FILE: /opt/keycloak/conf/server.crt
      KC_HTTPS_CERTIFICATE_KEY_FILE: /opt/keycloak/conf/server.key
    ports:
      - "8500:8443"
    networks:
- ft-network| <DOCKER_HOST> should be replaced with valid hostname or IP |
The start-dev command runs Keycloak in development mode — no TLS, no hostname verification, relaxed security. In production, use the start command with proper TLS certificates and a production database. See the Keycloak production configuration guide.
|
The ft-network is a named bridge network (ft-shared-network) that will be shared with the OneIoT backend stack. Keycloak is attached to both keycloak-internal (for PostgreSQL access) and ft-network (for backend communication).
|
The Keycloak Admin Console will be available at http://<DOCKER_HOST>:<KEYCLOAK_PORT>/admin with the credentials defined in KEYCLOAK_ADMIN / KEYCLOAK_ADMIN_PASSWORD.
|
3.2. Starting Keycloak
# Start the Keycloak stack in detached mode
docker compose -f compose-saml.yml up -d

# Verify container are running and healthy
docker compose -f compose-saml.yml ps

# Check Keycloak startup logs
docker logs keycloak --tail 50
Open the Admin Console in your browser:
https://localhost:8500/admin
Log in with admin / admin (default credentials from the compose file).
3.3. Keycloak configuration
| For detailed step-by-step instructions on configuring Keycloak as a SAML IdP, see SAML SSO Setup — Keycloak setup (test IdP). |
The following configuration steps must be completed in the Keycloak Admin Console. The SC and MC portals use two separate realms, each containing a single SAML client:
-
Create two realms in Realm settings:
-
oneiot-sc— for the Support Center portal -
oneiot-mc— for the Management Console portal
-
-
Create one SAML client per realm:
-
In realm
oneiot-sc: clientoneiot-sp-sc(Client typeSAML) -
In realm
oneiot-mc: clientoneiot-sp-mc(Client typeSAML)
-
-
Disable Client signature required on the Keys tab of each client.
-
Export IdP signing certificates — in each realm’s Realm Settings > Keys, export the
RS256signing certificate and save it assc-idp.crt(fromoneiot-sc) andmc-idp.crt(fromoneiot-mc). See Exporting IdP Signing Certificate. -
Configure User Profile attributes in each realm — add
domain,user-group, andportal-typeat Realm Settings → User profile (repeat per realm). -
Create test users in each realm with the custom attributes filled in at Users → Create user.
-
Create Protocol Mappers for the dedicated client scope of each client —
username,email,domain,user-group,portal-typeat Clients →oneiot-sp-sc/oneiot-sp-mc→ Client scopes →oneiot-sp-sc-dedicated /oneiot-sp-mc-dedicated → Configure new mapper → User Attribute.
When setting the
Master SAML Processing URL and for example https://<UI_HOST>:8843/iot-webservice/login/saml2/sso/saml-support-portal or saml-management-portal
Valid Redirect URIs for example https://<UI_HOST>:8843/iot-webservice/*
in Keycloak, use the
externally accessible
URL of the UI (the same value as SAML_REDIRECT_HOST=https://<UI_HOST>:8843/),
not the Docker-internal hostname.
|
4. Backend deployment with SAML
4.1. Connecting to the shared network
The existing OneIoT backend compose.yml (located at iot-web-app-build/docker/compose.yml) must be connected to the same Docker network as Keycloak so the backend container can reach Keycloak by its container name.
4.1.1. Option A: Modify compose.yml (recommended)
Add the external network declaration and attach the ui-backend service to it:
# Add to the top-level networks section of compose.yml:
networks:
  ft-network:
    external: true
    name: ft-shared-network

# Add network membership to ui-backend service:
services:
  ui-backend:
    networks:
      - ft-network
      - default
    # ... rest of the service definition ...
4.2. SAML environment variables
The following environment variables control SAML SSO behavior. They are passed to the backend via the .env.saml file.
| Environment variable | YAML path | Default value | Description |
|---|---|---|---|
|
|
|
Enables/disables SAML SSO. When |
|
|
— (required) |
Base application URL used to construct redirect links and the ACS URL. Example: |
|
|
|
Service Provider Entity ID for the Support Center portal. |
|
|
— (required when SAML enabled) |
IdP Entity ID used by the Support Center portal. Example: |
|
|
— (required when SAML enabled) |
IdP Single Sign-On URL used by the Support Center portal. Example: |
|
|
|
Service Provider Entity ID for the Management Console portal. |
|
|
— (required when SAML enabled) |
IdP Entity ID used by the Management Console portal. |
|
|
— (required when SAML enabled) |
IdP Single Sign-On URL used by the Management Console portal. |
|
|
|
Name of the SAML attribute containing the username. |
|
|
|
Name of the SAML attribute containing the user email. |
|
|
|
Name of the SAML attribute determining the portal type ( |
|
|
|
Name of the SAML attribute containing the user domain. The value must match the domain name in the database. |
|
|
|
Name of the SAML attribute containing the user group. The value must match the group name in the database. |
|
|
|
Name of the SAML attribute with the account expiration date. Formats: ISO-8601 ( |
The IdP signing certificate paths are not exposed as environment variables. They are fixed to ${app.home}/conf/sc-idp.crt (Support Center) and ${app.home}/conf/mc-idp.crt (Management Console). In Docker, ${app.home} is /opt/app, so the files must be mounted into /opt/app/conf/sc-idp.crt and /opt/app/conf/mc-idp.crt — see Certificate mount.
|
4.3. Post-authentication redirect URLs
After successful SAML authentication, the backend redirects the browser to the frontend with a JWT token and session hash as query parameters.
| Portal | URL | Configuration |
|---|---|---|
SC |
|
|
MC |
|
|
The frontend receives the JWT token and session hash as query parameters:
https://portal.example.com/support-portal/login/auth-callback?token=eyJhbG...&sessionHash=BASE64...
4.4. .env.saml configuration file
The project includes a template SAML environment file at iot-web-app-build/docker/.env.saml. Copy this file and fill in the values for your deployment.
Below is a complete filled-in example for a Docker deployment where Keycloak runs in the same Docker host:
# ==========================================================
# SAML Configuration for Docker Deployment
# ==========================================================

SAML_ENABLED=true
SAML_REDIRECT_HOST=https://<DOCKER_HOST>:8843

# --- SC (Support Center) registration ---
SAML_SC_SP_ENTITY_ID=oneiot-sp-sc
SAML_SC_IDP_ENTITY_ID=https://<DOCKER_HOST>:8500/realms/oneiot-sc
SAML_SC_IDP_SSO_URL=https://<DOCKER_HOST>:8500/realms/oneiot-sc/protocol/saml

# --- MC (Management Console) registration ---
SAML_MC_SP_ENTITY_ID=oneiot-sp-mc
SAML_MC_IDP_ENTITY_ID=https://<DOCKER_HOST>:8500/realms/oneiot-mc
SAML_MC_IDP_SSO_URL=https://<DOCKER_HOST>:8500/realms/oneiot-mc/protocol/saml

# --- Attribute mapping (defaults shown) ---
SAML_ATTR_USERNAME=username
SAML_ATTR_EMAIL=email
SAML_ATTR_CLIENT_TYPE=portal-type
SAML_ATTR_DOMAIN=domain
SAML_ATTR_USER_GROUP=user-group
SAML_ATTR_EXPIRE_DATE=expire-date
The SC and MC portals use two separate Keycloak realms (oneiot-sc and oneiot-mc in this example). Each realm has its own signing key, so the exported certificates must be placed in sc-idp.crt and mc-idp.crt respectively. SC and MC success-redirect URLs are built from SAML_REDIRECT_HOST automatically — no separate SAML_SUCCESS_REDIRECT / SAML_MC_SUCCESS_REDIRECT variables are needed.
|
4.5. Certificate mount
SAML IdP certificates must be mounted into the backend container. The application loads them from ${app.home}/conf/ (i.e. /opt/app/conf/ inside the container).
Place the certificate files in the ui-backend-conf/ directory on the host — this directory is mounted into /opt/app/conf by the backend container (see the volumes: section of compose.yml):
| File | Purpose | Format | Required |
|---|---|---|---|
|
Support Center IdP signing certificate (exported from the SC realm in Keycloak) |
X.509 PEM |
true (when |
|
Management Console IdP signing certificate (exported from the MC realm in Keycloak) |
X.509 PEM |
true (when |
| No SP key/certificate is required. The application does not sign outgoing AuthnRequests, so no SP signing credential is configured. |
Each certificate must be in X.509 PEM format:
-----BEGIN CERTIFICATE-----
MIICnTCCAYUCBgGE... (base64-encoded certificate data)
...
-----END CERTIFICATE-----
Each certificate MUST include the -----BEGIN CERTIFICATE----- and -----END CERTIFICATE----- header/footer lines. If both portals share the same Keycloak realm, the same content is written to both sc-idp.crt and mc-idp.crt. See Exporting IdP Signing Certificate for how to obtain them.
|
4.6. Starting the backend with SAML
Follow this sequence to start the full deployment:
# 1. Ensure Keycloak is running and healthy
docker compose -f compose-saml.yml ps
# Expected: keycloak (healthy), if exist: keycloak-db (healthy)

# 2. Verify the shared network exists
docker network ls | grep ft-shared-network

# 3. Start the backend stack with both env files
cd iot-web-app-build/docker
docker compose --env-file .env.mysql --env-file .env.saml up -d

# 4. Verify the backend can reach Keycloak via the shared network
docker exec <backend-container> curl -s http://keycloak:8080/realms/oneiot-sc/.well-known/openid-configuration | head -5

# 5. Verify SAML metadata is published by the backend
curl http://localhost:8880/iot-webservice/saml2/metadata/saml-support-portal
If step 4 fails with "Could not resolve host: keycloak", the backend container is not connected to ft-shared-network. See Connecting to the shared network or run docker network connect ft-shared-network <backend-container>.
|
5. Shared Docker network setup
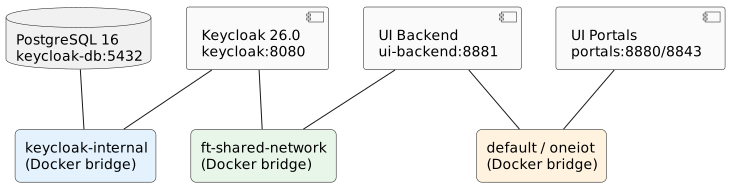
5.1. How it works
When two Docker Compose stacks need to communicate, they must share a common Docker network. Each Compose stack creates its own isolated default network, so containers from different stacks cannot reach each other unless explicitly connected.
In this deployment:
-
The Keycloak stack creates the
ft-shared-networkbridge network (defined asft-networkwithname: ft-shared-network). -
The OneIoT backend stack joins this network as an
externalnetwork. -
Containers on the shared network can reach each other by container name — Docker’s embedded DNS server resolves container names to IP addresses within the same network.
5.2. Network topology diagram
| Network | Scope | Connected containers |
|---|---|---|
|
Cross-stack communication |
|
|
Keycloak stack internal |
|
|
OneIoT stack internal |
|
5.3. Verifying network connectivity
# Check that the shared network exists
docker network inspect saml-shared-network

# List containers connected to the shared network
docker network inspect saml-shared-network --format '{{range .Containers}}{{.Name}} {{end}}'

# Test DNS resolution from the backend container
docker exec <backend-container> ping -c 3 keycloak

# Test Keycloak SAML descriptor endpoint from the backend container
docker exec <backend-container> curl -sf http://keycloak:8080/realms/oneiot-sc/protocol/saml/descriptor | head -5
5.4. Troubleshooting network issues
5.4.1. "SAML signature validation failed"
Cause: The sc-idp.crt or mc-idp.crt file mounted into the backend container does not match the current signing key of the corresponding Keycloak realm.
Solution:
-
Identify which portal is failing (SC or MC) from the failure URL / stack trace.
-
Re-export the IdP signing certificate from the affected realm (see Exporting IdP Signing Certificate).
-
Replace the
sc-idp.crtormc-idp.crtfile on the host inui-backend-conf/. -
Restart the backend container:
docker compose restart ui-backend
5.4.2. "Invalid redirect URI" in Keycloak
Cause: The SAML_REDIRECT_HOST value does not match the Valid Redirect URIs configured in the Keycloak SAML client.
Solution:
-
Open the Keycloak Admin Console > Clients >
oneiot-sp-sc(oroneiot-sp-mc). -
Verify that Valid Redirect URIs includes the redirect URL pattern, e.g.
https://portal.example.com/*. -
Verify that Master SAML Processing URL matches the ACS URL pattern:
https://portal.example.com/iot-webservice/login/saml2/sso/saml-support-portal.
6. Complete deployment example
This section provides a full end-to-end walkthrough for deploying Keycloak and the OneIoT backend with SAML SSO enabled.
6.1. Directory structure
Prepare the following directory structure on the deployment host:
/usr/local/ft-services/
├── compose-saml.yml                     # Keycloak stack (from this guide)
├── compose.yml                          # OneIoT stack (from iot-web-app-build/docker/)
├── .env.mysql                           # Database env (from iot-web-app-build/docker/)
├── .env.saml                            # SAML env (filled in from template)
├── ui-backend-conf/
│   ├── hazelcast-client.xml             # Main Hazelcast client configuration
│   ├── ftacs.keystore                   # Backend keystore used when HTTPS is enabled
│   ├── logback-spring.xml               # Default external logging configuration
│   ├── interfaceItems.json              # Interface seed data, loaded if present
│   ├── sc-idp.crt                       # Exported from the SC Keycloak realm
│   ├── mc-idp.crt                       # Exported from the MC Keycloak realm
│   ├── customization/
│   │   ├── def/
│   │   ├── mc/
│   │   └── sc/
│   └── ssl/                             # HTTPS certificates for Nginx/portals when configured
└── ft-data/ui-portals/
    ├── backend/logs/
    └── nginx/logs/
6.2. Verification checklist
After completing the deployment, verify each item:
| # | Check | Command |
|---|---|---|
1 |
Keycloak Admin Console is accessible |
Open |
2 |
Keycloak realms |
Check in Admin Console |
3 |
SAML clients are configured (one per realm) |
Check |
4 |
Shared Docker network exists |
|
5 |
Backend container is on the shared network |
|
6 |
Backend can resolve Keycloak hostname |
|
7 |
Backend SAML metadata is published |
|
8 |
IdP certificates match Keycloak |
Compare |
9 |
SAML login URL endpoint responds |
|
10 |
Auth type returns |
|
7. Appendix: Full docker-compose example with SAML
Below is the complete compose.yml with all SAML modifications applied — external network, env file reference, and certificate volume mounts:
version: "3.8"
name: ft-ui-portals

networks:
  ft-network:                                     (1)
    external: true
    name: ft-shared-network

services:
  ui-backend:
    image: hub.friendly-tech.com/ui/backend:latest
    ports:
      - "${FT_UI_BACKEND_HTTP_PORT:-8881}:8880"
    env_file:
      - .env.mysql
      - .env.saml                                 (2)
    environment:
      USE_NOHUP: 0
      APP_HOME: "/opt/app"
      CLICKHOUSE_SCHEMA: "${CLICKHOUSE_DATABASE}"
      JAVA_OPTS: "${FT_UI_BACKEND_JAVA_RAM:--Xms512m -Xmx2g} -Duser.timezone=${TZ}"
    volumes:
      - ${DATA_FOLDER:-.}/ui-backend-conf:/opt/app/conf
      - ${DATA_FOLDER:-.}/ft-data/ui-portals/backend/logs:/opt/app/logs
    networks:                                    (4)
      - default
      - ft-network
    extra_hosts:
      - "host.docker.internal:host-gateway"
    restart: unless-stopped
    healthcheck:
      test: [ "CMD", "curl", "-f", "http://127.0.0.1:8880/iot-webservice/swagger-ui/index.html" ]
      interval: 10s
      timeout: 5s
      retries: 5
    stop_grace_period: 45s

  portals:
    image: hub.friendly-tech.com/ui/portals:latest
    depends_on:
      ui-backend:
        condition: service_healthy
    ports:
      - "${FT_UI_HTTP_PORT:-8880}:80"
      - "${FT_UI_HTTPS_PORT:-8843}:443"
    env_file:
      - .env.mysql
    volumes:
      - ${DATA_FOLDER:-.}/ft-data/ui-portals/nginx/logs:/var/log/nginx
      - ${DATA_FOLDER:-.}/ui-backend-conf/ssl:/etc/nginx/ssl:ro
    extra_hosts:
      - "host.docker.internal:host-gateway"
    restart: unless-stopped
    healthcheck:
      test: [ "CMD", "curl", "-f", "http://127.0.0.1/support-portal/index.html" ]
      interval: 10s
      timeout: 5s
      retries: 5
stop_grace_period: 45s| 1 | Declares ft-shared-network as an external network (created by the Keycloak stack). |
| 2 | Loads SAML environment variables from .env.saml in addition to the database env file. |
| 3 | Mounts SAML certificates from the host into the container at the paths expected by the application. |
| 4 | Attaches ui-backend to both the default network (for communication with portals) and ft-shared-network (for communication with keycloak). |
8. Related documentation
-
SAML SSO Integration Guide — full SAML configuration reference, authentication flow, Keycloak setup, attribute mapping
-
UI Services on Separate Host — standard Docker deployment without SAML
-
SSL / HTTPS Configuration — TLS setup for production deployments