Keycloak Deployment
| Parameter | Value |
|---|---|
Keycloak version |
26.0 (Docker) |
Storage |
Main DB (MySQL or Oracle), isolated |
Serves login types |
|
1. Overview
Keycloak is the shared identity server for every OneIoT login type that is not the
built-in database login. The same single Keycloak installation serves all of them — you deploy it once (this document) and then configure it per login type in the
matching guide:
| Login type | Keycloak’s role |
|---|---|
|
Keycloak is the SAML Identity Provider for the backend. Users live in Keycloak (or are brokered from an upstream IdP). See SAML SSO Setup. |
|
Keycloak is the OIDC provider; it validates credentials against Active Directory / LDAP via User Federation. See LDAP Login via Keycloak. |
|
Keycloak is the OIDC provider performing silent Kerberos SSO against AD. See Windows (AD / Kerberos) SSO. |
Azure AD |
Keycloak is the SAML IdP for the backend and brokers authentication to Azure AD (Entra ID) over OIDC. See Azure AD + Keycloak. |
|
Not used — the backend shows its own local login form and stores users in its DB. |
| This document covers only the deployment of the Keycloak container (compose, storage, TLS, networking, HA). The realm/client/mapper configuration inside the Keycloak Admin Console is described per login type in the guides linked above. |
|
Deploying on Oracle? Read this first
On an Oracle Main DB the single most common deployment failure is Keycloak refusing to start with |
2. General interaction architecture
Regardless of login type, the moving parts and their relationships are the same. The browser always talks to the OneIoT portals and backend; the backend talks to Keycloak; Keycloak talks to the Main DB (its own storage) and to the upstream user directory (local users, LDAP/AD, or Azure AD). After login the backend issues its own internal JWT and Keycloak is no longer involved.
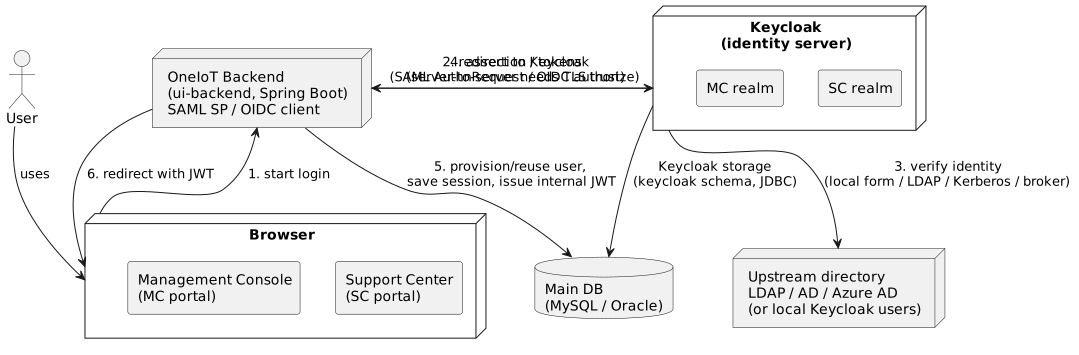
Key points:
-
The browser is redirected to Keycloak, which authenticates the user against the configured directory (local Keycloak users, LDAP/AD, Kerberos, or a brokered IdP such as Azure AD).
-
On success Keycloak returns a signed SAML assertion or OIDC tokens to the backend. For OIDC the code-for-token exchange is a server-to-server call and requires the backend to trust Keycloak’s TLS certificate.
-
The backend provisions or reuses the user in its own database and issues its own internal JWT (HS256). All later API calls use that JWT; Keycloak plays no further part.
-
Keycloak keeps its own state (realms, clients, users, sessions) in a dedicated, isolated
keycloakschema inside the Main DB.
3. Prerequisites
-
Docker Engine 24+ and Docker Compose v2+ on the deployment host.
-
The OneIoT backend image built and available (locally or in a registry), and the Main DB (MySQL or Oracle) reachable from the Keycloak container.
-
The ready-made Keycloak stack downloaded from FT_DISK (see Downloading the Keycloak stack from FT_DISK below).
3.1. Downloading the Keycloak stack from FT_DISK
All Keycloak deployment artifacts live in one FT_DISK folder — FT_DISK → prerelease → ONE_IOT_UI → docker → all-in-one → keycloak.
This is the single source for every link referenced later in this document.
| Artifact | What it is | Download |
|---|---|---|
|
The Keycloak Compose file. Run it with the DB block matching your vendor (see Docker Compose). |
|
|
Keycloak data directory, bind-mounted at |
|
|
The two pre-configured realm files |
Place compose-oidc.yml and the kc-data/ folder into the deployment directory (e.g.
/usr/local/ft-system/), next to the OneIoT compose.yml.
The same Keycloak stack serves every login type.
The Windows/Kerberos-only mounts (keycloak.keytab, krb5.conf) are shipped commented out and are enabled only for the
windows login type.
|
3.2. What each Main DB vendor requires
| Main DB | Extra step before first start |
|---|---|
MySQL |
Nothing extra — the MySQL JDBC driver is bundled in the Keycloak image. |
Oracle |
Mount the Oracle JDBC driver into |
4. Keycloak data storage
Keycloak stores its metadata (realms, clients, users, sessions) in the Main DB — the
same MySQL or Oracle instance the backend uses — always in a dedicated, isolated schema
named keycloak. There is no separate PostgreSQL container and no manual database
preparation:
-
The
ui-backendservice creates thekeycloakschema automatically via Liquibase on startup, on both vendors. -
Keycloak always connects with the default
ftacsMain DB user — no separate Keycloak login is created. -
On MySQL the schema is a database (
CREATE DATABASE keycloak), selected through the JDBC URL (…/keycloak). -
On Oracle (where a schema is a user) Liquibase creates an isolated, login-less
keycloakschema owner; Keycloak still connects asftacsand targets that schema viaKC_DB_SCHEMA=keycloak, so its tables land in thekeycloakschema — not in the sharedftacsschema.
Do not create a separate keycloak schema or DB user by hand on either vendor.
|
Upgrading an existing Oracle deployment
Before the isolated |
5. TLS certificate for Keycloak
Keycloak serves HTTPS, so it needs a certificate and a matching private key. The
certificate’s SAN must cover the hostname used in KC_HOSTNAME, otherwise the backend’s
server-to-server calls fail hostname verification even when the certificate is trusted.
Store the certificate and key in ui-backend/config/ssl/ — the directory that is
bind-mounted into the container (see the compose file below). In the standard all-in-one
stack this is the same certificate pair the portals Nginx uses (friendly.crt /
friendly.key), so Keycloak and the portals present the same certificate.
For a test environment a self-signed pair can be generated:
mkdir -p ui-backend/config/ssl
openssl req -x509 -newkey rsa:2048 -nodes -days 825 \
  -keyout ui-backend/config/ssl/server.key -out ui-backend/config/ssl/server.crt \
  -subj "/CN=<keycloak-host>" \
  -addext "subjectAltName=DNS:<keycloak-host>"
Keycloak reads the bind-mounted files at startup; if the container process cannot read them Keycloak fails to start (permission denied on the certificate/key), so grant read permissions:
chmod 644 ui-backend/config/ssl/server.crt ui-backend/config/ssl/server.key| When the backend later calls Keycloak over HTTPS (OIDC code-for-token exchange), the backend’s JVM must trust this certificate. A self-signed or private-CA certificate has to be imported into the backend truststore — see the TLS trust section of LDAP Login via Keycloak. |
6. LDAPS certificate trust (for the ldap login type)
Only the ldap login type needs this. When Keycloak validates credentials against Active
Directory over LDAPS (ldaps://<ad-host>:636), Keycloak acts as a TLS client and must
trust the AD domain controller’s certificate. Without it, Keycloak’s Test connection in
User Federation fails with a PKIX / TLS-handshake error and login never reaches AD.
This is a different certificate from Keycloak’s own HTTPS server certificate (previous section): there Keycloak presents a certificate to the browser/backend; here Keycloak trusts an outbound directory server and presents nothing.
6.1. Fetching the AD LDAPS certificate
Pull the certificate straight off the domain controller’s LDAPS port and save it as a PEM file
next to the compose file, in ui-backend/config/:
echo | openssl s_client -connect <ad-host>:636 2>/dev/null \
  | openssl x509 -out ui-backend/config/ldaps-certs.pem
<ad-host> is the AD domain controller’s address (hostname or IP), for example:
echo | openssl s_client -connect 10.0.0.10:636 2>/dev/null \
  | openssl x509 -out ui-backend/config/ldaps-certs.pem
The command opens a TLS session to the LDAPS port, extracts the presented certificate, and
writes it in PEM form. ldaps-certs.pem then sits alongside the server.crt / server.key
already in ui-backend/config/.
6.2. Mounting it and pointing Keycloak at it
Keycloak 26 trusts extra certificates through its truststore: mount the PEM into the
container and set KC_TRUSTSTORE_PATHS to it. Both compose blocks below (MySQL and Oracle)
already carry these lines commented out — uncomment them for the ldap login type:
    volumes:
      # Enable for the `ldap` login type: trust the AD LDAPS certificate
      - ./ui-backend/config/ldaps-certs.pem:/opt/keycloak/conf/ldaps-certs.pem:ro
    environment:
      # Enable for the `ldap` login type: truststore for the outbound LDAPS connection
      KC_TRUSTSTORE_PATHS: /opt/keycloak/conf/ldaps-certs.pem
KC_TRUSTSTORE_PATHS accepts a file or a directory (comma-separated for several); pointing it
at the single PEM is enough. After changing it, recreate the container
(docker compose -f compose-oidc.yml up -d) so Keycloak re-reads the truststore.
6.3. When the certificate is issued for a hostname, not an IP
LDAPS certificates are usually issued for the domain controller’s hostname (SAN =
dc01.corp.local), not its IP. If you then connect with ldaps://10.0.0.10:636, Keycloak
trusts the certificate but fails hostname verification — the IP is not in the SAN. Connect
by the certificate’s hostname instead, and map that hostname to the AD IP with a Docker
extra_hosts entry so it resolves inside the Keycloak container:
  keycloak:
    # ...
    extra_hosts:
      - "dc01.corp.local:10.0.0.10"   # the LDAPS cert's hostname -> the AD IP
Then use the matching hostname URL in Keycloak’s User Federation Connection URL:
ldaps://dc01.corp.local:636. The hostname in the Connection URL, the extra_hosts entry, and
the certificate SAN must all be the same name.
|
For LDAPS this is the only correct fix — hostname verification is strict and cannot be
relaxed. Keycloak’s general |
7. Docker Compose
Run compose-oidc.yml (download it from Downloading the Keycloak stack from FT_DISK) with the block matching your database vendor.
Placeholders:
-
<keycloak-host>/<keycloak-port>— the public hostname/port end users open in the browser; must match the host used in the login-type IdP/issuer URLs. -
<mysql-host>/<oracle-host>— the Main DB reachable from the Keycloak container.
7.1. MySQL Main DB
The MySQL JDBC driver is bundled in the image, so this block is complete as-is — no extra volume is needed.
version: "3.9"

networks:
  ft-network:
    name: ft-shared-network
    driver: bridge

services:
  keycloak:
    user: root
    image: quay.io/keycloak/keycloak:26.0
    command: start --import-realm --hostname=https://<keycloak-host>:<keycloak-port>   # 'start' for production; 'start-dev' ONLY for throwaway tests. --import-realm loads kc-data/import/*.json on first start
    volumes:
      # Keycloak data dir. Realms are imported from kc-data/import/*.json via --import-realm
      # (works on any KC_DB backend). The h2/ store here is ignored once KC_DB targets the Main DB.
      - ./kc-data:/opt/keycloak/data
      # HTTPS certificate + private key (from ui-backend/config/ssl/)
      - ./ui-backend/config/ssl/server.crt:/opt/keycloak/conf/server.crt
      - ./ui-backend/config/ssl/server.key:/opt/keycloak/conf/server.key
#     Uncomment for the LDAP login type only: trust the AD LDAPS certificate (see <<ldaps-certificate-trust>>)
#     - ./ui-backend/config/ldaps-certs.pem:/opt/keycloak/conf/ldaps-certs.pem:ro
#     Uncomment for the Windows (Kerberos) login type only:
#     - ./keycloak.keytab:/opt/keycloak/keycloak.keytab:ro
#     - ./krb5.conf:/etc/krb5.conf:ro
    environment:
      # Keycloak storage: the isolated `keycloak` schema, auto-created by ui-backend (Liquibase).
      KC_DB: mysql
      KC_DB_URL: jdbc:mysql://<mysql-host>:3306/keycloak
      KC_DB_SCHEMA: keycloak    # redundant on MySQL (schema == database, already in the URL); kept for parity with the Oracle block — must match the DB in KC_DB_URL
      KC_DB_USERNAME: ftacs
      KC_DB_PASSWORD: ftacs

      KC_HTTPS_CERTIFICATE_FILE: /opt/keycloak/conf/server.crt
      KC_HTTPS_CERTIFICATE_KEY_FILE: /opt/keycloak/conf/server.key

#     Uncomment for the LDAP login type only: truststore for the outbound LDAPS connection (see <<ldaps-certificate-trust>>)
#      KC_TRUSTSTORE_PATHS: /opt/keycloak/conf/ldaps-certs.pem

      KEYCLOAK_ADMIN: admin
      KEYCLOAK_ADMIN_PASSWORD: <admin-password>
#     Uncomment for the Windows (Kerberos) login type only:
#      KRB5_CONFIG: /etc/krb5.conf
#   Uncomment for the LDAP login type when the LDAPS cert is issued for a hostname, not an IP:
#   map the cert's hostname to the AD IP so it resolves inside the container (see <<ldaps-certificate-trust>>)
#    extra_hosts:
#      - "dc01.corp.local:<ad-ip>"
    ports:
      - "<keycloak-port>:8443"
    networks:
      - ft-network
    restart: unless-stopped
For an Oracle Main DB do not edit the block above — use the complete Oracle block in Oracle Main DB, which differs in both the KC_DB* environment and the volumes (the driver mount).
|
7.2. Oracle Main DB
Oracle needs two things MySQL does not, and missing either stops Keycloak from starting:
-
The Oracle JDBC driver mounted into
/opt/keycloak/providers/— it is not bundled in the image (see Providing the Oracle JDBC driver for how to obtain the jar). -
KC_DB_SCHEMA=keycloak— Oracle does not select the schema through the JDBC URL, so without this Keycloak creates its tables in the connecting user’s default schema instead of the isolatedkeycloakschema.
Use this complete keycloak service (both the environment and the driver volume are already in place — copy it as-is, it is not a delta on the MySQL block):
services:
  keycloak:
    user: root
    image: quay.io/keycloak/keycloak:26.0
    command: start --import-realm --hostname=https://<keycloak-host>:<keycloak-port>
    volumes:
      - ./kc-data:/opt/keycloak/data
      - ./ui-backend/config/ssl/server.crt:/opt/keycloak/conf/server.crt
      - ./ui-backend/config/ssl/server.key:/opt/keycloak/conf/server.key
      # REQUIRED on Oracle: the Oracle JDBC driver (not bundled in the image).
      # Without this line Keycloak fails to start with the checkJdbcDriver error below.
      - ./keycloak/drivers/ojdbc11.jar:/opt/keycloak/providers/ojdbc11.jar:ro
#     Uncomment for the LDAP login type only: trust the AD LDAPS certificate (see <<ldaps-certificate-trust>>)
#     - ./ui-backend/config/ldaps-certs.pem:/opt/keycloak/conf/ldaps-certs.pem:ro
    environment:
      KC_DB: oracle
      KC_DB_URL: jdbc:oracle:thin:@<oracle-host>:<oracle-port>/XEPDB1
      KC_DB_SCHEMA: keycloak          # REQUIRED on Oracle: keeps Keycloak tables in the isolated keycloak schema
      KC_DB_USERNAME: ftacs
      KC_DB_PASSWORD: ftacs

      KC_HTTPS_CERTIFICATE_FILE: /opt/keycloak/conf/server.crt
      KC_HTTPS_CERTIFICATE_KEY_FILE: /opt/keycloak/conf/server.key

#     Uncomment for the LDAP login type only: truststore for the outbound LDAPS connection (see <<ldaps-certificate-trust>>)
#      KC_TRUSTSTORE_PATHS: /opt/keycloak/conf/ldaps-certs.pem

      KEYCLOAK_ADMIN: admin
      KEYCLOAK_ADMIN_PASSWORD: <admin-password>
#   Uncomment for the LDAP login type when the LDAPS cert is issued for a hostname, not an IP:
#   map the cert's hostname to the AD IP so it resolves inside the container (see <<ldaps-certificate-trust>>)
#    extra_hosts:
#      - "dc01.corp.local:<ad-ip>"
    ports:
      - "<keycloak-port>:8443"
    networks:
      - ft-network
    restart: unless-stopped
Adjust KC_DB_URL, the port, and the Oracle service name (XEPDB1) to match your Main DB.
Reuse the networks: block from the MySQL example above.
|
Troubleshooting:
Unable to find the JDBC driver (oracle.jdbc.driver.OracleDriver)If Keycloak on Oracle crashes at startup with: the driver volume above is missing. Add it and restart the stack. Because the container never becomes healthy, an automated (Jenkins) deploy does not show this message directly — it waits on the health poll and then aborts with
|
7.2.1. Providing the Oracle JDBC driver
The Oracle driver is proprietary and not shipped in the official Keycloak image, so it must be mounted into /opt/keycloak/providers/ (the volume in the block above) and picked up by Keycloak’s build step.
You do not need to download anything: the OneIoT backend already ships the Oracle driver it uses to talk to Oracle — ojdbc11 — in its ext/ directory.
Reuse that exact jar for
Keycloak; it is a current driver validated against the same Oracle targets as the application.
-
Get the jar from the backend’s
ext/directory:-
Dist / non-Docker deployment: it is already on disk at
${APP_HOME}/ext/ojdbc11-*.jar— use it directly. -
Docker deployment: it is baked into the backend image at
/opt/app/ext/(not a host volume), so copy it out to the host once, next to the compose file:# find the exact driver version shipped in the backend image docker exec <ui-backend-container> ls /opt/app/ext/ | grep ojdbc # copy that jar to the host, next to compose-oidc.yml mkdir -p ./keycloak/drivers docker cp <ui-backend-container>:/opt/app/ext/ojdbc11-<version>.jar ./keycloak/drivers/ojdbc11.jar
-
-
The
./keycloak/drivers/ojdbc11.jar:/opt/keycloak/providers/ojdbc11.jar:rovolume in the Oracle block above then exposes it inside the container. Usingcommand: start(the recommended production mode) triggers a build on startup that augments the image with the driver inproviders/, so no separatekc.sh buildstep is needed.
ojdbc11 targets JDK 11+ and runs on Keycloak 26’s JDK 17/21 runtime, and supports Oracle
19c/21c/23ai — matching the gvenzl/oracle-xe / Oracle XE targets used by OneIoT. It is the
recommended source because it is the exact driver the application is validated against. If you
would rather use a standalone file, the older ojdbc8-18.3.0.0.jar bundled at
iot-web-app-build/docker/clickhouse/jdbc-bridge/drivers/ also works.
|
7.3. Environment variables
| Variable | Meaning |
|---|---|
|
The bind-mounted TLS certificate and private key. To replace the certificate later, swap
the two files and run |
|
Connection to the isolated |
|
LDAP login type only. The Keycloak truststore used for the outbound LDAPS connection
to Active Directory; point it at the mounted |
|
The admin account for the Keycloak Admin Console at |
|
Use |
8. Shared Docker network
When Keycloak and the OneIoT backend run as separate Compose stacks, they must share a
Docker network so the backend can reach Keycloak by container name. Each stack otherwise
creates its own isolated default network.
-
The Keycloak stack (
compose-oidc.yml) creates theft-shared-networkbridge network (declared asft-networkwithname: ft-shared-network). -
The OneIoT backend stack (
compose.yml) joins it as anexternalnetwork.
Add to the backend compose.yml (at iot-web-app-build/docker/compose.yml):
# Top-level networks section:
networks:
  ft-network:
    external: true
    name: ft-shared-network

# ui-backend service:
services:
  ui-backend:
    networks:
      - ft-network
      - default
    # ... rest of the service definition ...
Containers on the shared network resolve each other by container name via Docker’s embedded DNS.
Keycloak reaches the Main DB over JDBC using the KC_DB_URL host. If the Main DB
runs as a container in another stack, attach Keycloak to that stack’s network as well (or
use an externally reachable DB host) so the KC_DB_URL host resolves from the keycloak
container.
|
8.1. Verifying network connectivity
# The shared network exists
docker network inspect ft-shared-network

# Containers connected to it
docker network inspect ft-shared-network --format '{{range .Containers}}{{.Name}} {{end}}'

# DNS resolution from the backend container
docker exec <backend-container> ping -c 3 keycloak
If DNS resolution fails with "Could not resolve host: keycloak", the backend container
is not connected to ft-shared-network. Run
docker network connect ft-shared-network <backend-container>.
|
9. Importing the pre-configured realms
OneIoT ships two ready-made realms so you do not have to build them by hand.
Both files come from the kc-data/import/ folder on FT_DISK (download them from
Downloading the Keycloak stack from FT_DISK):
| Realm file | Realm |
|---|---|
|
|
|
|
|
The realms come from
import/*.json, not from the H2 storeThe realms are provisioned by Keycloak’s realm import ( |
|
Manual install: copy the realm files into
kc-data/import/ yourselfThe automated Jenkins deployment fetches the realm files and drops them into
|
Once the files are in kc-data/import/, the command: start --import-realm line (in the compose blocks above) tells Keycloak to read every *.json in /opt/keycloak/data/import/
on startup and create the realms in its configured storage:
-
It works on any
KC_DBbackend — the realms are written into the H2 dev store, or into the MySQL/Oraclekeycloakschema, whicheverKC_DBselects. This is why realms are shipped asimport/*.jsonand not as a baked H2 blob (which a DB-backed Keycloak ignores). -
Import runs only when the realm does not already exist. On the first start the two realms are created; on every later start Keycloak logs
Realm 'oneiot-sc' already exists.
Import skipped
and leaves the live realm untouched. Your Admin-Console edits are therefore safe across restarts.
|
Re-importing after you change a realm file
Because import is skipped when the realm exists, dropping a newer
|
The realm files are environment-neutral structure (clients, mappers, IdP
settings). Host-specific values — the SAML issuer/SSO URLs and the SP client redirect
URIs — still have to match your deployment; review them in the Admin Console (or in the
login-type guide) after the first import. To publish updated realms back to FT_DISK, use
the Admin Console Realm settings → Action → Partial export (include clients and
groups; secrets are masked in the export) and replace the corresponding file under
kc-data/import/.
|
10. Starting Keycloak
# Start the Keycloak stack in detached mode
docker compose -f compose-oidc.yml up -d

# Verify the container is running and healthy
docker compose -f compose-oidc.yml ps

# Check startup logs
docker logs keycloak --tail 50
Open the Admin Console at {KC_HOSTNAME}/admin and log in with the
KEYCLOAK_ADMIN / KEYCLOAK_ADMIN_PASSWORD credentials from the compose file.
11. High availability (multiple Keycloak nodes)
A single node needs nothing extra. The KC_DB settings only give Keycloak persistent
storage — they do not form a cluster.
If you run more than one Keycloak node (replicas behind a load balancer, all pointing
at the same Main DB), the nodes must discover each other and share their runtime caches
(login/authentication sessions, action tokens). Persisting to the same database is not
enough on its own — runtime session state lives in the Infinispan cache, not in KC_DB.
Otherwise a session created on node A is unknown to node B and logins fail intermittently
as the load balancer routes requests to different nodes.
Add to the environment of every node so they discover each other through a table in
the shared Main DB (JDBC_PING, no multicast required):
    environment:
      # --- existing KC_DB / KC_DB_URL / KC_DB_USERNAME / KC_DB_PASSWORD (+ KC_DB_SCHEMA on Oracle) ---
      # --- Cluster discovery via the shared Main DB (add on EVERY node) ---
      KC_CACHE: ispn               # distributed cache (default in 'start' mode)
      KC_CACHE_STACK: jdbc-ping    # nodes discover each other via the shared keycloak schema
      JAVA_OPTS_APPEND: "-Djgroups.bind.address=<node-ip> -Djgroups.external_addr=<node-ip>"
and publish the JGroups port so nodes can reach each other:
    ports:
      - "<keycloak-port>:8443"
      - "7800:7800"                # JGroups cluster traffic between nodes
All nodes must use the same KC_DB_URL (same Main DB and keycloak schema).
JDBC_PING stores the live node list in a JGROUPSPING table Keycloak creates
automatically in the keycloak schema (the ftacs user already has table-create
privileges there). Run every node with the same external hostname
(--hostname=https://<LB_HOST>:<PORT>) pointing at the load balancer, and enable sticky
sessions on the LB to reduce cross-node cache lookups. After startup each node’s log should
show a JGroups view listing all cluster members.
|
12. Selecting the authentication type per portal
The authentication type is stored in the database per portal and can be changed without a redeploy:
-
Where it lives: the
iotw_client_interfacetable, itemAuthenticationType, one value perclientType(sc/mc). -
How to change it: application UI → Settings → Interface → Authentication (or directly in the DB).
| Auth type | Behavior |
|---|---|
|
Redirect to a SAML identity provider (Keycloak, or Keycloak brokering Azure AD). |
|
Redirect to Keycloak; Keycloak validates the password against LDAP via its login form. |
|
Same OIDC/Keycloak redirect, but Keycloak performs silent Kerberos SSO. |
|
Built-in local login form (users stored in the application DB); Keycloak not involved. |
13. Next steps
With Keycloak deployed, configure it for the login type you need:
-
SAML SSO Setup — SAML realms, clients, mappers, IdP certificates.
-
LDAP Login via Keycloak — OIDC client, mappers, LDAP User Federation.
-
Azure AD + Keycloak — brokering to Azure AD (Entra ID).
-
Windows (AD / Kerberos) SSO — silent Kerberos SSO.