SAML SSO — Integration Guide
| Parameter | Value |
|---|---|
Application version |
Spring Boot 3.5.6 / Java 25 |
Library |
Spring Security SAML2 (Relying Party) |
Standard |
SAML 2.0, HTTP POST Binding |
1. Overview
1.1. What is SAML SSO
SAML (Security Assertion Markup Language) is an open standard for exchanging authentication data between an Identity Provider (IdP) and a Service Provider (SP). In this project, the OneIoT application acts as the SP, while an external IdP (Keycloak, Azure AD, Okta, ADFS, etc.) performs user authentication.
1.2. How SAML SSO works in this project
The application supports two separate SAML client registrations, each with its own Identity Provider connection and signing certificate:
| Portal | Registration ID | SP Entity ID (default) | IdP certificate file |
|---|---|---|---|
Support Center (SC) |
|
|
|
Management Console (MC) |
|
|
|
Each portal has its own ACS URL, Entity ID, IdP entity ID, IdP SSO URL, IdP signing certificate, and post-authentication redirect URL. The two portals may point to the same IdP or to two completely independent IdPs.
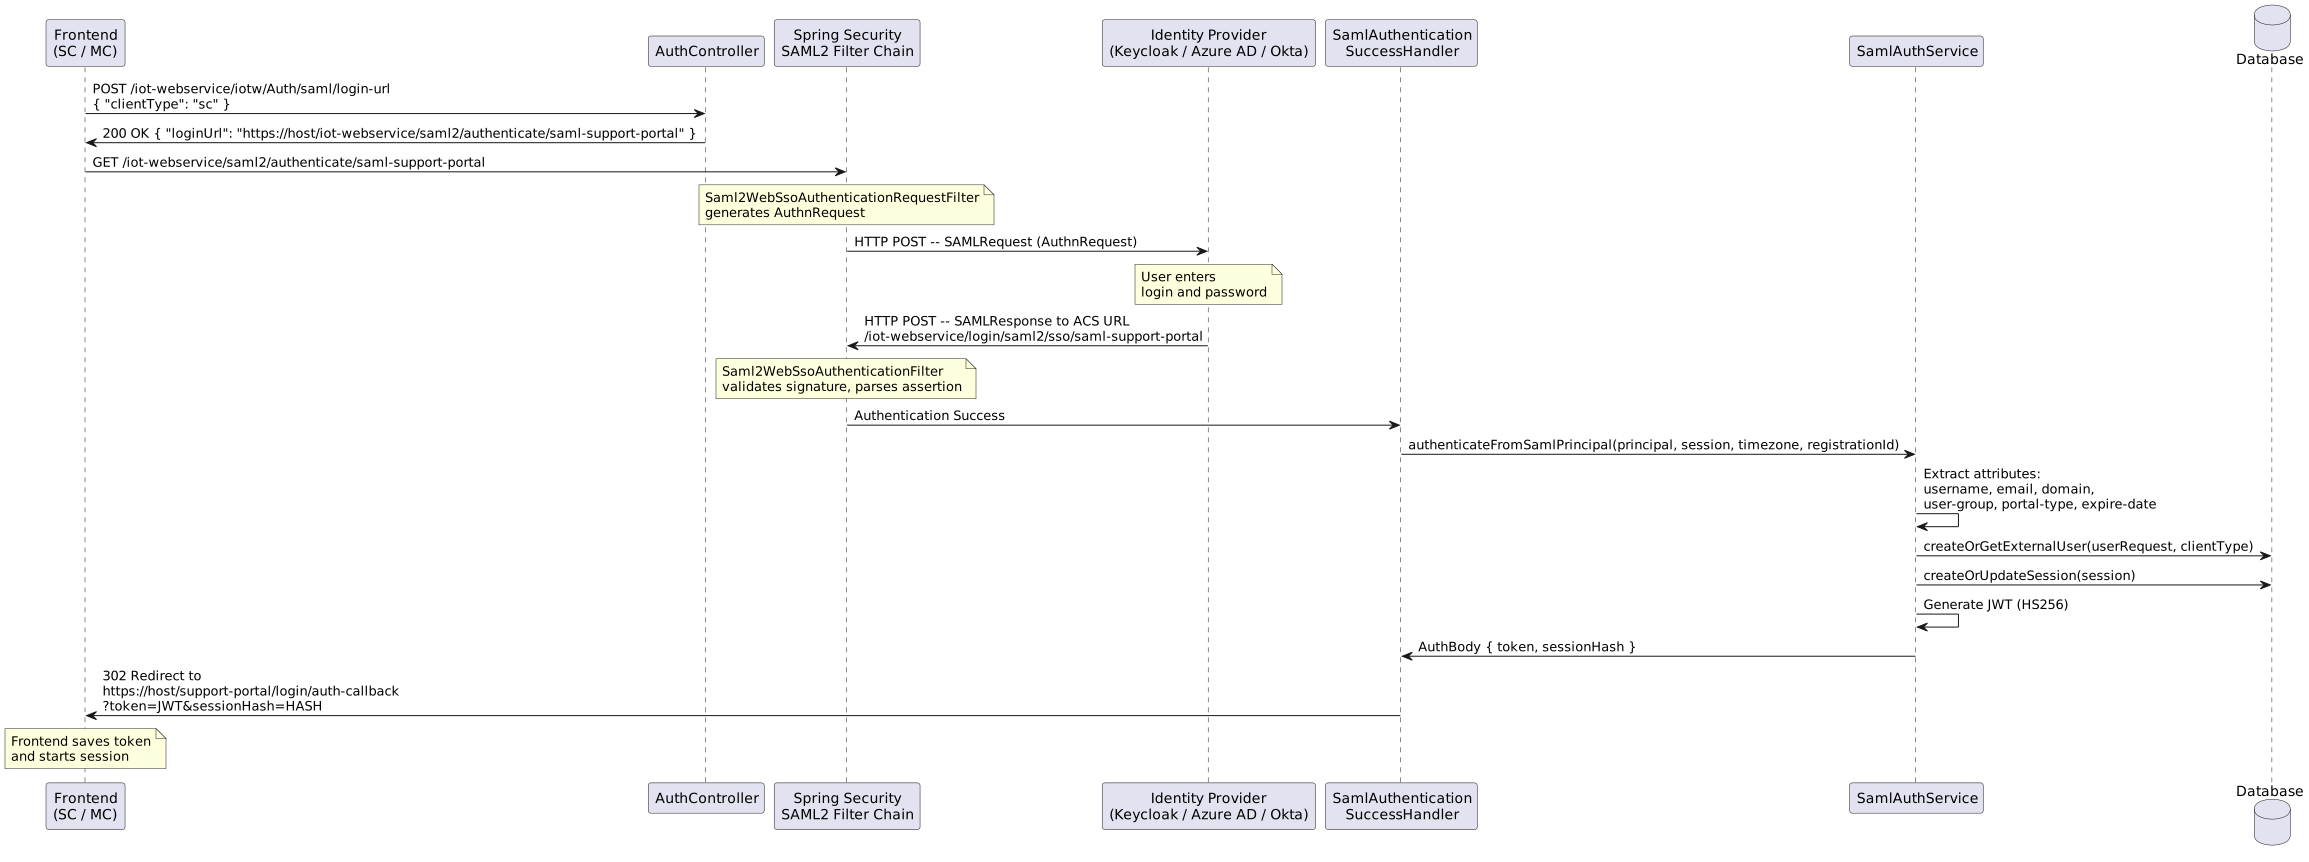
2. Application configuration
This guide covers the SAML login type: backend configuration, certificates, and the
Keycloak Admin Console setup. To deploy the Keycloak container itself (Docker Compose,
keycloak schema, TLS certificate, shared network, HA), see
Keycloak Deployment first.
|
2.1. Prerequisites
To enable SAML SSO:
-
Set the
app.authentication-typevariable tosaml:app: authentication-type: samlThis value determines the authentication type returned by the
POST /iot-webservice/iotw/Auth/typeendpoint. The frontend uses it to choose between the login/password form and the SSO button. -
Set
SAML_ENABLED=true— this activates theSamlAuthenticationSuccessHandlerbean and the SAML filter chain inSecurityConfig.
2.2. Environment variables
| Environment variable | YAML path | Default value | Description |
|---|---|---|---|
|
|
|
Enables/disables SAML SSO. When |
|
|
— (required) |
Base application URL used to construct redirect links and the ACS URL. Example: |
|
|
|
Service Provider Entity ID for the Support Center portal. |
|
|
— (required when SAML enabled) |
IdP Entity ID for the Support Center portal. Example: |
|
|
— (required when SAML enabled) |
IdP Single Sign-On URL for the Support Center portal. Example: |
— (not env-configurable) |
|
|
Path to the Support Center IdP signing certificate (X.509 PEM). Used to verify the SAMLResponse signature for the SC registration. |
|
|
|
Service Provider Entity ID for the Management Console portal. |
|
|
— (required when SAML enabled) |
IdP Entity ID for the Management Console portal. |
|
|
— (required when SAML enabled) |
IdP Single Sign-On URL for the Management Console portal. |
— (not env-configurable) |
|
|
Path to the Management Console IdP signing certificate (X.509 PEM). Used to verify the SAMLResponse signature for the MC registration. |
|
|
|
Name of the SAML attribute containing the username. |
|
|
|
Name of the SAML attribute containing the user email. |
|
|
|
Name of the SAML attribute determining the portal type ( |
|
|
|
Name of the SAML attribute containing the user domain. The value must match the domain name in the database. |
|
|
|
Name of the SAML attribute containing the user group. The value must match the group name in the database. |
|
|
|
Name of the SAML attribute with the account expiration date. Formats: ISO-8601 ( |
2.3. Spring Security SAML2 Relying Party configuration
Relying party registrations are built programmatically at startup by SamlRelyingPartyConfig, using values from the app.saml.* properties in application.yaml.
Spring Boot’s built-in Saml2RelyingPartyAutoConfiguration is explicitly excluded, so the spring.security.saml2.relyingparty.registration YAML section is not used by this project.
The Spring Boot auto-configuration is disabled in application.yaml:
spring:
  autoconfigure:
    exclude:
      - org.springframework.boot.autoconfigure.security.saml2.Saml2RelyingPartyAutoConfiguration
The two registrations are driven by the following property block:
app:
  saml:
    redirect-url: ${SAML_REDIRECT_HOST:}
    enabled: ${SAML_ENABLED:false}
    sc-registration-id: saml-support-portal
    mc-registration-id: saml-management-portal
    sc:
      sp-entity-id: ${SAML_SC_SP_ENTITY_ID:oneiot-sp-sc}
      success-redirect-url: ${SAML_REDIRECT_HOST:}/support-portal/login/auth-callback
      idp-entity-id: ${SAML_SC_IDP_ENTITY_ID:}
      idp-sso-url: ${SAML_SC_IDP_SSO_URL:}
      idp-certificate-location: file:${app.home:./}/conf/sc-idp.crt
    mc:
      sp-entity-id: ${SAML_MC_SP_ENTITY_ID:oneiot-sp-mc}
      success-redirect-url: ${SAML_REDIRECT_HOST:}/management-portal/login/auth-callback
      idp-entity-id: ${SAML_MC_IDP_ENTITY_ID:}
      idp-sso-url: ${SAML_MC_IDP_SSO_URL:}
      idp-certificate-location: file:${app.home:./}/conf/mc-idp.crt
At startup, SamlRelyingPartyConfig.relyingPartyRegistrationRepository():
-
Loads the SC IdP certificate from
app.saml.sc.idp-certificate-locationand builds thesaml-support-portalregistration. -
Loads the MC IdP certificate from
app.saml.mc.idp-certificate-locationand builds thesaml-management-portalregistration. -
For each registration, sets the ACS URL to
${SAML_REDIRECT_HOST}/iot-webservice/login/saml2/sso/{registrationId}, binding POST, andwantAuthnRequestsSigned=false. -
Registers both in an
InMemoryRelyingPartyRegistrationRepository.
Key points:
-
No SP signing credentials are configured. The AuthnRequest is not signed (
wantAuthnRequestsSigned=false), so there is no SP private key or SP certificate — only the two IdP verification certificates exist. -
SC and MC are fully independent: each has its own SP entity ID, IdP entity ID, IdP SSO URL, and IdP signing certificate. They may point to the same IdP realm or to two different IdPs.
-
The ACS URL for both registrations is built from
${SAML_REDIRECT_HOST}— the externally accessible base URL of the application.
2.4. ACS URL format
${SAML_REDIRECT_HOST}/iot-webservice/login/saml2/sso/{registrationId}
Specific values:
-
SC:
https://portal.example.com/iot-webservice/login/saml2/sso/saml-support-portal -
MC:
https://portal.example.com/iot-webservice/login/saml2/sso/saml-management-portal
2.5. Post-authentication redirect URLs
| Portal | URL | Configuration |
|---|---|---|
SC |
|
|
MC |
|
|
The frontend receives the JWT token and sessionHash as query parameters:
https://portal.example.com/support-portal/login/auth-callback?token=eyJhbG...&sessionHash=BASE64...
2.6. SP Metadata URL
The application automatically publishes SP metadata at:
/iot-webservice/saml2/metadata/{registrationId}
Examples:
-
https://portal.example.com/iot-webservice/saml2/metadata/saml-support-portal -
https://portal.example.com/iot-webservice/saml2/metadata/saml-management-portal
| This URL can be used in the IdP for automatic SP configuration. |
3. Certificates
The application requires two IdP signing certificates — one per portal registration.
They are loaded from the external conf/ directory under ${app.home} (typically mounted as /opt/app/conf in Docker deployments):
| File | Purpose | Format | Configuration property |
|---|---|---|---|
|
Support Center IdP signing certificate — used to verify SAMLResponse signatures for the |
X.509 PEM |
|
|
Management Console IdP signing certificate — used to verify SAMLResponse signatures for the |
X.509 PEM |
|
No Service Provider key pair is configured.
The application does not sign outgoing AuthnRequests (wantAuthnRequestsSigned=false in SamlRelyingPartyConfig), so there is no sp.key / sp.crt and no SP signing credential to manage.
|
3.1. IdP certificates (sc-idp.crt, mc-idp.crt)
Each certificate is used for:
-
Verifying the signature of the SAMLResponse received from the corresponding IdP
-
Must exactly match the signing certificate configured in that IdP
If both portals are served by the same IdP (same realm / same signing key), the same certificate content is used for both files — but the application still loads them as two separate files, one per registration.
Each file must be in X.509 PEM format with the following structure:
-----BEGIN CERTIFICATE-----
MIICnTCCAYUCBgGE... (base64-encoded certificate data)
...
-----END CERTIFICATE-----
Each certificate MUST include the -----BEGIN CERTIFICATE----- and -----END CERTIFICATE----- header/footer lines.
The content between headers must be base64-encoded.
If an IdP rotates its signing keys, you MUST update the corresponding sc-idp.crt or mc-idp.crt file.
A certificate mismatch will cause signature verification failure and authentication denial for the affected portal.
See Exporting IdP Signing Certificate for how to obtain the certificate from Keycloak.
|
3.2. Obtaining the IdP certificate
For Keycloak, the IdP certificate can be obtained from:
-
Realm Settings > Keys — copy the public key of the
RS256entry with usageSIG -
SAML Descriptor URL:
https://<KEYCLOAK_HOST>/realms/<REALM>/protocol/saml/descriptor— extract the certificate from<ds:X509Certificate> -
Admin Console: Realm Settings > Keys > select
RSA (sig)> View Certificate
See Exporting IdP Signing Certificate for detailed step-by-step instructions.
Repeat the export for each IdP/realm used by the SC and MC portals, saving the results as sc-idp.crt and mc-idp.crt respectively.
4. API Endpoints
4.1. POST /iot-webservice/iotw/Auth/saml/login-url
Returns the URL for redirecting the user to the IdP.
Authentication: not required (public endpoint).
4.1.1. Request
POST /iot-webservice/iotw/Auth/saml/login-url HTTP/1.1
Content-Type: application/json

{
  "clientType": "sc"
}| Field | Type | Required | Description |
|---|---|---|---|
|
|
Yes |
Portal type. Allowed values: |
4.1.2. Successful response (200 OK)
{
  "loginUrl": "https://portal.example.com/iot-webservice/saml2/authenticate/saml-support-portal"
}| Field | Type | Description |
|---|---|---|
|
|
Full URL for user redirection. Format: |
4.1.3. Error responses (400 Bad Request)
SAML disabled:
{
  "error": "SAML authentication is not enabled"
}
Invalid clientType:
{
  "error": "Invalid clientType. Must be 'sc' or 'mc'"
}
4.1.4. Registration ID resolution logic
| clientType | registrationId | Description |
|---|---|---|
|
|
Registration for the Support Center portal |
|
|
Registration for the Management Console portal |
4.1.5. curl examples
# Get login URL for SC portal
curl -X POST https://portal.example.com/iot-webservice/iotw/Auth/saml/login-url \
  -H "Content-Type: application/json" \
  -d '{"clientType": "sc"}'

# Get login URL for MC portal
curl -X POST https://portal.example.com/iot-webservice/iotw/Auth/saml/login-url \
  -H "Content-Type: application/json" \
  -d '{"clientType": "mc"}'
4.2. POST /iot-webservice/iotw/Auth/type
Auxiliary endpoint returning the current authentication type.
curl -X POST https://portal.example.com/iot-webservice/iotw/Auth/typeResponse when SAML is configured:
"saml"The frontend uses this endpoint to determine whether to show the login/password form or the SSO button.
5. Keycloak setup (test IdP)
| Keycloak is used here solely as a test Identity Provider. In production, any SAML 2.0-compliant IdP may be used: Azure AD (Entra ID), Okta, ADFS, OneLogin, Shibboleth, etc. |
5.1. Creating Realms
The SC and MC portals use two separate realms — one per portal. Each realm hosts a single SAML client, so the two portals have fully independent users, signing keys, and attribute mappers.
5.1.1. Support Center realm (oneiot-sc)
-
Open the Keycloak Admin Console (
https://<KEYCLOAK_HOST>/admin). -
In the left menu, click the current realm and select Create realm.
-
Enter:
-
Realm name:
oneiot-sc
-
-
Click Create.
5.1.2. Management Console realm (oneiot-mc)
-
From the realm selector, click Create realm again.
-
Enter:
-
Realm name:
oneiot-mc
-
-
Click Create.
The realm names (oneiot-sc / oneiot-mc) are examples — use whatever naming convention fits your deployment.
They only need to match the SAML_SC_IDP_ENTITY_ID / SAML_SC_IDP_SSO_URL and SAML_MC_IDP_ENTITY_ID / SAML_MC_IDP_SSO_URL values.
|
5.2. Creating SAML clients
Each realm contains one SAML client.
The client for the Support Center lives in the oneiot-sc realm; the client for the Management Console lives in the oneiot-mc realm.
5.2.1. Support Center (SC) client — in realm oneiot-sc
-
Switch to realm
oneiot-scusing the realm selector. -
Navigate to Clients > Create client.
-
Fill in:
-
Client type:
SAML -
Client ID:
oneiot-sp-sc
-
-
Click Next, then Save.
-
On the Settings tab, configure:
-
Valid Redirect URIs:
https://<PORTAL_HOST>.rd.friendly-tech.com/* -
Master SAML Processing URL:
https://<PORTAL_HOST>.rd.friendly-tech.com/iot-webservice/login/saml2/sso/saml-support-portal -
Name ID Format:
username -
Force Name ID Format:
ON
-
5.2.2. Management Console (MC) client — in realm oneiot-mc
-
Switch to realm
oneiot-mcusing the realm selector. -
Navigate to Clients > Create client.
-
Fill in:
-
Client type:
SAML -
Client ID:
oneiot-sp-mc
-
-
Click Next, then Save.
-
On the Settings tab, configure:
-
Valid Redirect URIs:
https://<PORTAL_HOST>.rd.friendly-tech.com/* -
Master SAML Processing URL:
https://<PORTAL_HOST>.rd.friendly-tech.com/iot-webservice/login/saml2/sso/saml-management-portal -
Name ID Format:
username -
Force Name ID Format:
ON
-
5.3. Keys settings
In each realm, for its respective client (oneiot-sp-sc in oneiot-sc, oneiot-sp-mc in oneiot-mc):
-
Go to the client’s Keys tab.
-
Set Client signature required = OFF.
This corresponds to wantAuthnRequestsSigned=false in SamlRelyingPartyConfig.
The application does not sign the AuthnRequest, so neither IdP may require a client signature.
|
5.4. Exporting IdP Signing Certificate
Each realm has its own signing key, so the export must be performed once per realm: from oneiot-sc for the Support Center, and from oneiot-mc for the Management Console.
The result is two certificate files (sc-idp.crt and mc-idp.crt) in the application’s conf/ directory.
Repeat the following steps for each realm:
-
Switch to the target realm (
oneiot-scoroneiot-mc) using the Keycloak realm selector. -
Go to Realm Settings > Keys.
-
Find the RS256 key with provider rsa-generated and usage SIG.
-
Click the Certificate button in that row to view the X.509 certificate.
-
Copy the entire certificate content displayed by Keycloak.
-
Paste it into the corresponding file in the application
conf/directory:-
${app.home}/conf/sc-idp.crt— from realmoneiot-sc(Support Center) -
${app.home}/conf/mc-idp.crt— from realmoneiot-mc(Management Console)
-
The file must be in X.509 PEM format with the following structure:
-----BEGIN CERTIFICATE-----
MIICnTCCAYUCBgGE... (base64-encoded certificate data)
...
-----END CERTIFICATE-----
The certificate MUST include the -----BEGIN CERTIFICATE----- and -----END CERTIFICATE----- header/footer lines.
The certificate content between headers must be base64-encoded (this is what Keycloak displays).
If Keycloak only shows the raw base64 without headers, you must manually add the -----BEGIN CERTIFICATE----- and -----END CERTIFICATE----- wrapper.
When Keycloak rotates its signing keys, you MUST update the affected certificate file (sc-idp.crt and/or mc-idp.crt), otherwise SAML signature validation will fail for that portal.
|
You can also obtain the certificate from the SAML Descriptor URL: https://<KEYCLOAK_HOST>/realms/<REALM>/protocol/saml/descriptor. The certificate is inside the <ds:X509Certificate> element — copy that value and wrap it with the PEM header/footer lines.
|
5.5. User Profile (attributes)
Repeat this step in both realms (oneiot-sc and oneiot-mc) so that users in either realm can carry the required custom attributes.
-
Switch to the target realm using the Keycloak realm selector.
-
Navigate to Realm Settings > User Profile.
-
Create custom attributes that will be assigned to each user.
The username and email attributes already exist by default. You need to create the following additional attributes:
| Attribute Name | Display Name | Description |
|---|---|---|
|
|
User domain. The value must exactly match the domain name in the application database. |
|
|
User group. The value must exactly match the group name in the application database. |
|
|
Portal type: |
For each attribute:
-
Click Create attribute.
-
Fill in Attribute name and Display name and SAML name according to the table above.
-
Optionally set Required field = ON (recommended for
domainanduser-group). -
Click Save.
5.6. Creating users
Create users in the realm that matches the portal they are supposed to log into: Support Center users go into oneiot-sc, Management Console users go into oneiot-mc.
The same person needing access to both portals must exist as a user in both realms.
-
Switch to the target realm (
oneiot-scoroneiot-mc). -
Navigate to Users > Add user.
-
Fill in the required fields:
-
Username — the username
-
Email — the user email
-
First name, Last name — first and last name (optional)
-
-
Fill in the custom attributes:
-
domain — domain name (e.g.,
SuperDomain,TenantA) -
user-group — group name (e.g.,
admin,operator) -
portal-type —
scormc
-
-
Click Create.
-
Go to the Credentials tab and set a password.
The domain and user-group values must exactly match existing records in the application database. If a domain or group is not found in the database, the user will be created with domainId = null or userGroupId = null. The portal-type attribute must contain the value sc or mc.
|
5.7. Creating Mappers (Protocol Mappers)
To pass custom attributes in the SAML assertion, you need to create the same set of mappings in each realm’s client dedicated scope.
Each client lives in its own realm, so the mappers must be added twice — once in oneiot-sc > oneiot-sp-sc, and once in oneiot-mc > oneiot-sp-mc.
5.7.1. Configuration for oneiot-sp-sc client (realm oneiot-sc)
-
Switch to realm
oneiot-sc. -
Navigate to Clients > oneiot-sp-sc > Client scopes.
-
Click on oneiot-sp-sc-dedicated.
-
Click Add mapper > By configuration > User Attribute.
-
Create the following mappings:
| Mapper Name | User Attribute | SAML Attribute Name | SAML Attribute NameFormat |
|---|---|---|---|
|
|
|
Basic |
|
|
|
Basic |
|
|
|
Basic |
|
|
|
Basic |
|
|
|
Basic |
For each mapping:
-
Fill in the fields according to the table.
-
Ensure SAML Attribute NameFormat is set to
Basic. -
Click Save.
5.7.2. Configuration for oneiot-sp-mc client (realm oneiot-mc)
Repeat the same steps in the other realm for the oneiot-sp-mc client:
-
Switch to realm
oneiot-mc. -
Navigate to Clients > oneiot-sp-mc > Client scopes.
-
Click on oneiot-sp-mc-dedicated.
-
Click Add mapper > By configuration > User Attribute.
-
Create the same 5 mappings from the table above.
After completing all steps in both realms, the Keycloak configuration is finished.
6. SAML attribute mapping
6.1. General principle
After successful authentication, the IdP returns a SAMLResponse containing a SAML assertion with user attributes. The SamlAuthService.authenticateFromSamlPrincipal() method extracts these attributes and maps them to internal application fields.
6.2. Attribute mapping table
| SAML attribute (default) | Environment variable | YAML path | Used for | Required |
|---|---|---|---|---|
|
|
|
Username in the system. If the attribute is missing, |
Recommended |
|
|
|
User email. If missing — empty string. |
Optional |
|
|
|
Determines the portal type (SC or MC). |
Optional |
|
|
|
Domain name for user binding. Looked up in the database by name. |
Recommended |
|
|
|
User group name. Looked up in the database by name and client type. |
Recommended |
|
|
|
Account expiration date. Formats: |
Optional |
6.3. ClientType resolution (3-level strategy)
SamlAuthService.extractClientType() determines the portal type using a three-level priority strategy:
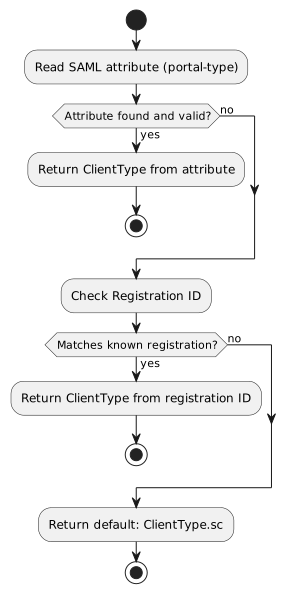
| Level | Source | Example | Result |
|---|---|---|---|
1 (highest) |
SAML attribute |
|
|
2 |
Registration ID |
|
|
2 |
Registration ID |
|
|
3 (lowest) |
Default value |
— |
|
6.4. Domain resolution
-
The SAML attribute specified in
app.saml.mapping.domain-attribute(default:domain) is read. -
If the attribute is present, the domain is looked up by name in the database via
DomainService.getDomainIdByName(). -
Special case: if the domain name matches
SuperDomain(theSUPER_DOMAIN_NAMEconstant),domainId = 0is returned. -
If the domain is not found in the database,
domainIdis set tonull.
6.5. User group resolution
-
The SAML attribute
user-groupis read. -
If the attribute is present, the group is looked up by name and client type via
UserGroupService.findGroupIdForSaml(groupName, clientType). -
If the group is not found in the database,
userGroupIdis set tonull.
| The group is not created automatically. It must exist in the database before the first SAML authentication of the user. |
6.6. User creation/update
After all attributes are extracted, UserService.createOrGetExternalUser(userRequest, clientType, zoneId) is called:
-
If a user with the given
usernamealready exists — the existing user is returned. -
If the user does not exist — a new user is created with the extracted attributes.
7. Architecture
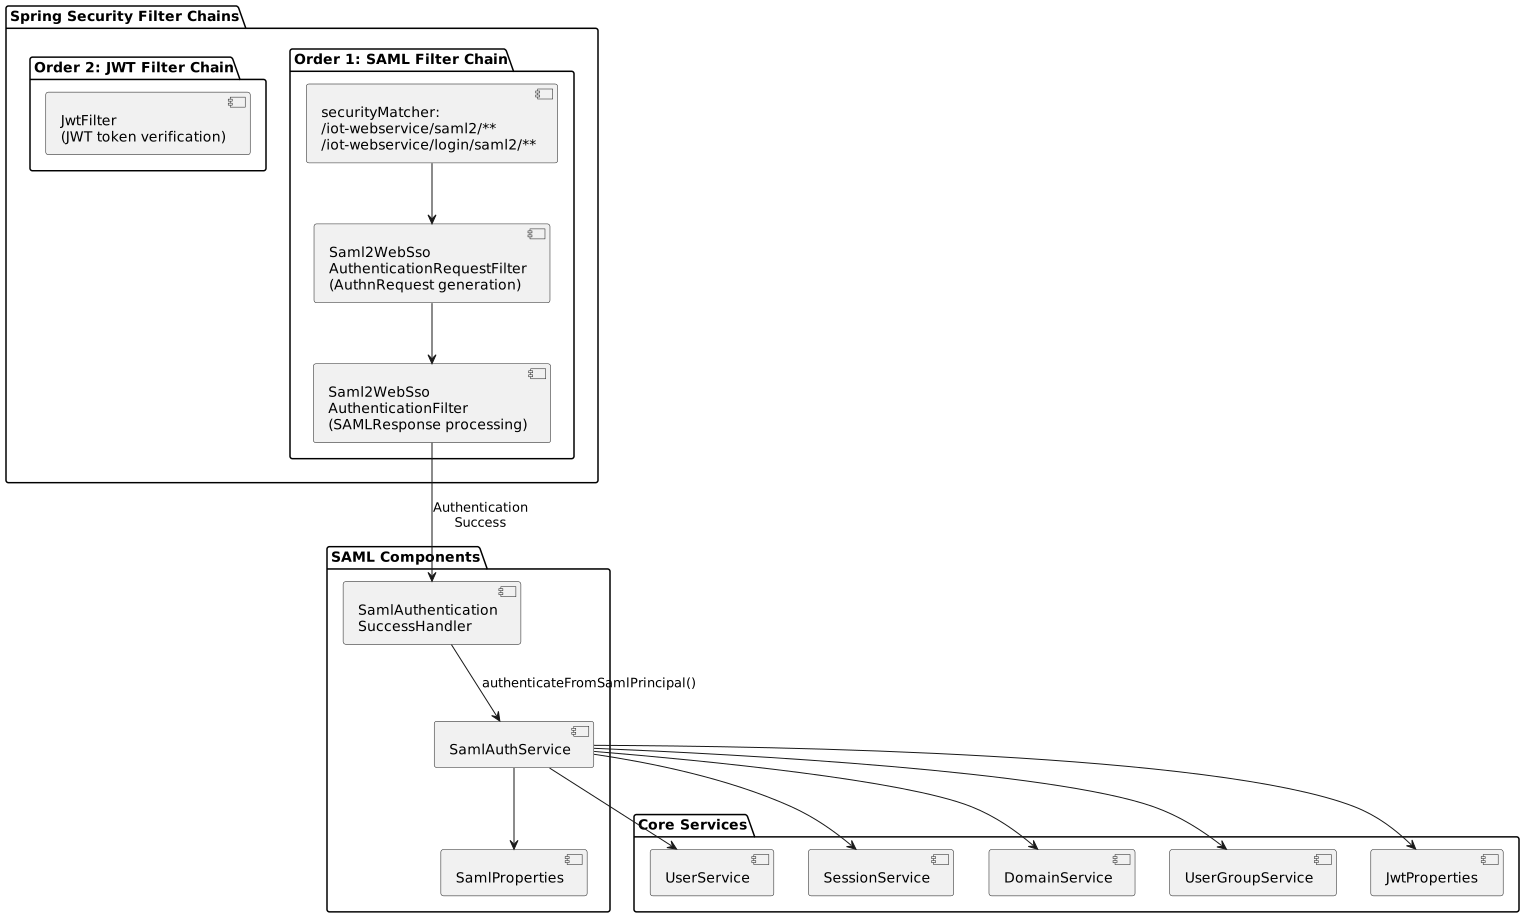
7.2. SecurityConfig — SAML Filter Chain
The SecurityConfig class defines two SecurityFilterChain beans:
| Order | Bean | Purpose | Condition |
|---|---|---|---|
|
|
SAML SSO processing |
|
|
|
JWT authentication for REST API |
Always active |
The SAML filter chain intercepts requests matching:
-
/iot-webservice/saml2/**— sending AuthnRequest to the IdP -
/iot-webservice/login/saml2/**— receiving SAMLResponse from the IdP
7.2.1. saml2Login configuration
.saml2Login(saml2 -> saml2
    .successHandler(samlSuccessHandler)
    .loginProcessingUrl("/iot-webservice/login/saml2/sso/{registrationId}")
    .authenticationRequestUri("/iot-webservice/saml2/authenticate/{registrationId}")
    .failureHandler(...)
)| Parameter | URL | Description |
|---|---|---|
|
|
ACS URL where the IdP sends the SAMLResponse (HTTP POST). |
|
|
URL that initiates the AuthnRequest to the IdP. |
|
|
URL for publishing SP metadata (XML). |
7.3. SamlAuthenticationSuccessHandler
Activated via @ConditionalOnProperty(name = "app.saml.enabled", havingValue = "true").
Sequence of actions on successful SAML authentication:
-
Extracts
registrationIdfromDefaultSaml2AuthenticatedPrincipal.getRelyingPartyRegistrationId(). -
Extracts
timezonefrom the HTTP session (saml_timezoneattribute). -
Calls
SamlAuthService.authenticateFromSamlPrincipal()to create the JWT session. -
Determines the redirect URL based on
registrationId:-
saml-management-portal— usesapp.saml.mc.success-redirect-url -
All others — uses
app.saml.success-redirect-url
-
-
Redirects the browser to a URL of the form:
{redirectBaseUrl}?token={JWT}&sessionHash={BASE64_HASH}
7.4. SamlAuthService
The main SAML authentication service. The authenticateFromSamlPrincipal() method performs:
-
Attribute extraction from the SAML assertion (username, email, groups, domain, user-group, expire-date).
-
ClientType resolution using the 3-level strategy.
-
Domain resolution via
DomainService.getDomainIdByName(). -
Group resolution via
UserGroupService.findGroupIdForSaml(). -
User creation/retrieval via
UserService.createOrGetExternalUser(). -
Session creation via
SessionService.createOrUpdateSession(). -
JWT generation using the HS256 algorithm, with token lifetime determined by
jwt.token.expired(default 36,000,000 ms = 10 hours).
8. Backend deployment (Docker)
Once Keycloak is deployed and configured as the SAML IdP,
the backend needs two SAML-specific things at the container level: the IdP signing
certificates mounted into conf/, and the SAML environment variables, which live in the
unified database env file (.env.mysql or .env.oracle) the backend already loads — there is no separate SAML env file.
8.1. IdP certificate mount
SAML IdP certificates must be available to the backend container at ${app.home}/conf/
(i.e. /opt/app/conf/ inside the container). Place the files in the ui-backend/config/
directory on the host — this directory is mounted into /opt/app/conf by the backend
container (see the volumes: section of compose.yml):
| File | Purpose | Format | Required |
|---|---|---|---|
|
Support Center IdP signing certificate (exported from the SC realm in Keycloak) |
X.509 PEM |
true (when |
|
Management Console IdP signing certificate (exported from the MC realm in Keycloak) |
X.509 PEM |
true (when |
The IdP signing certificate paths are not exposed as environment variables. They
are fixed to ${app.home}/conf/sc-idp.crt and ${app.home}/conf/mc-idp.crt. See
Exporting IdP Signing Certificate for how to export them, and Certificates for the
PEM format. If both portals share the same Keycloak realm, the same content is written to
both files. No SP key/certificate is required — the application does not sign outgoing
AuthnRequests.
|
8.2. SAML environment variables (in .env.mysql / .env.oracle)
The SAML variables are not a separate file — they are part of the same database env file
the backend already loads (.env.mysql or .env.oracle, in iot-web-app-build/docker/).
That file ships with a SAML Configuration (Optional — disabled by default) block where
SAML_ENABLED=false; to turn SAML on, set SAML_ENABLED=true and fill in the values in that
same block. The relevant entries (example for a deployment where Keycloak runs on the same
Docker host):
# ==========================================================
# SAML Configuration -- block inside .env.mysql / .env.oracle
# ==========================================================

SAML_ENABLED=true
SAML_REDIRECT_HOST=https://<PORTALS_HOST>:8843

# --- SC (Support Center) registration ---
SAML_SC_SP_ENTITY_ID=oneiot-sp-sc
SAML_SC_IDP_ENTITY_ID=https://<PORTALS_HOST>/realms/oneiot-sc
SAML_SC_IDP_SSO_URL=https://<PORTALS_HOST>/realms/oneiot-sc/protocol/saml

# --- MC (Management Console) registration ---
SAML_MC_SP_ENTITY_ID=oneiot-sp-mc
SAML_MC_IDP_ENTITY_ID=https://<PORTALS_HOST>/realms/oneiot-mc
SAML_MC_IDP_SSO_URL=https://<PORTALS_HOST>/realms/oneiot-mc/protocol/saml

# --- Attribute mapping (defaults shown) ---
SAML_ATTR_USERNAME=username
SAML_ATTR_EMAIL=email
SAML_ATTR_CLIENT_TYPE=portal-type
SAML_ATTR_DOMAIN=domain
SAML_ATTR_USER_GROUP=user-group
SAML_ATTR_EXPIRE_DATE=expire-date
The SAML_*IDP_ENTITY_ID and SAML*_IDP_SSO_URL values must match the URLs
Keycloak advertises, derived from the --hostname (KC_HOSTNAME) of the Keycloak container.
If you include a port in the hostname, include the same port here.
|
The ui-backend service already references this one file in compose.yml — a single unified
env file, no SAML-specific one to attach:
services:
  ui-backend:
    env_file:
      - .env.mysql   # <-- or .env.oracle
    volumes:
      - ${DATA_FOLDER:-.}/ui-backend/config:/opt/app/conf   # mounts sc-idp.crt / mc-idp.crt
Then start the stack with that same file:
cd iot-web-app-build/docker
docker compose --env-file .env.mysql up -d   # or --env-file .env.oracle
8.3. Verification checklist
After deployment, verify each item:
| # | Check |
|---|---|
1 |
Keycloak realms |
2 |
The backend can reach Keycloak: |
3 |
|
4 |
SP metadata is published: |
5 |
The login-URL endpoint responds: |
6 |
Auth type returns |
If SAML signature validation fails, the mounted sc-idp.crt / mc-idp.crt no longer
matches the realm’s signing key — re-export it (see Exporting IdP Signing Certificate),
replace the file, and run docker compose restart ui-backend.
|
9. Appendix: Full configuration example
# === SAML SSO ===
export SAML_ENABLED=true
export SAML_REDIRECT_HOST=https://portal.example.com

# SP + IdP (Support Center) -- Keycloak realm `oneiot-sc`
export SAML_SC_SP_ENTITY_ID=oneiot-sp-sc
export SAML_SC_IDP_ENTITY_ID=https://keycloak.example.com/realms/oneiot-sc
export SAML_SC_IDP_SSO_URL=https://keycloak.example.com/realms/oneiot-sc/protocol/saml
# SC IdP signing certificate file path is fixed at ${app.home}/conf/sc-idp.crt

# SP + IdP (Management Console) -- Keycloak realm `oneiot-mc`
export SAML_MC_SP_ENTITY_ID=oneiot-sp-mc
export SAML_MC_IDP_ENTITY_ID=https://keycloak.example.com/realms/oneiot-mc
export SAML_MC_IDP_SSO_URL=https://keycloak.example.com/realms/oneiot-mc/protocol/saml
# MC IdP signing certificate file path is fixed at ${app.home}/conf/mc-idp.crt

# Attribute Mapping (default values, shown for reference)
export SAML_ATTR_USERNAME=username
export SAML_ATTR_EMAIL=email
export SAML_ATTR_CLIENT_TYPE=portal-type
export SAML_ATTR_DOMAIN=domain
export SAML_ATTR_USER_GROUP=user-group
export SAML_ATTR_EXPIRE_DATE=expire-date

# Authentication type
# In application.yaml: app.authentication-type: saml
The example above uses two separate Keycloak realms (oneiot-sc and oneiot-mc), each containing a single SAML client.
Each realm has its own signing key, which must be exported to sc-idp.crt and mc-idp.crt respectively.
If you prefer a single shared realm, point both SAML_SC_IDP_* and SAML_MC_IDP_* to that realm and write the same certificate content to both files.
|