User Guide
This guide explains how to drive the IoT Emulator from its web interface — first as a guided walk-through, then as a set of task-oriented recipes, followed by a complete reference for every panel and control.
|
New here? Start with Getting Started to run your first simulation, then pick the matching recipe in Common Workflows. The remaining sections are a field-by-field reference for each part of the UI. |
Getting Started
This walk-through takes you from a freshly started emulator to a running device simulation.
|
These steps assume the emulator is already running and reachable at |
-
Open the Web UI at
http://localhost:8556. The header shows the connection status and a link to the API docs. -
Pick a protocol in the toolbar (LWM2M, MQTT, CoAP, USP, FSH_HUB or DUSUN). See Supported Protocols for protocol-specific defaults.
-
Set the target server — enter the IP and Port of the server you want to emulate against (ACS, LWM2M server, MQTT broker, …). Leave the client IP as
0.0.0.0unless you need a specific local interface. -
(Optional) Choose a data model — in Config Files, select the
*_resources.xmlthat defines the device parameter tree. The built-in file for the selected protocol is used by default. -
(Optional) Set how many devices — under CPE Amount, set Groups, Concurrent and Delay to simulate more than one device. See Simulate Multiple Devices.
-
Save the configuration with the Save button (most fields also persist automatically on change).
-
Initialize tree — builds the device data model in memory. The status changes to Initialized.
-
Start — the emulator registers the device(s) with the target server and the status becomes Running.
-
Watch the Logs panel — raw IN/OUT protocol messages stream in real time. Click any row for the full payload. See Logs.
-
When finished, click Stop to disconnect, or Reset to return to the initial state.
Common Workflows
Task-oriented recipes for the most frequent jobs. Each one links to the detailed reference further down the page.
Simulate Multiple Devices
Use the CPE Amount controls in the toolbar to scale beyond a single device:
-
Groups — number of device groups to create.
-
Concurrent — how many devices connect at the same time.
-
Delay — seconds to wait between registrations (spreads load on the target server).
Set the values, then Initialize tree and Start as usual. Every device appears as a row in Active Devices.
For large counts, raise the JVM heap — see JAVA_OPTS.
|
Replay a Real Device Tree from an ACS Database
Instead of the bundled *_resources.xml, you can pull a parameter tree from an existing device record:
-
Expand Extract CPE from DB in the right panel (collapsed by default).
-
Enter the DB Address/Port/Login/Password/Catalog and the CPE Serial to extract.
-
Click Extract to fetch the device’s parameters, then Init Tree to load them as the data model.
The credentials persist to gui_connection_options.properties on Save. Full field reference: Extract CPE from DB.
Generate Telemetry with Autoupdate
To make a parameter change on its own while the emulator runs (e.g. a fluctuating sensor reading):
-
Open a device’s Parameters tree and click Edit on the target parameter — this loads it into the right panel.
-
Switch to the Autoupdate tab, enable autoupdatable, and set Min/Max/Step/Step type/Period.
-
(Optional) Enable global to apply the same config to every device that owns this parameter.
-
Click Apply — the emulator schedules the updates immediately. Detailed fields: Update Parameters.
Provide a pipe-separated Dataset (v1|v2|v3) to cycle through fixed values instead of a numeric range.
|
Customize Behaviour with Rules
The Rules tab lets you run JavaScript on every parameter update — the body of onParamUpdated(param, device, ctx), persisted to rules.js:
-
Open the Rules tab and edit the code (use Help for the available objects and examples).
-
Click Compile to validate and save. Compilation errors are shown inline.
See the Rules Tab under Update Parameters.
Save & Restore with Snapshots
Capture the current device list and parameter values, then restore them later:
-
Save snapshot — writes
configuration/snapshot.json. -
Load snapshot — restores it (only when the emulator is stopped/reset).
See Active Devices. The same actions are available over REST — see Snapshot endpoints.
Drive the Emulator over REST
Every UI action has a REST equivalent for scripting and CI. The base URL is http://localhost:8556/api and Swagger UI is at http://localhost:8556/swagger-ui.html.
# Initialize and start, then list active devices
curl -X POST http://localhost:8556/api/init
curl -X POST http://localhost:8556/api/start
curl -s     http://localhost:8556/api/devices
Full reference: REST API.
Web Interface Overview
The IoT Emulator provides a modern web-based interface for controlling device simulation. Access it by navigating to http://localhost:8556 in your browser.
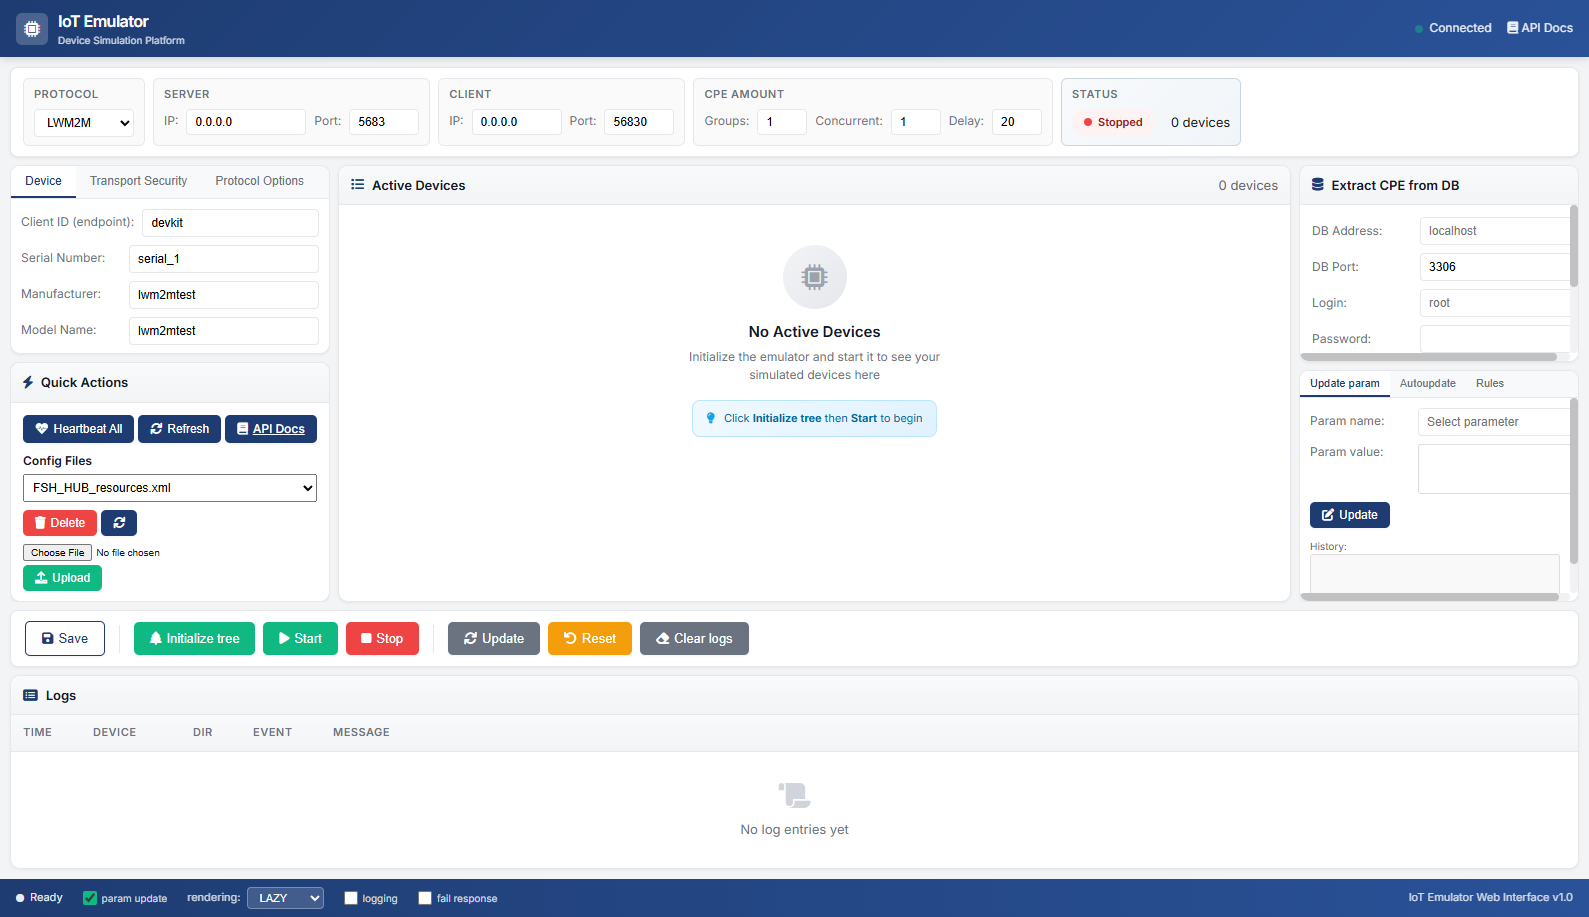
The interface is divided into several functional areas:
| Area | Description |
|---|---|
Header |
Application title, connection status, and API documentation link |
Toolbar |
Protocol selection, server/client configuration, CPE amount, and status |
Left Panel |
Device settings, transport security, protocol options, quick actions, and config files |
Center Panel |
Active devices list with actions |
Right Panel |
Extract CPE from DB (collapsible) and parameter management tools (Update / Autoupdate / Rules) |
Control Bar |
Main action buttons (Save, Initialize, Start, Stop, etc.) |
Logs Panel |
Live stream of raw protocol messages (IN/OUT) plus client actions |
Footer |
Status indicators and rendering options |
Toolbar
The toolbar at the top provides quick access to essential settings.
Protocol Selection
| Field | Description |
|---|---|
Protocol |
Select the communication protocol: LWM2M, MQTT, CoAP, USP, FSH_HUB, or DUSUN |
Server Configuration
| Field | Description |
|---|---|
IP |
IP address of the target server (e.g., ACS, LWM2M server) |
Port |
Server port number (default varies by protocol) |
Client Configuration
| Field | Description |
|---|---|
IP |
Local IP address for the emulator client (usually 0.0.0.0) |
Port |
Local port for the emulator client |
Device Configuration
The left panel contains tabs for device settings.
Device Tab
| Field | Description |
|---|---|
Client ID (endpoint) |
Unique identifier for the device endpoint |
Serial Number |
Device serial number |
Manufacturer |
Device manufacturer name |
Model Name |
Device model identifier |
Transport Security Tab
Configure security settings for the connection:
-
Unsecured — No encryption
-
PSK — Pre-Shared Key authentication
-
PSK ID — Identity string
-
PSK Key — Hexadecimal key value
-
-
Certificate — X.509 certificate authentication
-
Key Store Path/Password
-
Trust Store Path/Password
-
Certificate Alias/Password
-
Protocol Options Tab
Protocol-specific settings rendered dynamically from {protocol}_gui.properties. Values are persisted to the server-side properties file immediately on change — there is no need to click Save afterwards.
Examples per protocol:
-
LWM2M — registration lifetime, binding mode, queue mode, bootstrap settings
-
USP —
mtp(STOMP / CoAP / WebSocket / MQTT) together with a pairedportselector,usp.mtp.mqtt.qos,usp.mtp.ping_interval, content type, WebSocket sub-protocol -
CoAP / MQTT / FSH_HUB / DUSUN — protocol-specific keepalive, QoS, topic patterns and so on
For USP, the MTP selector (STOMP/CoAP/WebSocket/MQTT) lives in this tab — picking an MTP value also enables the matching port dropdown.
|
Quick Actions
| Button | Description |
|---|---|
Heartbeat All |
Send registration update to all active devices |
Refresh |
Refresh the current status |
API Docs |
Open Swagger UI API documentation |
Active Devices
The center panel displays all active simulated devices in a table:
| Column | Description |
|---|---|
Client ID |
Device endpoint identifier |
Serial Number |
Device serial number |
Port |
Local port used by the device |
Manufacturer |
Device manufacturer |
Model |
Device model name |
Actions |
Heartbeat (icon) and Parameters tree (icon + label) buttons |
Click Parameters tree on a device row to open a large modal listing every parameter of that device — see Parameters Tree Viewer.
The header above the device table also exposes:
-
Save snapshot — write the current device list and parameter values to
configuration/snapshot.json -
Load snapshot — restore the device list and parameter tree from
configuration/snapshot.json(only available when the emulator is stopped/reset)
Parameters Tree Viewer
The Parameters tree button opens a near-fullscreen modal (≈90% of viewport) that shows all parameters of the chosen device.
Features:
-
Alphabetical sort by parameter name (case-insensitive, natural numeric order so
param2precedesparam10) -
Live filter at the top — type any substring to match name / value / type; the
X of Ycounter shows how many entries are visible -
Sticky table header so columns stay anchored when scrolling long trees
-
Edit action on each row sends the parameter name + current value to the Update param tab in the right panel
-
Closes on the Close button, the X, clicking the dim backdrop, or pressing Esc (Esc first clears the filter, then closes)
Extract CPE from DB
The Extract CPE from DB panel in the right column lets the emulator pull a parameter template from an existing ACS database. The panel is collapsed by default — click the header to expand it.
| Field | Description |
|---|---|
DB Address |
Database server hostname or IP |
DB Port |
Database port (default: 3306) |
Login |
Database username |
Password |
Database password |
Catalog |
Database name (e.g., "acs") |
CPE Serial |
Serial number of device to extract |
Buttons:
-
Extract — Fetch device data from database
-
Init Tree — Initialize device tree with extracted data
All six credentials are persisted to gui_connection_options.properties (keys acs.ip/port/login/password/schema/serial) when Save is clicked, and reloaded on next start.
Update Parameters
The mini-tabs at the bottom of the right column manage selected parameters: Update param, Autoupdate, and Rules.
Update param Tab
Modify a device parameter in real-time. Pick a parameter from the Parameters tree viewer first.
| Field | Description |
|---|---|
Param name |
Full parameter path (read-only — populated from the Parameters tree) |
Param value |
New value for the parameter (resizable textarea, big enough for JSON/structured values) |
History |
Log of recent values for the selected parameter |
Click Update to push the new value into the running device.
Autoupdate Tab
Configure how the emulator periodically mutates a parameter while running. This matches the desktop GUI behaviour and is per-parameter.
| Field | Description |
|---|---|
autoupdatable |
Master switch — when off, the parameter is removed from the autoupdater |
global |
Apply the same config to every device that owns a parameter with this name/path |
Min / Max |
Value range when generating updates |
Step |
Numeric step between successive values |
Step type |
|
Period (ms) |
Interval between updates |
Deviation |
When |
randomize step type |
When |
Dataset (pipe-separated) |
Optional |
Click Apply to commit the config; the emulator reschedules the parameter immediately while running.
Rules Tab
Edit the JavaScript rule that runs on every parameter update. The rule is the body of function onParamUpdated(param, device, ctx) and is persisted to configuration/rules.js.
| Control | Description |
|---|---|
Code editor |
Monospace textarea (resizable), pre-populated with the current rule from |
Compile |
Compiles the rule via the emulator’s rule engine and writes it to |
Help |
Opens a modal with documentation of the available parameters ( |
Control Buttons
Main action buttons for controlling the emulator:
| Button | Description |
|---|---|
Save |
Save current configuration to file |
Initialize tree |
Create the device data model tree |
Start |
Begin device simulation and connect to server |
Stop |
Stop simulation and disconnect devices |
Update |
Send registration update (heartbeat) to all devices |
Reset |
Reset emulator to initial state |
Clear logs |
Clear the log panel |
Logs
The Logs panel streams every raw protocol message (IN/OUT) observed by the emulator, plus local UI actions (Init, Start, Snapshot saved, etc.). The data comes from the server-side ring buffer (capacity ≈ 500 entries) — the page polls GET /api/logs?since=<seq> every 2 seconds and appends only new rows, so the table updates while the emulator is running.
| Column | Description |
|---|---|
Time |
Wall-clock time the message was observed ( |
Device |
Client ID of the device that sent/received the message (or |
Dir |
|
Event |
Event type ( |
Options |
Protocol-specific options (e.g. |
Payload |
Human-readable payload (truncated to 200 chars in the table) |
Click any row to open a detail modal containing the full Options, Payload and Raw message — the analogue of the desktop GUI’s double-click action.
The Clear logs button in the control bar empties both the visible table and the server-side ring buffer.
Footer Options
These runtime toggles persist on change to gui_connection_options.properties (via POST /api/config/runtime) so they survive a restart, and they are applied immediately — no need to click Save.
| Option | Description |
|---|---|
param update |
Whether parameter changes drive UI / observer notifications |
rendering |
Parameter rendering mode: |
logging |
Whether raw protocol messages get written to the Logs ring buffer (the file/console log is always written) |
fail response |
Simulate failure responses for testing |