QA Deployment
1. Introduction
1.1. What is the QA Process?
QA (Quality Assurance) is the process of ensuring the quality of software. The purpose of this document is to describe the full code delivery cycle from development to testing in the QA environment, and subsequently to production release.
1.2. Overall Development and Deployment Process
The development and delivery workflow in our project includes the following key steps:
-
Development – creating code in
feature/orfix/branches -
QA Build Assembly – merging code into the
devbranch and producing a test build -
QA Testing – verifying functionality in the QA environment
-
Release – merging the validated code into the
mainbranch and generating the production release
|
All build and deployment automation is implemented via GitHub Actions, so many operations run automatically after completing the above steps. |
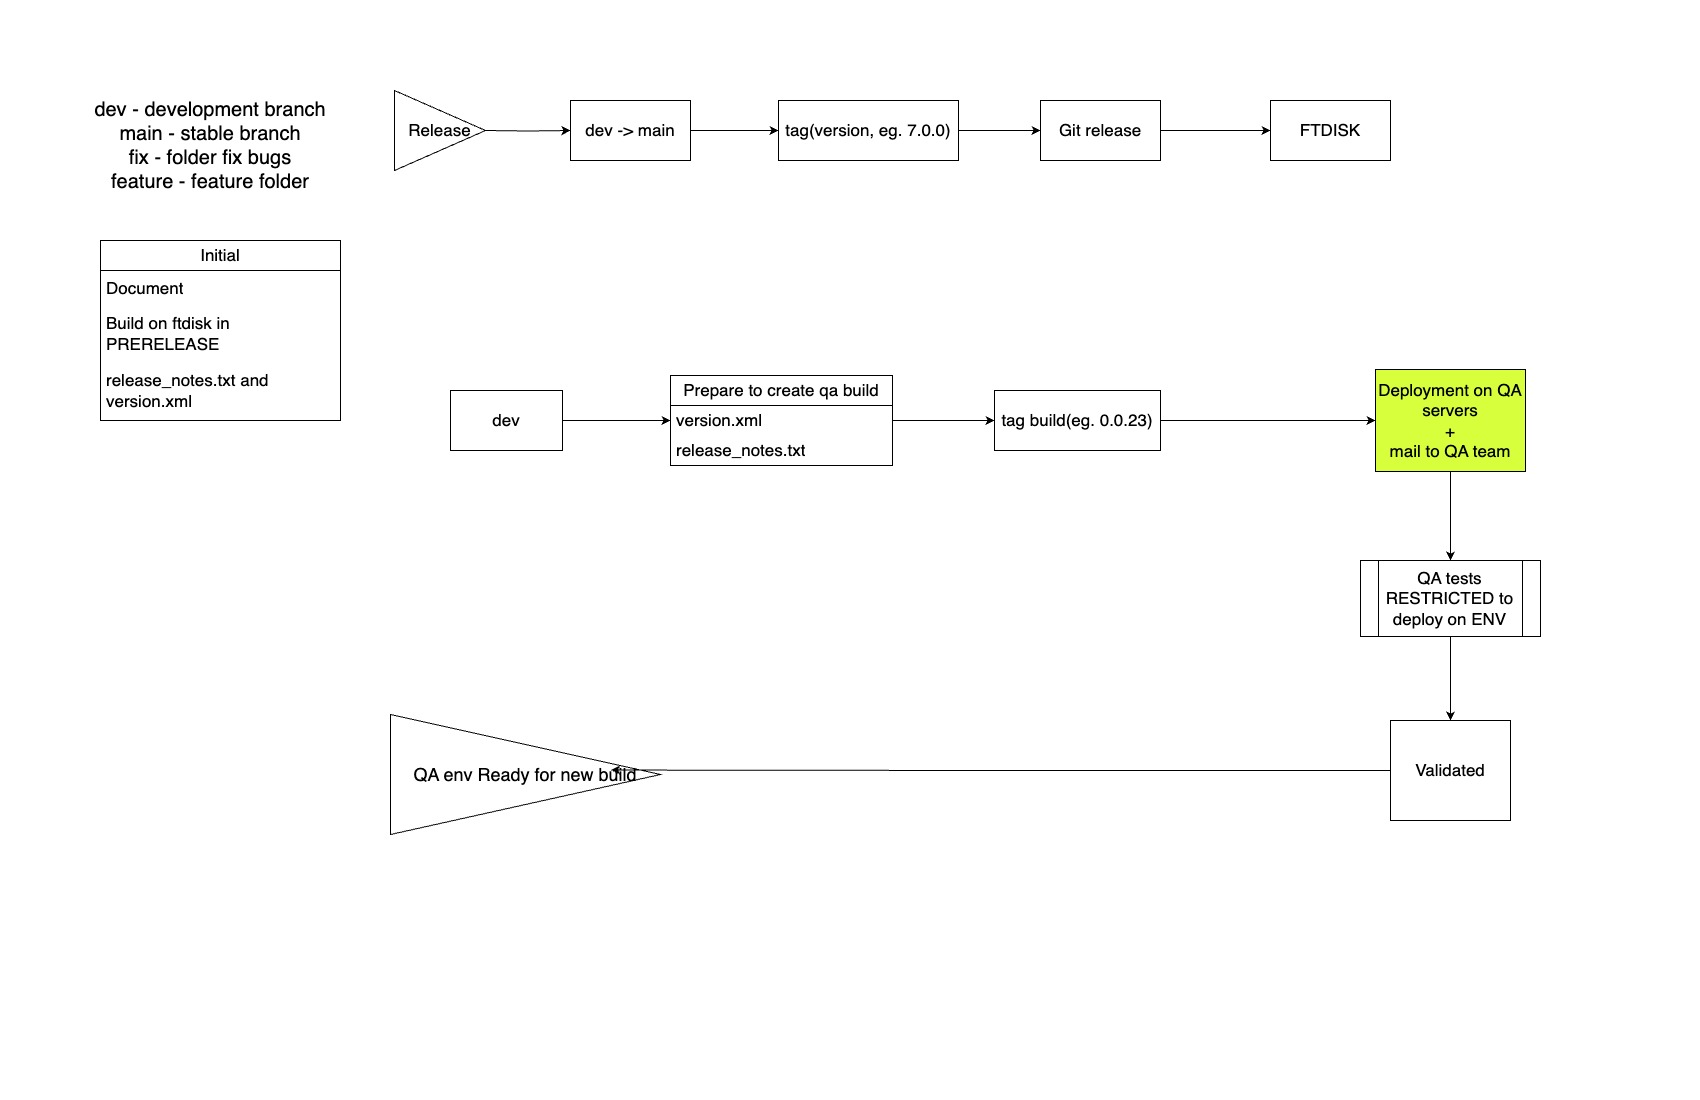
3. Branching Strategy
Our project follows a Git Flow–based branching strategy. Each branch has a specific purpose and rules for contributions.
| Branch | Purpose | When to Use | Who Can Commit |
|---|---|---|---|
|
Main development branch for daily work |
Used to integrate all new features and fixes before QA |
Only via Pull Request from |
|
Stable production-ready branch |
Contains only tested and approved code |
Only via formal release procedure |
|
Development of new features |
Created for each new feature |
Developers |
|
Bug fixes and urgent patches |
Created to address discovered issues |
Developers |
|
Never commit directly to the |
3.1. Typical Workflow
# Create a new feature branch
git checkout dev
git pull origin dev
git checkout -b feature/new-awesome-feature

# Develop and commit changes
# ...

# Push changes and open a Pull Request
git push origin feature/new-awesome-feature
# Then create the Pull Request in the GitHub interface
4. QA Build Creation and Testing Process
4.1. Triggering the Automated Build and Deploy
To create a new QA build, the developer only needs to run the corresponding GitHub Actions workflow:
-
Open the project’s GitHub repository
-
Go to the "Actions" tab
-
Locate the workflow named "Build & Deploy on QA"
-
Click the "Run workflow" button
-
Select the
devbranch and click the green "Run workflow" button
|
Before running the workflow, ensure all changes are committed and pushed with clear commit messages, as these will be used to generate the release notes. |
4.2. Automated Steps in the Workflow
After the workflow is triggered, the system will automatically perform the following actions:
-
Project Build using Gradle, producing a JAR file.
-
Version Generation and Metadata Update:
-
A new build number is generated automatically.
-
The
version.xmlfile is updated with the new version number. -
Structure of
version.xml:<?xml version="1.0" encoding="UTF-8"?> <version id="3.0.0"> <!-- Product major version --> <build id="0.0.6" /> <!-- Build identifier --> </version>
-
-
Updating
release_notes.txt:-
The system prepends the file with the current date, version, and a list of changes.
-
Release notes entries are extracted automatically from commit messages.
-
Entry format in
release_notes.txt:DD.MM.YYYY v. X.Y.Z b. A.B.C <!-- Date, version, and build number --> BUG_NUMBER Description of change <!-- List of changes --> -
Example of an updated release notes file:
12.06.2025 v. 3.0.0 b. 0.0.6
35840 Provision API > SOAP > RemoveServices > Device online > Request with "sn" and "service" > Response with "518" operation code received
-
-
Creating and Pushing a Git Tag with the new build number.
-
Building the Docker Image and deploying it to the QA servers.
-
Notifying the QA Team about the new available build.
4.3. Monitoring Progress and Results
After triggering the workflow, monitor its execution in real time:
-
Go to the "Actions" tab in the GitHub repository.
-
Find the running workflow "Build & Deploy on QA".
-
Click it to view details.
-
Review each step’s status indicators.
|
Pay attention to the "Create release notes" step in the |
Upon completion:
-
You will see green checkmarks for all successful steps.
-
A new commit with updated metadata files appears in the repository.
-
A new tag prefixed with "qa-" and the build number is created.
-
The QA team receives a notification that the new version is ready for testing.
To automate QA build and deployment:
-
Open the project’s GitHub repository.
-
Navigate to the "Actions" tab.
-
Locate the "Build & Deploy on QA" workflow.
-
Click "Run workflow".
-
Select the
devbranch and click the green "Run workflow" button.
This process will:
-
Build the project with Gradle.
-
Generate the JAR file.
-
Create the Docker image.
-
Deploy to QA servers.
-
Notify the QA team.
|
All artifacts are generated automatically; however, uploading to the FT_DISK is not fully automated yet. After the workflow completes, manually copy the artifacts to the FT_DISK directory. |
4.4. QA Testing
After a successful deployment, testing begins:
-
QA Team Executes Tests:
-
Functional testing
-
Integration testing
-
Performance testing (if needed)
-
-
Logging Issues:
-
All findings are logged in the issue tracker.
-
Critical bugs lead to creation of
fix/*branches for fixes.
-
-
Validation of Results:
-
Once all tests pass, the QA environment is marked as Validated.
-
The QA team confirms readiness for the next stage.
-
|
No release can proceed without complete QA testing and resolution of critical defects! |
5. Production Release Process
After successful QA testing, the project is ready for production release. This process involves merging into the main branch and creating the official release.
5.1. Release Preparation
Before starting the release process:
-
Ensure QA testing is fully completed.
-
Obtain confirmation from the QA team.
-
Conduct a final code review.
-
Update release notes with a complete list of changes.
5.2. Merging dev into main
To promote tested code to production:
# Switch to main branch and update
git checkout main
git pull origin main

# Merge dev into main, preserving commit history
git merge --no-ff dev

# Push changes to remote
git push origin main|
Merging into |
5.3. Creating the Release Tag
After merging, create a version tag following semantic versioning:
-
Major: incompatible API changes
-
Minor: new features, backward-compatible
-
Patch: bug fixes, backward-compatible
|
The release tag creation is also automated when running the production workflow on pushes to |
To create a tag manually:
# Create an annotated tag
git tag -a v7.0.0 -m "Release version 7.0.0"

# Push the tag to remote
git push origin v7.0.0
5.4. Generating Release Artifacts
After tagging, the production CI/CD workflow runs:
-
The
build-test-qa-deploy.ymlworkflow is triggered. -
The product is built and tested.
-
Docker images are created.
-
Artifacts are uploaded to FT_DISK.
-
Servers are updated with the new images.
|
Monitor the deployment status in the "Actions" tab on GitHub. |