Simplified View
|
This module is currently unavailable and will be available in future versions. The documentation below is provided for reference only. |
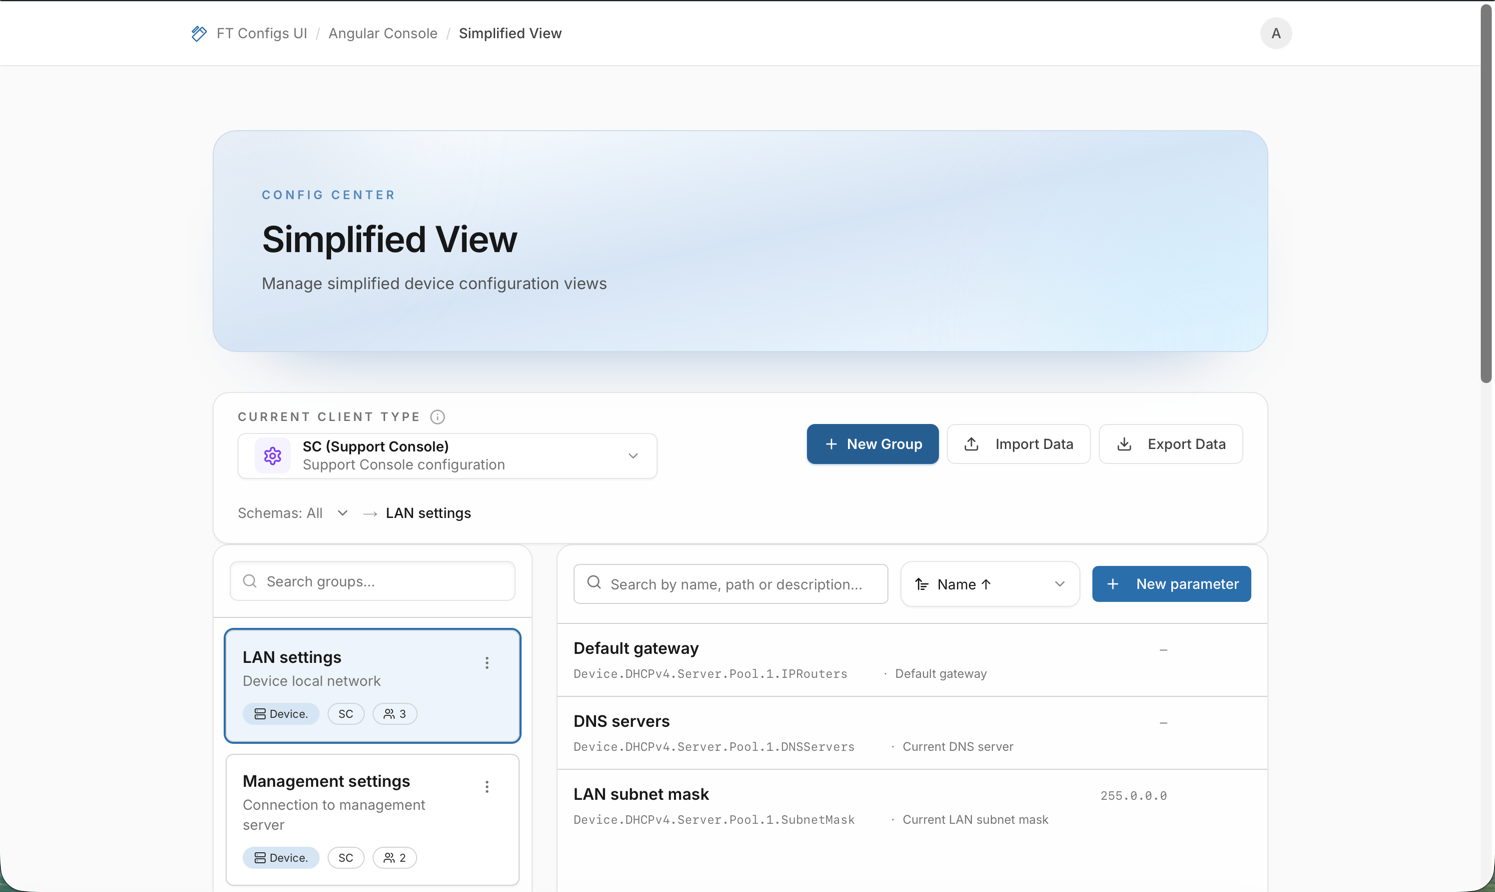
Simplified View helps operators maintain a curated set of configuration fields that are shown in the UI as grouped “views”. It exists to make large configuration models easier to navigate by organizing fields into groups and filtering them by Root paths. Use this module to browse UI-visible fields, manage groups and items (with permissions), and apply bulk changes safely via export and import.
When to use Simplified View
Use Simplified View when you need to:
-
browse which fields are shown to users in the simplified UI,
-
manage groups and their items (permission-based),
-
maintain and use Root paths (schemas) to narrow scope,
-
export a snapshot for backup or change review,
-
import a prepared JSON file to apply bulk updates safely.
Prerequisites
-
A Client Type must be selected (for example: DEF, MC, SC).
-
Your role determines which actions are available.
In Simplified View specifically:
-
VIEWER — browse groups/items and export.
-
EDITOR / ADMIN — can also create, edit, delete, and import.
| If the Client Type is missing, actions may be disabled and data may not load until you select a Client Type. |
Key concepts
- Root paths (schemas)
-
Root paths represent the “top-level prefix” used to group and filter simplified view data (for example,
Device.orInternetGatewayDevice.). In the UI they are shown in the Schemas selector and in group cards as Root Path. - Groups
-
A group is a logical container under a root path. Operators use groups to organize related fields (items) under a clear name.
- Items
-
An item is a single UI-visible entry inside a group. Items typically include a Full Name (the full parameter path) and a Short Name (a UI-friendly label), plus optional description/remark/default value.
| All changes are scoped to the currently selected Client Type. |
Common tasks
Browse groups and items
-
Open Simplified View from the Angular Console dashboard.
-
Confirm the correct Client Type in the toolbar.
-
(Optional) Use the Schemas selector to filter the group list by root path.
-
Use the group search to find a group, then select it.
-
Review the items list for the selected group.
-
Use item search/sort to find a specific entry and open it to view details.
What you should see:
-
a group list showing group name, root path, and item count,
-
an items list that updates when you select a group,
-
an item details panel/drawer with the selected item’s fields.
| If the group list looks “too empty”, clear the Schemas selection (show all) or broaden the search query. |
Manage groups and items (EDITOR / ADMIN)
Use manual edits for targeted changes. For large updates, prefer import with dry-run.
Manage groups
-
Click New Group.
-
Set the group Root Path, Name, and (optional) Remark, then save.
-
To edit a group, open the group actions menu and choose Edit.
-
To delete a group, choose Delete and confirm.
Expected result: the group appears (or updates) in the list for the selected Client Type, and selecting it loads its items.
| Deleting a group also deletes all items in that group. Export a snapshot first if you may need to restore the previous state. |
Manage items
-
Select the target group.
-
Click New parameter to create a new item.
-
Fill in the item fields (including Full Name and Short Name) and save.
-
To edit or delete an item, open it and use the available actions.
Expected result: the item appears in the items list for that group and is available after refresh.
| After significant manual edits, export a snapshot for backup and audit: Export a Snapshot. |
Export a snapshot
-
Confirm the correct Client Type.
-
Click Export Data and save the downloaded JSON file.
| Include module name + Client Type + date in the filename, and store the snapshot with the change ticket. For details, see Export a Snapshot. |
Import with dry-run (EDITOR / ADMIN)
Import is the safest way to apply many changes at once. Always follow the safety flow: export → dry-run → apply.
-
Export a snapshot first: Export a Snapshot.
-
Click Import Data.
-
Choose the import mode (MERGE or REPLACE).
See Merge vs Replace.
-
Select a JSON file.
-
Wait for the dry-run preview to complete.
-
Dry-run runs automatically after you select a file.
-
Changing the file or switching MERGE/REPLACE re-runs the preview.
-
-
Review the preview summary:
-
created / updated / deleted counts,
-
duplicates,
-
sections grouped by root path (use the preview’s path filter to narrow review).
-
-
Click Confirm import only when the preview matches your intent.
| In REPLACE mode, the import can delete groups and items that are not present in the file. Treat large delete counts as a stop signal until you confirm the file is complete and the Client Type is correct. |
| Duplicates in the dry-run preview mean some entries are not unique for this Client Type. Review the duplicates section, remove or correct conflicting entries in the file, and re-run the preview (in MERGE mode, duplicates may be ignored as indicated by the Import Mode help text). |
Import safety checklist
-
Confirm you are in the correct environment.
-
Confirm your selected context (for example, client type) matches the file.
-
Export a snapshot before changes.
-
Run Dry-run and review:
-
errors (must be resolved),
-
warnings (understand impact),
-
create/update/delete counts.
-
-
If using REPLACE, confirm you accept deletions shown in the dry-run plan.
-
Apply import and immediately verify by refreshing and re-opening the affected entries.
After-change verification checklist
After any edit or import:
-
Confirm you are still on the intended Client Type.
-
Re-open the affected groups and verify items are present and correctly named.
-
Spot-check a few groups across different root paths (schemas), especially if you imported in REPLACE mode.
-
Refresh the page and confirm the state is stable.
-
(Recommended) Export a new snapshot for audit or rollback readiness.
Troubleshooting
- No data shown
-
Confirm the Client Type is selected, then clear or broaden the Schemas filter and group/item searches.
- I can’t create/edit/delete or import
-
You are likely signed in as VIEWER. Editing and import are available only for EDITOR or ADMIN.
- Dry-run shows many deletions
-
You may be using REPLACE, or the file is incomplete for the selected Client Type. Switch to MERGE or rebuild the file from an export snapshot and retry.
- Duplicates in dry-run
-
Review duplicate sections and remove conflicting entries from the file, then re-run the preview.
- Import fails
-
The file may not match the expected JSON structure. Start from a fresh export snapshot, apply your changes to that file, and import again.