App Ports
|
This module is not available in the current version. It will be available in a future version. Use this page for reference only. |
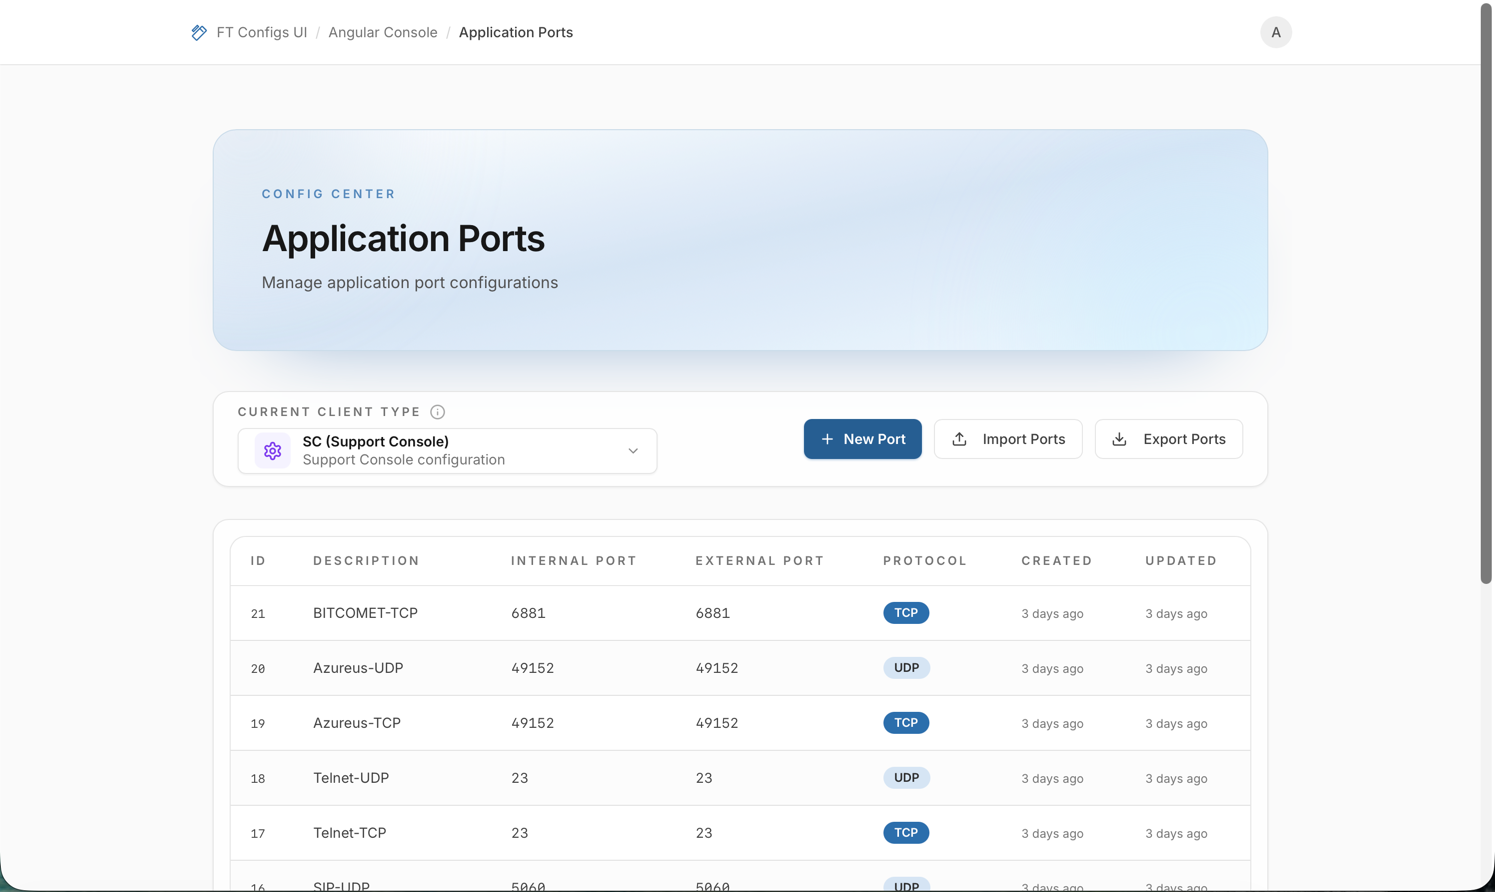
App Ports (Application Ports) is where operators manage port mapping rules for applications and services in the Angular Console. Each entry maps an internal port to an external port for a selected Client type and protocol. Wrong port rules can cause connectivity problems. Use small steps you can undo. Always use export and dry-run before bulk changes.
Where to find parameter descriptions: The form shows field labels only. The Description column shows your own text for each port mapping. This text is not a field explanation.
When to use it
Use App Ports to do the following:
-
Review the port rules of a client type.
-
Open a rule to check the internal and external ports and the protocol.
-
Export a snapshot as a backup before changes.
-
Import many changes from a prepared file. Dry-run is required.
-
Create, change, or delete a rule, if you have permission.
-
Check the result after an import or a change.
Before you start
-
Open Angular Console → App Ports.
-
Select a Client type: DEF, MC, or SC.
-
Check the environment and the client type. A wrong client type changes the wrong scope.
-
Check your role.
App Ports works on the selected client type.
Roles for this module:
-
VIEWER: browse only.
-
EDITOR or ADMIN: create, edit, delete, and import.
If you do not see New, Import, or Edit, your role does not allow it.
Fields
A port rule has these fields:
- Description
-
A short label. Required. Maximum 255 characters.
- Internal Port
-
The internal port number, an integer from 1 to 65535. The UI placeholder is
8080. - External Port
-
The external port number, an integer from 1 to 65535. The UI placeholder is
80. - Protocol
-
The transfer protocol of the rule:
TCPorUDP. - Client Type
-
The scope of the rule: DEF, MC, or SC. You cannot change the client type of an existing rule.
- ID and history
-
Read-only. The rule ID and audit data, such as created and updated times and the author, if available.
In the details view, the UI can mark ports in the range 49152–65535 as an Ephemeral port.
|
Find a rule
-
Open App Ports.
-
Select the Client type.
-
Browse the list of port rules.
-
Click a row to open Port Details.
Expected result:
-
You see a table with pages. The newest rules are first.
-
The columns include ID, Description, Internal Port, External Port, and Protocol.
-
Port Details shows the mapping
internal → external (protocol)and the history. -
VIEWER accounts see a read-only view. Write actions are hidden or disabled.
| Use the pagination controls to change the page and the page size. |
Add a rule
Required role: EDITOR or ADMIN.
-
Click New Port.
-
Select the Client type.
-
Enter Description, Internal Port, External Port, and Protocol.
-
Click Create.
-
Return to the list and open the new rule.
Expected result: the rule shows the saved values.
The create form uses these defaults: Internal Port 8080, External Port 80, Protocol TCP.
Always replace the defaults with the values of your rule.
|
Change a rule
Required role: EDITOR or ADMIN.
-
Open a rule from the list to see Port Details, or open the Edit Port page.
-
Click Edit.
-
Change the fields.
-
Click Save.
-
Open the rule again.
Expected result: the rule shows the new values.
App Ports checks basic limits.
The description is required.
Ports must be integers from 1 to 65535.
The protocol must be TCP or UDP.
Fix field errors before you save.
|
Export a snapshot
-
Open App Ports.
-
Select the Client type.
-
Click Export Ports.
-
Save the downloaded JSON file.
The export has all port rules of the selected client type, not only the current page.
For details, see Export a Snapshot.
Import with dry-run
Import is the safest way to apply many changes at once. Always follow this order: export, dry-run, apply.
-
Export a snapshot first: Export a Snapshot.
-
Select the Client type.
-
Click Import Ports.
-
Select an Import Mode.
-
Merge: adds and updates rules. The rest of the set stays the same.
-
Replace: replaces all rules of the selected client type.
-
-
Select a
.jsonfile. The maximum size is 10 MB. -
Wait for the dry-run. It starts after you select the file. It runs again if you change the import mode.
-
Read the dry-run preview.
-
Summary counts: to add, to update, to delete, to skip.
-
Duplicates, if reported.
-
Details for each rule, grouped by status, if the backend sends them.
-
Errors and warnings.
-
-
Click Confirm import only if the preview matches your intent.
Import safety checklist
-
Check the environment name.
-
Check the selected client type. It must match the file.
-
Export a snapshot before you change data.
-
Run Dry-run and review:
-
the errors: you must fix them,
-
the warnings: you must understand them,
-
the create, update, and delete counts.
-
-
If you use REPLACE, review the deletions in the dry-run plan. Continue only if you accept them.
-
Apply the import.
-
Refresh the page and open the changed entries to check them.
| Replace can delete rules missing from the imported file. If the preview shows unexpected deletions, stop. Check if the file is complete and the client type is correct. |
Use an export as the base of your import file.
The import schema uses description, internalPort, externalPort, and protocol.
The importer ignores other exported fields, such as IDs.
|
Check the result
-
Check if you are in the correct environment.
-
Check the Client type: DEF, MC, or SC.
-
Open the App Ports list and check the number of rules and the entries.
-
Open the changed rules and check these values:
-
Internal Port and External Port.
-
Protocol: TCP or UDP.
-
The mapping preview
internal → external.
-
-
After a Replace import, check a few rules you expect to stay. Missing rules show an unwanted removal.
-
Optional: export a new snapshot for audit. See Export a Snapshot.
Troubleshooting
- The page shows no ports for a client type
-
Check if you selected the correct client type. If the list is still empty, this scope can have no rules.
- You do not see New, Import, or Edit
-
You are probably signed in as VIEWER. Ask an administrator for EDITOR or ADMIN access.
- Export does not work in read-only mode
-
Some deployments limit export for VIEWER accounts. If Export Ports does nothing, ask for a higher role.
- Save is disabled
-
The form has field errors. App Ports requires Description, integer ports from
1to65535, and a valid protocol:TCPorUDP. - Dry-run says the file is not valid
-
App Ports imports
.jsonfiles only. The maximum size is 10 MB. Use an export as the base, change it, and upload it again. - Dry-run shows errors or duplicates
-
Fix the reported problems in the file. For example, remove duplicate entries or correct wrong values. Then select the file again to run the dry-run again.
- Dry-run shows many deletions
-
You probably selected Replace, or the file is not complete for the selected client type. Create the file again from an export and try again.
- The list does not look updated after a successful import
-
Close the import dialog and open the App Ports page again. You can also select another client type and then select the first one again. Check if you imported into the correct client type.